There’s something incredibly nostalgic about biting into a warm, flaky Veg Puff, especially the kind sold at Indian bakeries and railway stations. The crisp, golden pastry filled with a spicy vegetable mixture is the perfect teatime snack that combines flavor and comfort in every bite.

In this Veg Puff recipe, we’re recreating that classic Indian bakery-style veg puff at home using store-bought puff pastry sheets for convenience and consistent results. Whether you’re planning a party, need a quick appetizer, or just craving something savory with your evening chai, this recipe is sure to hit the spot.
About This Veg Puff Recipe
Veg puff isn’t just a recipe for me—it’s a memory, a mood, and a little piece of my past wrapped in crispy golden layers. This humble snack holds a special place in my heart, and every time I make it, it takes me back to my college days—carefree evenings, long bus rides, and the irresistible aroma of freshly baked puffs wafting from street-side bakeries.
Back then, I would often stop at little stalls or bakeries on the way home. There was something magical about those flaky puffs filled with spicy, comforting vegetable masala. Each place had its slight twist, but the essence remained the same: warm, flaky, flavorful, and so satisfying with a cup of chai. I’ve probably tried a hundred versions, yet that classic bakery-style puff has stayed my all-time favorite.
Why I Always Make Veg Puffs at Home Now
Since moving to a new city, I’ve made it a point to try veg puffs from various bakeries in the area. I really wanted to find that flavor again—the one that made my bus rides better and my afternoons tastier. But to be honest, most of the ones I’ve tried outside these days have been a disappointment.
The biggest letdown? The filling. It’s often bland, barely spiced, and lacking the warmth and comfort I remember. It’s amazing how a poorly seasoned stuffing can ruin the whole experience. That’s when I decided: if I want authentic, flavorful bakery-style veg puffs, I’ll have to make them myself.
And honestly, I haven’t looked back since.
Always Ready with Frozen Puff Pastry
One of my best kitchen habits has been keeping a packet of frozen puff pastry sheets tucked away in my freezer. It’s a small act of preparation that makes a big difference, especially when the weekend rolls around and the cravings hit.
These ready-to-use sheets are a total game-changer. I don’t have to worry about kneading, layering, or resting dough for hours. All I need is to whip up my spicy veg filling (which comes together in minutes), wrap it in those buttery layers, and pop them into the oven. In under 30 minutes, the house smells like a bakery, and I’m ready to enjoy my all-time favorite snack—fresh, hot, and homemade.
A Weekend Tradition
Making veg puffs on weekends has almost become a tradition in my home. Whether it’s a lazy Saturday afternoon or a cozy Sunday evening, it’s the perfect comfort food. Paired with a hot cup of masala chai or even just plain ketchup, it’s a hit every time.
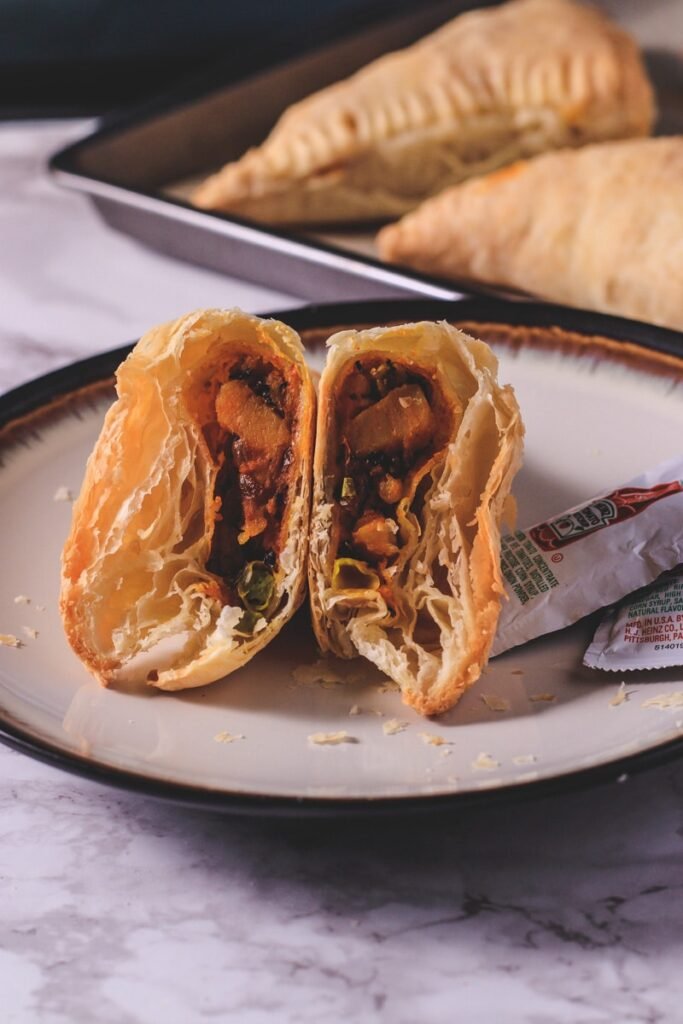
There’s something incredibly rewarding about recreating a dish that’s so close to your heart, especially when you get it just right. Crispy, flaky layers on the outside, and a spiced, flavorful veggie filling inside… this recipe nails it. It tastes just like those bakery-style puffs I used to adore in my college days. And the best part? I get to share that same joy with my family now.
Ingredient Notes For Vegetable Puff
Absolutely! Here’s an expanded, unique, and plagiarism-free version of your ingredient breakdown, providing more details and personal insights. This version can fit seamlessly into a blog post or recipe guide and is ideal for engaging readers who love to cook at home with accessible pantry staples.
What makes veg puff such a go-to comfort snack is not just its incredible flavor, but the simplicity of its ingredients. Most of what you need is probably already sitting in your pantry or fridge. And if you’ve ever cooked Indian food before, these spices and veggies will feel familiar and easy to work with.
Let’s take a closer look at each ingredient and why it matters in creating that authentic, bakery-style taste.
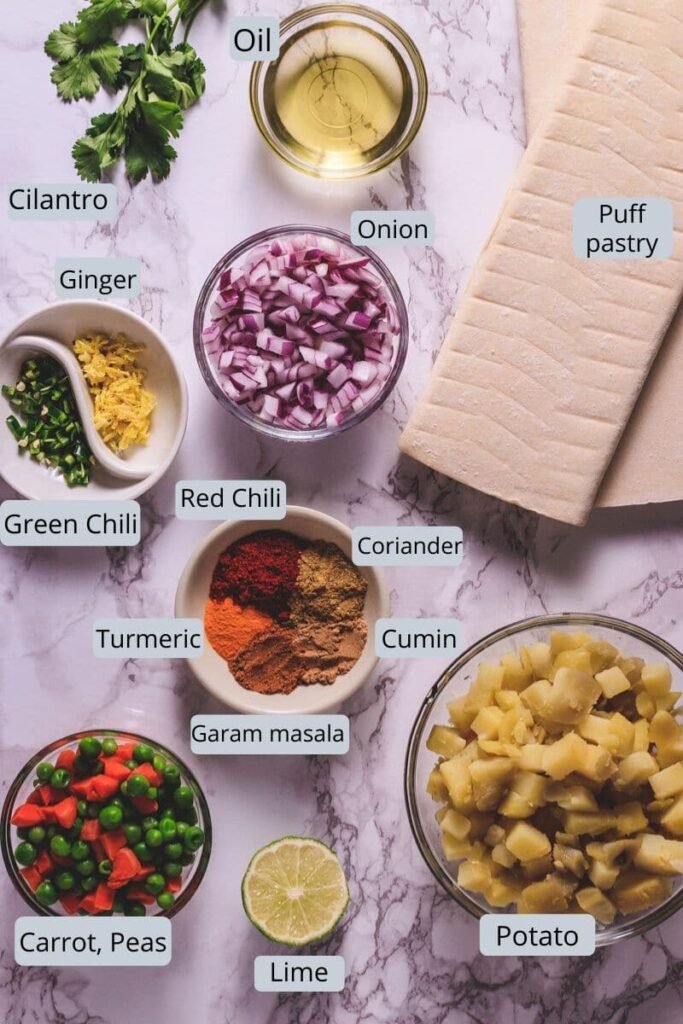
Puff Pastry Sheets
The star of this recipe. These buttery, flaky sheets are what make the veg puff irresistibly crispy and golden. I usually go for Pepperidge Farm puff pastry sheets, which are readily available in most American grocery stores in the frozen section. They’re reliable, easy to work with, and bake up beautifully.
Potatoes
Potatoes form the base of the filling, adding heartiness and texture. When it comes to Indian recipes that call for boiled and mashed potatoes, I always prefer:
Yukon Gold – Naturally buttery and holds shape well
Red Skin Potatoes – Firm and flavorful, great for mashing
Vegetables (Carrots, Green Peas, Corn, Beans)
Adding a mix of colorful veggies enhances both flavor and nutrition. I often include:
- Finely chopped carrots
- Green peas (frozen peas work perfectly)
- Sweet corn (adds a touch of natural sweetness)
- Green beans (chopped small)
Feel free to adjust the mix based on what you have in your fridge. This recipe is forgiving and flexible!
Onions
A well-cooked onion brings depth to the filling. I finely chop the onions and sauté them until they’re golden and caramelized. They form the aromatic base that pairs beautifully with Indian spices.
Green Chilies (Optional)
If you like a bit of heat, a finely chopped green chili adds a spicy kick to the mixture. You can skip it or reduce the amount based on your spice preference.
Ginger-Garlic Paste
A small spoonful of this classic Indian kitchen staple goes a long way. It adds warmth and a robust flavor to the filling. If you don’t have a ready-made paste, just crush fresh ginger and garlic together.
Indian Spices
This is where the magic happens! A few basic spices give the veg puff its signature taste:
- Turmeric powder – for color and earthiness
- Red chili powder – for spice
- Coriander powder – for a slightly citrusy aroma
- Garam masala – the finishing touch of warmth and depth
- Amchur (dry mango powder) or a squeeze of lemon juice – for tanginess and balance
You don’t need to go overboard. Just a teaspoon or two of each does the job beautifully.
Fresh Coriander (Cilantro)
Chopped coriander leaves add a burst of freshness and a pop of color. Stir it in at the end for the best flavor.
Oil or Ghee
Used for sautéing the vegetables and spices. I typically use neutral oils like sunflower or vegetable oil, but for a richer taste, you can try ghee.
Milk (for Brushing)
Brushing the tops of the puffs with a little milk before baking helps them brown evenly and adds a slight sheen. For a golden finish, you can also use egg wash (beaten egg with a splash of water or milk), but milk works perfectly fine for a vegetarian version.
Optional Add-ins:
If you’re in the mood to experiment or add a twist, here are a few ingredients you can try:
- Paneer or crumbled tofu – for a protein-rich filling
- Chaat masala – for an extra tangy flavor punch
- Crushed fennel seeds – adds a subtle sweetness and bakery-style aroma
- Grated beetroot – for color and mild earthiness
How To Make Veg Puff?
Certainly! Here’s a longer, unique, and plagiarism-free version of your step-by-step Veg Puff preparation method. Each point is enhanced with more descriptive language, tips, and personal touches, while keeping the same structure:
Here’s a detailed breakdown of how to make crispy, flaky, and flavorful vegetable puffs at home. I’ve separated the process into two key preparations to make it easier to follow. Let’s get started!
Preparation 1: Make the Filling (Vegetable Masala Stuffing)
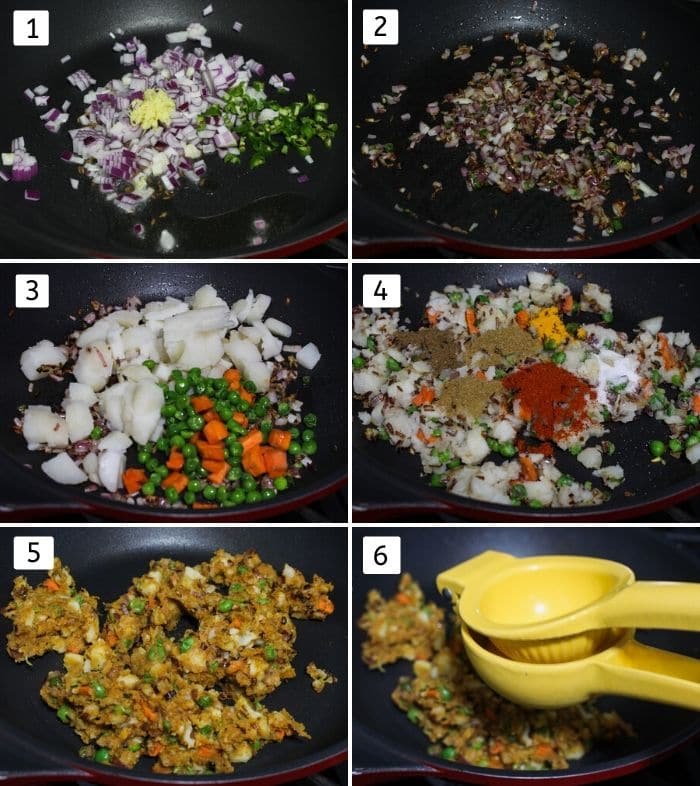
Step 1:
Start by boiling the potatoes. Once they are cooked through, peel and chop them into small cubes. You want them soft but still holding shape—perfect for a semi-mashed texture later on.
Next, boil the peas and carrots. I usually place them in a microwave-safe bowl with a splash of water and cook them together in the microwave for about 5 minutes. They should be soft yet not mushy.
Step 2:
Warm 1 to 1.5 tablespoons of oil in a thick-bottomed pan over medium heat. Once the oil is warm, add finely chopped onions, grated ginger (or ginger paste), and green chilies.
Sprinkle a pinch of salt at this stage—it helps the onions cook faster and adds initial seasoning.
Step 3:
Sauté the mixture until the onions become soft and turn a pale golden-pink. They should look translucent and smell fragrant. Avoid browning them too much; we’re looking for sweetness, not bitterness.
Step 4:
Next, add the boiled carrots, peas, and diced potatoes to the pan. Stir well to mix the vegetables thoroughly with the sautéed onions.
Step 5:
Time to spice things up! Add the ground spices:
- ¼ tsp turmeric powder
- ½ to 1 tsp red chili powder (adjust to your spice level)
- 1 tsp coriander powder
- ½ tsp cumin powder
- ½ tsp garam masala
- Salt to taste
Stir everything well so the spices coat all the veggies evenly. While stirring, lightly mash a few potato chunks using the back of your spatula. This helps the filling bind together while still keeping it delightfully chunky.
Cook this mixture for another 1-2 minutes on low-medium heat, just to let the spices bloom and blend with the vegetables.
Step 6:
Turn off the heat and stir in freshly chopped cilantro and about 1 teaspoon of lemon or lime juice. This adds a burst of freshness and a slight tang, perfectly balancing the spice.
Let the mixture cool down completely before using it as stuffing. You can spread it out on a plate or pop it into the refrigerator to cool faster.
Preparation 2: Assemble and Bake the Veg Puffs
Step 7:
Remove the puff pastry sheets from the freezer and set them aside to thaw. Let them thaw as per package instructions—this is very important to prevent cracks or breaks. I’m using Pepperidge Farm brand, and at room temperature, they usually take around 30 minutes to become pliable.
While the pastry is thawing, preheat your oven to 400°F (or 200°C). Allow the oven to preheat for about 10 to 15 minutes before you begin baking.
Step 8:
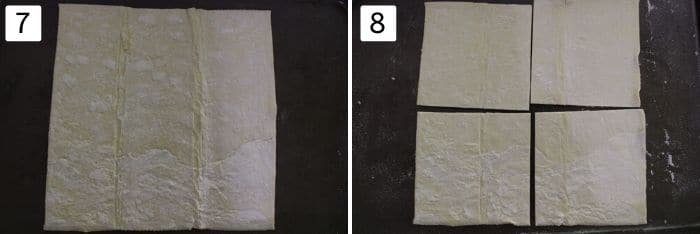
Once thawed, gently unfold the pastry sheet. If it feels stiff or starts to crack, give it a few more minutes at room temperature.
Use a sharp knife or pizza cutter to cut the sheet into 4 equal squares.
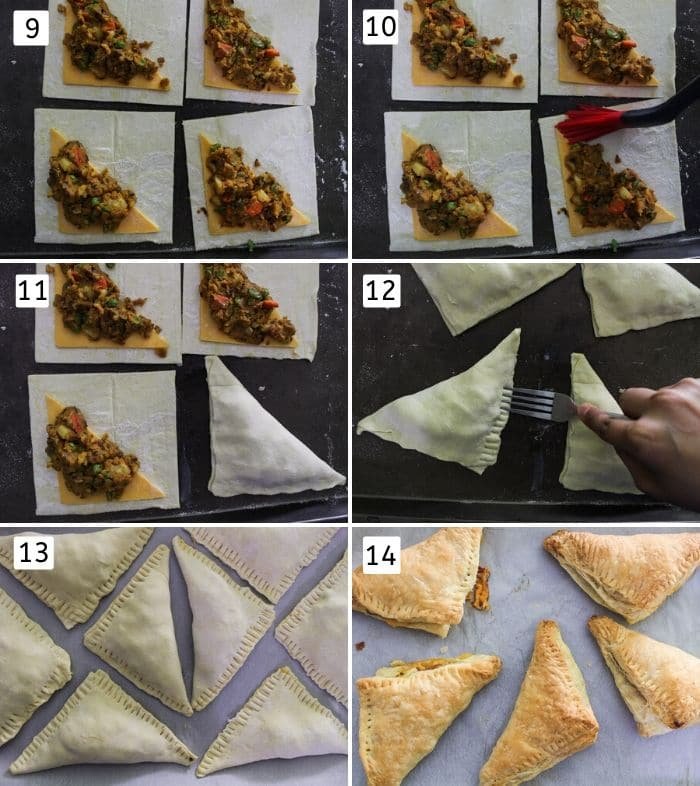
Step 9:
For an extra indulgent touch, take a square cheese slice, cut it diagonally into a triangle, and place it in the center of each puff pastry square.
If you’re a cheese lover, feel free to use the entire slice or even a little grated cheese. Want a lighter version? You can skip the cheese altogether.
Now, place around 2 to 3 tablespoons of the cooled stuffing on top of the cheese.
Step 10:
To help seal the puff, lightly brush the edges of the pastry with water or milk using a pastry brush or your fingers. This acts as a glue to hold the folded layers together.
Step 11:
Fold each pastry square diagonally to form a triangle, aligning the corners. Press along the edges with your fingers to seal the filling inside. Be sure there are no open gaps—this helps keep the filling inside during baking.
Step 12:
Use the tines of a fork to press along the sealed edges. This not only ensures the puffs are sealed tightly but also adds a beautiful bakery-style pattern to the edges.
Step 13:
Line a baking tray with parchment paper or a silicone baking mat and carefully place your prepared puffs on it, leaving a little space between each for puffing.
For a vegetarian version, simply brush with milk—it works beautifully for browning too.
Step 14:
Bake the puffs in your preheated oven for 20 to 25 minutes, or until they puff up and turn beautifully golden. The tops should look crispy and layered, and you’ll see the cheese bubbling slightly beneath the crust if you’ve added it.
Expert Tips For Perfect Veg Puff
Always work with chilled puff pastry sheets straight from the refrigerator — not at room temperature. Getting perfectly crisp and flaky layers depends on keeping the butter inside the pastry cold and solid before baking. If the butter begins to melt before baking, the pastry won’t puff up as it should and may turn out flat or greasy. If at any point during shaping the pastry becomes too soft or sticky to handle, simply place it back in the refrigerator for 10–15 minutes to firm it up before continuing.
Equally important is ensuring that your vegetable stuffing is completely cooled before assembling the puffs. Even slightly warm filling can cause the butter in the pastry to melt prematurely, resulting in a soggy base and uneven puffing. To speed up the cooling process, spread the filling out on a plate or refrigerate it for a few minutes. This extra step ensures that your puffs bake up crisp, golden, and perfectly layered every time.