
Dabeli, also known as Kutchi Dabeli, is a cherished road food that began in the Kutch region of Gujarat, India. This scrumptious and racy snack has grown in fashionability over the times and is now delighted across the entire country.
The name” Dabeli” literally means” pressed,” which refers to the system of assembling and hottingthe dish. Traditionally, Dabeli consists of a soft pav( chuckroll) stuffed with a racy, pungent, and slightly sweet potato filling that is been mixed with special Dabeli masala. This stuffing is also outgunned with a variety of textures and flavors — brickle roasted peanuts, fresh pomegranate seeds, finely diced onions, racy chutneys, and occasionally sev( bricklebricklegram flour polls). The pav is also smoothly heated on a visage with adulation or oil painting until it becomes golden and crisp on the outside while remaining soft within.
The magic of Dabeli lies in its bold and balanced flavor profile, where sweet, racy, pungent, and savory come together in every bite. It’s a snack that not only satisfies hunger but also delivers a memorable burst of flavor, which is why it has come a chief at road food booths, food carnivals, and indeed in home kitchens. moment, Dabeli has transcended indigenous boundaries. From the busy lanes of Mumbai and Delhi to the cafés of Bangalore and indeed overseas in Indian caffs
, Dabeli has set up suckers far and wide. Despite its simplicity, it showcases the creativity and uproariousness of Indian road food culture. Whether you are pining commodity racy, planning a chaat night at home, or simply want to try commodity new, Dabeli is an excellent choice. Let’s dive into how you can recreate this iconic Kutchi snack right in your own kitchen, using fluently available constituents and a step- by- step approach.
Imagine a flavorful creation that brings together a fiery mashed potato mixture infused with bold spices, generously slathered between soft sandwich buns. This fusion is elevated with layers of vibrant chutneys—each offering its own punch of tang, heat, and sweetness. Rather than using traditional laadi pav, I opted for ground sirloin sandwich buns, which were more readily available—though any bread of your choice will work just as well.
The final touch is where the magic happens: a generous sprinkle of fine nylon sev adds a delicate crunch, while freshly chopped onions provide a burst of sharpness. Roasted, zesty peanuts offer an earthy bite, and juicy pomegranate pearls bring in a sweet-tart contrast, turning this humble street-style treat into a visual and flavorful delight.
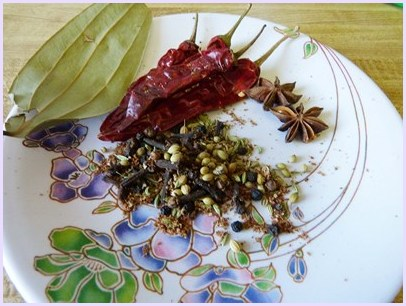
How to make Dabeli Masala?
- Gather all the whole spices required for making the Dabeli masala and transfer them into a grinder jar—preferably a spice grinder or a coffee grinder that you use exclusively for dry spices. This step is crucial as the authentic flavor of Dabeli comes from its freshly ground masala.
Notes:–
- If your spices feel a bit damp or have been stored for a while, consider dry roasting them lightly over low heat for a couple of minutes. This helps eliminate any residual moisture and enhances the aroma of the spices, resulting in a more potent and flavorful masala blend.
- Before adding dried red chilies to the grinder, it’s highly advisable to remove their stems and seeds. The seeds, in particular, can generate excessive internal heat when consumed, which may not be ideal for everyone—especially for those sensitive to spicy foods or with digestive concerns. Removing them makes the masala more balanced and gentler on the system.
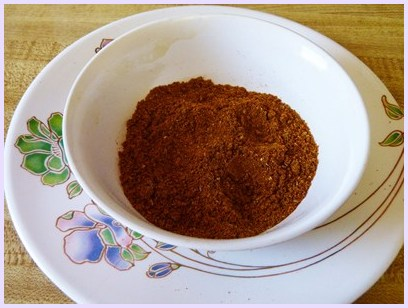
2. Grind to a Fine Powder: Once all the spices are prepped, grind them thoroughly until you achieve a fine, smooth powder. Ensure there are no coarse bits left, as this spice blend should have a uniform texture for even mixing into the Dabeli filling. Transfer the freshly ground masala to an airtight container or small bowl, and set it aside. You’ll use this aromatic spice mix later when preparing the spicy potato filling that forms the heart of the Dabeli.
Make 2 Chutneys
I generally prepare these two chutneys either a day in advance or earlier on the same day, depending on my schedule. Storing them in the refrigerator not only preserves their newness but also significantly streamlines the cuisine process latterly on.
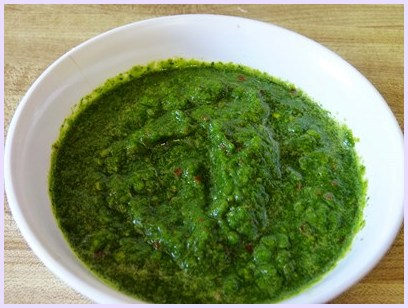
- Green Cilantro- Garlic Chutney To begin with the vibrant and salty green chutney, start by adding roughly ¼ mug of water to a blender. This helps achieve a smooth thickness. Next, add a generous bunch of fresh cilantro leaves, a many cloves of garlic, a small piece of hulled gusto, and green chilies according to your spice preference. Season the admixture with a pinch of swab and a bit of black swab for an redundant depth of flavor. Squeeze in some fresh bomb juice to buck up the chutney and enhance its tanginess. Blend everything together until you get a smooth, vibrant green paste
2. Tamarind-Date Chutney For the sweet and pungent tamarind-date chutney, gather your constituents and prepare them ahead of time for convenience. Begin by soaking seedless tamarind and leveled dates in warm water for about 15 – 20 minutes to soften them. Once they’re soft, transfer them to a blender and mix into a thick, smooth purée. Pour the admixture into a visage and cook it on low to medium heat.
Add jaggery or brown sugar, along with a pinch of swab, roasted cumin greasepaint, and a little red chili greasepaint for flavor. Stir constantly and let the chutney poach until it thickens slightly and the flavors immingle together beautifully. Allow it to cool fully before storing it in a clean vessel in the fridge. This chutney stays fresh for several days and makes an excellent incident to snacks and chaat dishes.
Making Masala Peanuts
Step 1 Riding the Peanuts Begin by placing a small skillet or frying pan on the cookstove over medium heat. Once the visage is gently hotted
, add the raw peanuts directly into the visage without any oil painting or water. This is called dry riding. Stir the peanuts continuously using a rustic ladle or spatula to insure indeed riding and to help them from burning. Keep shifting until the peanuts take on a light golden- brown tinge and start to release a rich, nutty aroma. This process may take several twinkles depending on the heat and volume. Once the peanuts are nicely roasted, remove them from the visage and spread them out unevenly on a plate. Allow them to cool fully before moving on to the coming step.
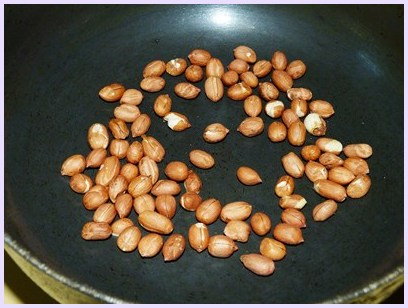
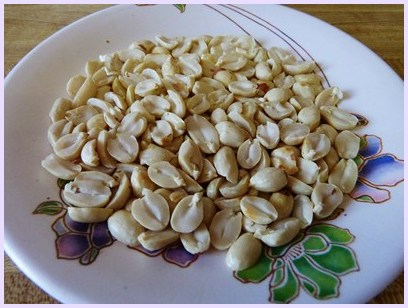
Step 2: Peeling and Splitting the Peanuts. After the roasted peanuts have cooled to room temperature, take a sprinkle at a time and rub them between your thumbs. This helps to loosen and remove the thin, papery skin that surrounds each peanut. Continue rubbing and gently blowing down or shaking off the skins. Once utmost of the skin has been removed, break each peanut into two halves by pressing them gently between your fingers. This step helps in enhancing the texture and allows the spices to fleece the peanuts more unevenly latterly on.
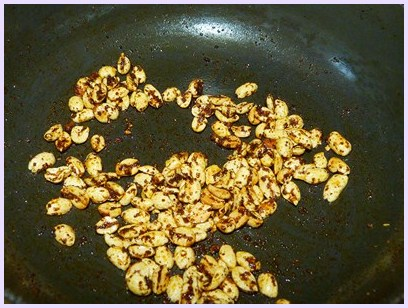
Step 3 Spicing the Peanuts Clean the skillet and place it back on the cookstove over medium heat. Add a small quantum of cooking oil painting — just enough to cover the base of the visage. Once the oil painting is sufficiently hot( but not smoking), precisely add the split roasted peanuts back into the visage. Now it’s time to season them. Sprinkle in a pinch of black swab and regular swab to taste.
Add red chili greasepaint for heat, amchur greasepaint( dry mango greasepaint) for tanginess, and a generous gusto of chaat masala to give the admixture a racy, savory kick. Stir everything together completely so that the peanuts are unevenly carpeted with the oil painting and spices. Continue to cook for another 2 to 3 twinkles, stirring sometimes to help burning and insure invariant seasoning.
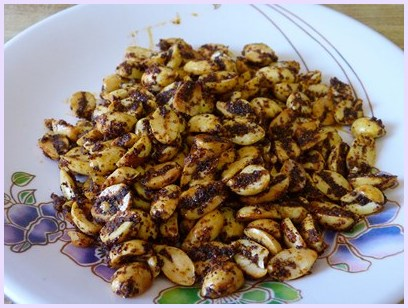
Step 4: Cooling and Storing Once the peanuts are well- carpeted and sweet, remove them from the heat and transfer them to a clean plate or charger. Spread them out unevenly and allow them to cool. As they cool, the peanuts will come crisp and brittle. formerly fully cooled, store them in a watertight vessel for after use. These spiced peanuts make for a succulent, bricklesnack that dyads wonderfully with tea, drinks, or as a beating on chaat and salads.
How to make Potato Masala for Dabeli?
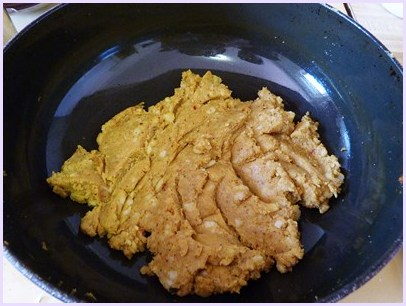
- Boil the potatoes in moment pot. Or utilize stove-top weight cooker (2 whistles).
- Once potatoes are cool to touch, peel and dispose of the skin. Squash it utilizing potato masher.
- Heat the oil in a container on medium warm. Once hot include bubbled and squashed potatoes, custom made dabeli masala powder, salt, tamarind date chutney. Blend well and cook it till potato blend get a few warm and masala get cooked (approximately 3-4 minutes). Separate potato blend into 12 rise to parcels. Keep it aside.
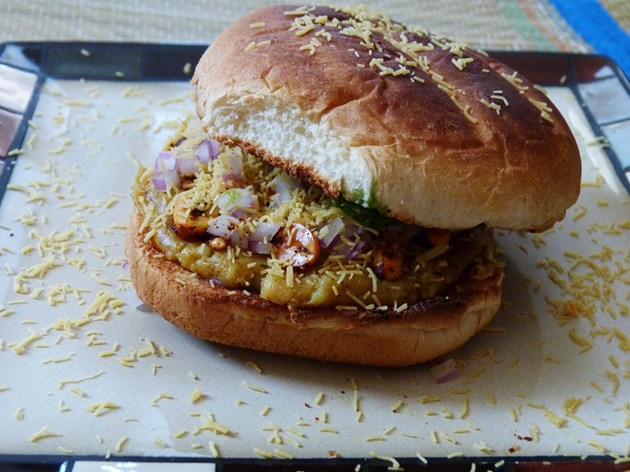
How to make Dabeli?
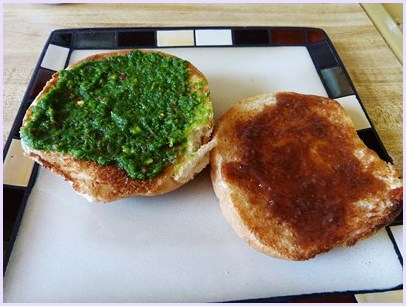
1. Toast the bun softly with oil or butter in a skillet. At that point on inward side of one cut spread coriander garlic chutney and on other cut spread tamarind date chutney.
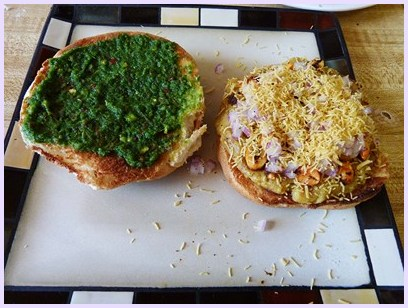
2. On the base cut spread a few potato blend. Beat with masala peanuts, chopped onions, pomegranate seeds and lean sev.
3) Near it with beat cut and serve.
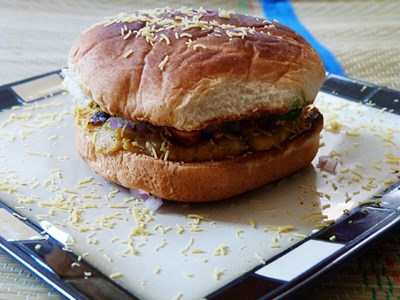
Repeat the gathering rest of the dabeli.
