
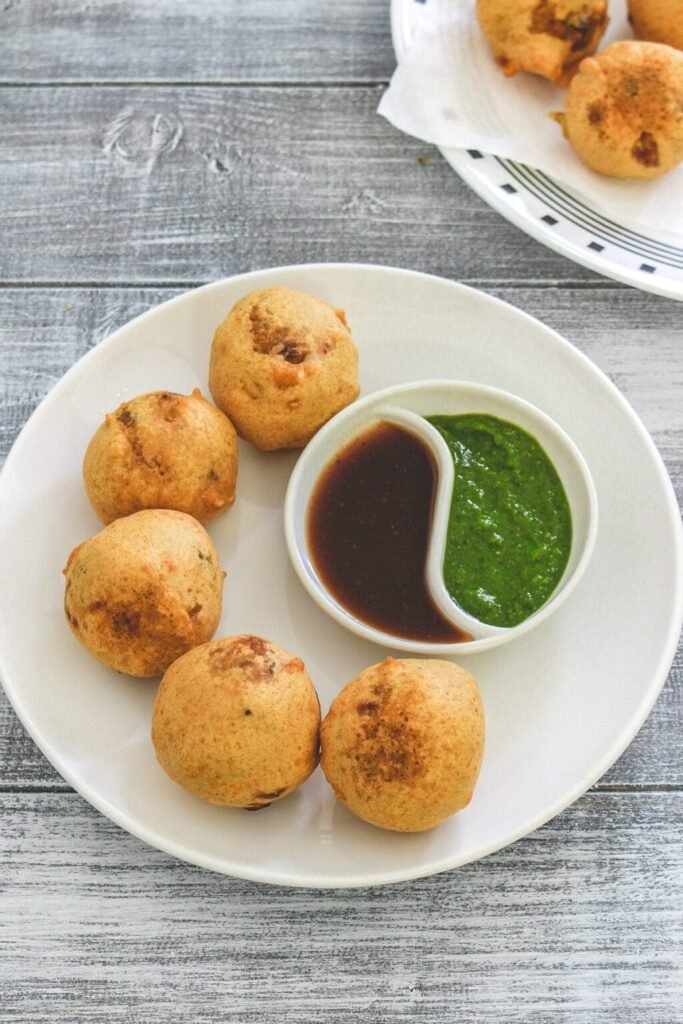
Batata vada is one of the most beloved street foods originating from Maharashtra, known for its crispy exterior and soft, flavorful potato filling. This savory snack holds a special place in the hearts of locals and visitors alike, often enjoyed as a quick bite on bustling city streets or as a comforting treat at home.
Traditionally, chefs coat spiced mashed potatoes in chickpea flour batter and deep-fry them to create a crispy, flavorful batata vada snack.
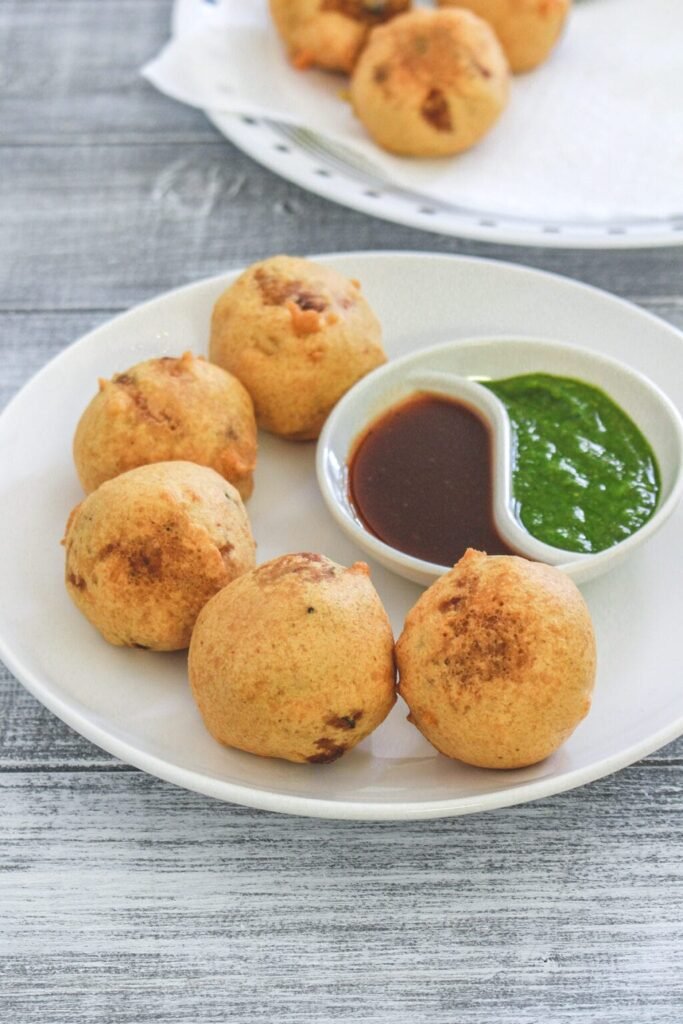
It pairs perfectly with hot tea or coffee and is served with tangy chutneys or ketchup, adding bold, delicious layers.
Batata vada is a key ingredient in vada pav, a popular Maharashtrian street food with chutneys and fried green chilies.
Enjoyed alone or in vada pav, it offers a delicious, comforting taste of Maharashtra’s vibrant culinary tradition.
About This Batata Vada Recipe
- Boil and mash potatoes until smooth to create a soft base for the flavorful inner filling.
- Mashed potatoes are then seasoned with fresh ginger, garlic, chopped green chilies, and curry leaves for a savory, aromatic taste.
- The outer coating is a thick besan and rice flour batter, seasoned with salt, turmeric, and chili powder for flavor.
- To assemble, shape the spiced mashed potato mixture into uniform round balls. Then, dip each ball thoroughly into the prepared gram flour batter for an even coating.
- Coated balls are gently fried in hot oil until golden and crispy, offering a crunchy outside and soft, flavorful potato inside.
Deep Frying is a must.
- Batata vada should never be shallow-fried.
- It is essential to fully submerge the vadas in hot oil during frying to maintain their perfect round shape.
- Shallow frying causes the vadas to flatten, losing their traditional form.
- Because deep frying requires a large quantity of oil, which cannot be reused easily, I rarely make batata vada at home.
- Additionally, this snack is quite high in calories, which is another reason for occasional preparation.
- The recipe provided here follows the authentic Maharashtrian style of making batata vada.
- In contrast, the Gujarati version differs as it does not include tempering or seasoning in the potato filling.
Ingredient Notes:
- Potatoes: For the best results, I prefer using Yukon Gold or red-skinned potatoes. These potatoes balance starch and moisture, forming firm, smooth balls. Idaho potatoes are avoided due to high starch and low moisture.
- Ginger, Garlic, and Green Chili: Crush ginger, garlic, and green chilies together or use ginger-garlic paste with finely chopped green chilies for fresh aroma. Both methods work well to infuse the filling with a vibrant, spicy flavor.
- Curry Leaves: Adding curry leaves is essential as they impart a wonderful fragrance and depth of flavor to the potato mixture. Their subtle aroma elevates the overall taste, making the filling more authentic and delicious.
- Lemon Juice: Including lemon juice is optional. Some prefer the tang it brings to balance the spices, while others choose to leave it out based on personal taste preferences.
- Besan and Rice Flour: Besan combined with rice flour in the batter creates a crispy, golden coating, making the vada crunchier than traditional besan-only batter.
- Baking Soda: You can add a very small pinch of baking soda to the batter to make the coating lighter and airier. However, omitting baking soda doesn’t significantly affect the vada’s texture or taste.
How To Make Batata Vada?
Making Potato Filling:
Start by cooking the potatoes in an Instant Pot or pressure cooker to ensure they boil quickly and evenly. Once cooled, peel potatoes and mash smoothly with a masher until lump-free and ready for the filling.
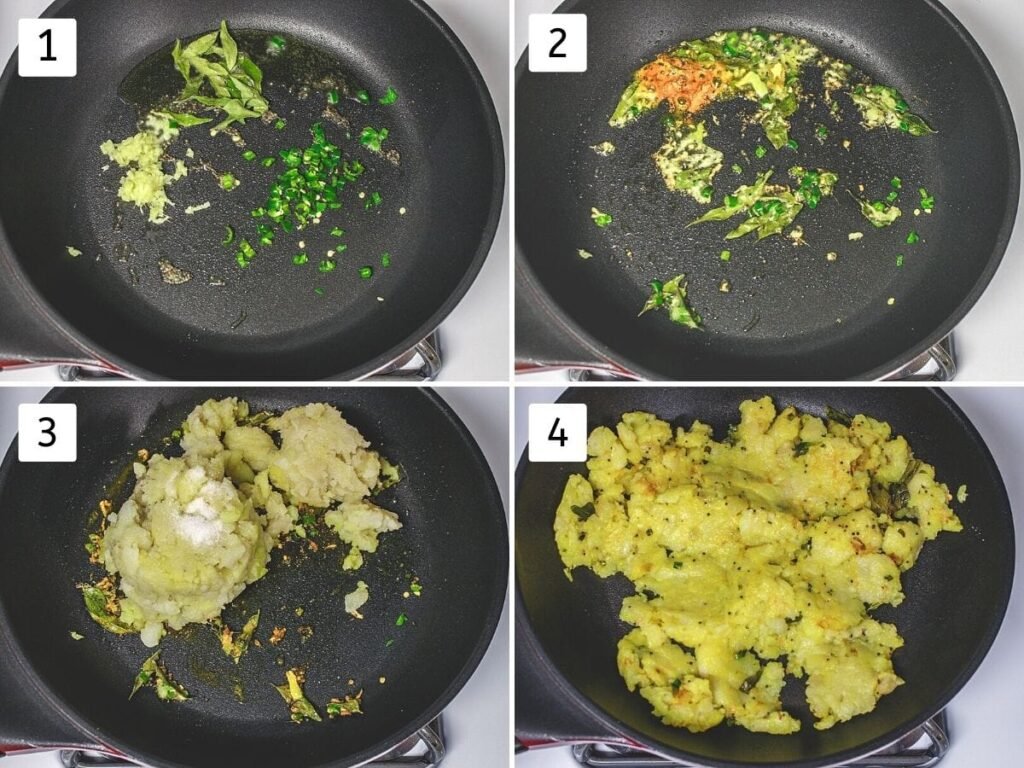
1) Heat oil in a pan on medium flame. When the oil is sufficiently hot, add mustard seeds and allow them to crackle and splutter. Then, add the ginger-garlic paste, sliced green chilies, and fresh curry leaves. Sauté this mixture for about 30 to 40 seconds, or until the raw aroma of ginger and garlic dissipates.
2) Add a pinch of asafoetida (hing) along with turmeric powder to the pan, stirring briefly to combine the spices evenly.
3) Immediately incorporate the mashed potatoes into the pan, along with the required amount of salt.
4) Stir the mixture thoroughly and cook it for 2 to 3 minutes on medium heat, allowing any excess moisture to evaporate until the potato filling feels dry and holds together well.
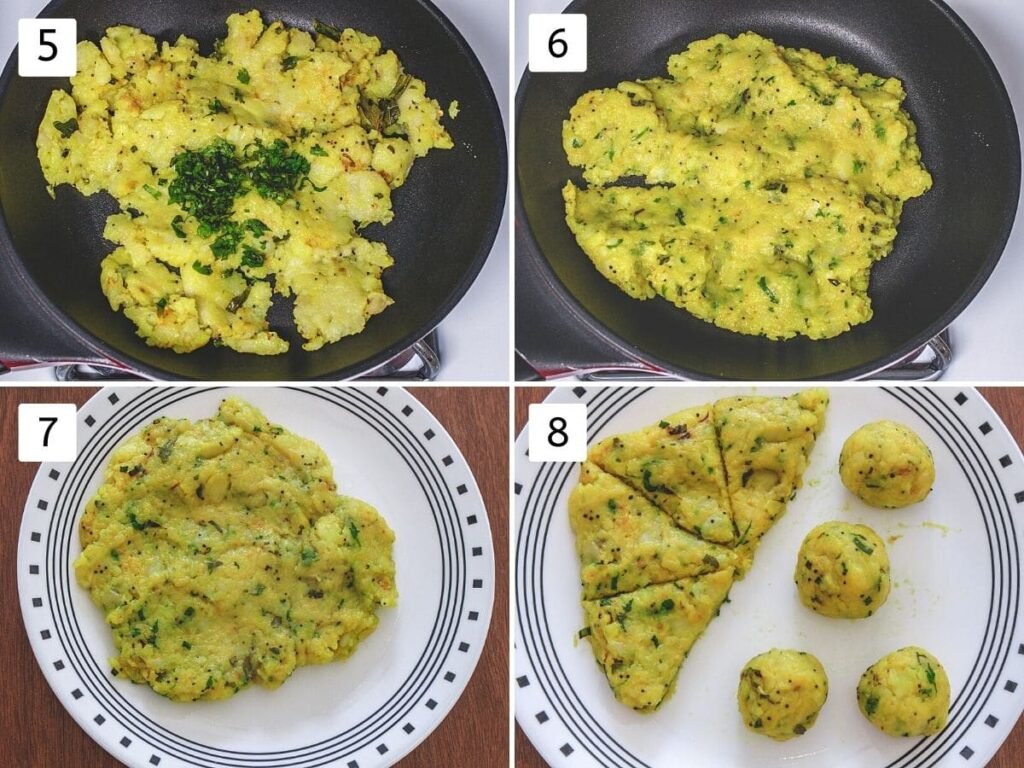
5) Turn off the heat source, then squeeze in fresh lemon juice and sprinkle chopped cilantro (coriander leaves) over the filling.
6) Mix everything well, taste the filling, and adjust the salt or lemon juice according to your preference.
7) Transfer the prepared potato mixture onto a plate or shallow bowl and allow it to cool completely to room temperature.
8) After the filling has cooled completely, portion it into 8 equal parts and roll each portion into smooth, round balls. If you prefer smaller batata vadas, you can make more than 8 by dividing the mixture accordingly.
Making The Batter:
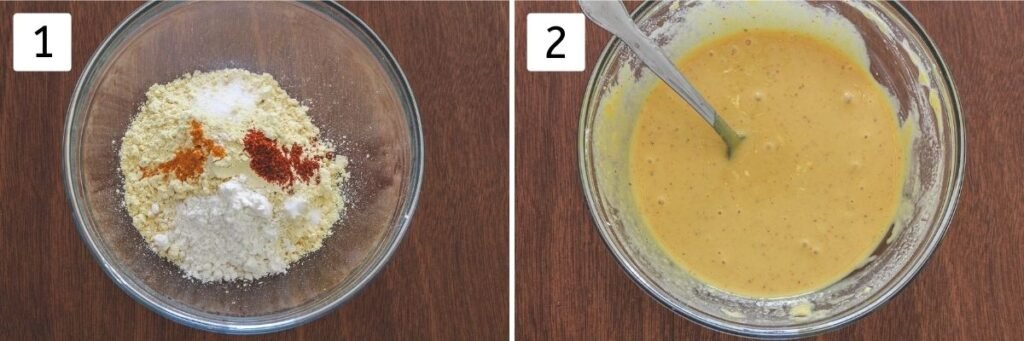
1) In a mixing bowl, combine besan (gram flour), rice flour, salt, turmeric powder, red chili powder, and a small pinch of baking soda. Thoroughly whisk these dry ingredients to blend them evenly.
2) Gradually pour in water while continuously stirring the mixture to form a smooth batter without any lumps. The ideal batter consistency should be balanced, not too watery but not overly thick, allowing it to coat the potato balls evenly while still being fluid enough to dip and adhere properly.
Making Batata Vada:
1) Begin by heating a generous amount of oil in a deep kadai or heavy-bottomed pan over medium heat. It’s important to add enough oil so that the batata vadas can be fully submerged during frying, which helps them cook evenly and maintain their round shape.
2) Once the oil reaches the right temperature and is sufficiently hot, take one prepared potato ball and carefully dip it into the besan batter. Move the ball gently within the batter to ensure it is completely and evenly coated from all sides, forming a smooth outer layer.
3) Gently lift the coated ball from the batter using your fingers or a spoon, letting any extra batter drip off back into the bowl to prevent clumping.
4) Slowly and cautiously drop the batter-coated vada into the heated oil. It’s crucial not to disturb or move the vadas immediately after dropping them into the oil, as this can cause them to break apart. Let them fry undisturbed for about 2 minutes to set the outer coating.
5) Once the initial frying time has passed, softly stir or shift the vadas in the oil to promote even browning on every side. Continue frying until they achieve a crisp texture and turn a light golden brown.
6) Once perfectly fried, remove the vadas from the oil using a slotted spoon and place them on a plate lined with paper towels. This helps drain off surplus oil, keeping the vadas crisp and delicious. Enjoy them hot for optimal flavor and texture.

Note: For an extra spicy touch, take fresh green chilies, make a small slit in each, and fry them in the hot oil until their skin blisters. Take the chilies out of the oil, season them with a pinch of salt, and serve them with the batata vadas for a traditional Maharashtrian touch.
Expert Tips For BEST Batata Vada
- The potato filling should be free of excess moisture to ensure it holds its shape well. If boiled potatoes are watery, cook on low heat until moisture evaporates, ensuring firm, easy-to-shape potato balls for frying.
- To prevent excess moisture in the filling, avoid overcooking the potatoes. Aim for potatoes that are soft enough to mash easily but still retain some firmness to avoid a soggy texture.
- Achieving the right batter consistency is crucial for a perfect batata vada. If the batter is too thin, the coating will be too light and won’t provide the satisfying crunch and flavor contrast to the potato filling. Conversely, a batter that’s too thick can result in a dense, hard, and chewy outer layer that feels doughy rather than crisp.
- As an alternative to traditional deep-frying, you can prepare batata vadas using a paniyaram pan. For this method, make smaller-sized vadas that fit neatly into the individual molds of the pan, resulting in a healthier and less oily version.
- Make-ahead tip: You can prepare the potato filling or shape the potato balls in advance and store them in the refrigerator. You can also mix the batter a few hours before cooking. When ready to serve, simply fry the vadas fresh. Be sure to bring the potato balls back to room temperature before frying to ensure even cooking.
- For reheating leftover batata vadas, use an oven or air fryer to restore their crispiness effectively. Avoid reheating in a microwave, as it tends to make the vadas soggy and lose their desirable texture.
Serving Ideas:
- Accompany the batata vada with crispy fried green chilies and your favorite dips such as tangy green chutney, classic ketchup, flavorful dry garlic chutney, or sweet and sour tamarind-date chutney.
- Enjoy the vada on its own, paired perfectly with a steaming cup of tea or coffee for a comforting snack.
- Alternatively, stuff the batata vada into soft buns along with assorted chutneys to create the iconic and delicious vada pav.