
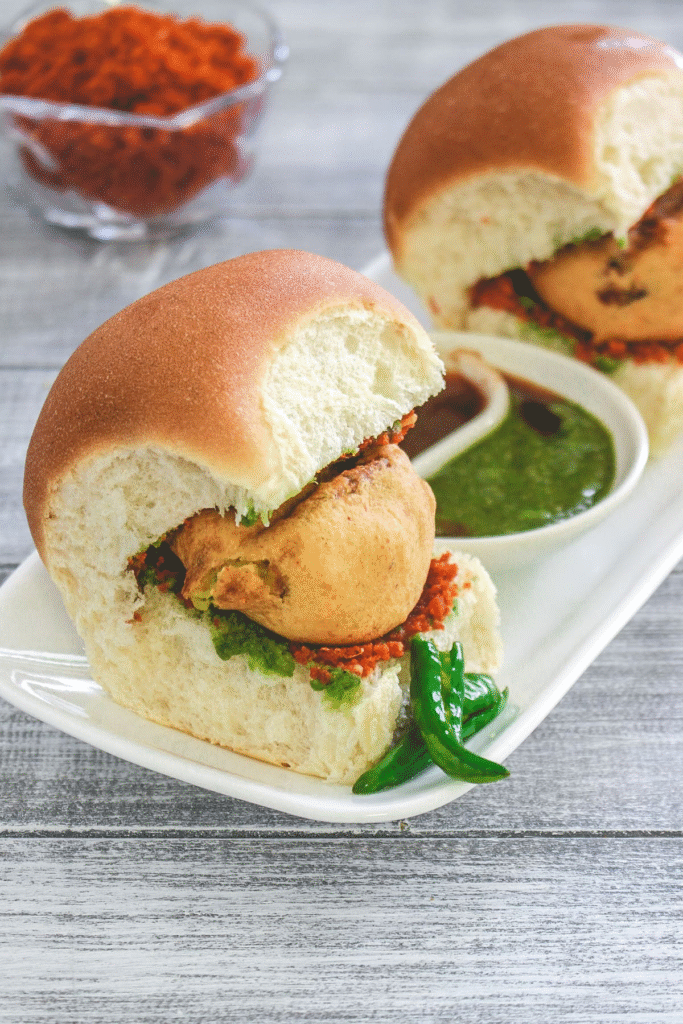
Vada Pav, often lovingly referred to as the “Indian burger,” is one of the most iconic and beloved street foods in India, particularly in Mumbai, Maharashtra. This homemade version of the vada pav captures all the authentic flavors and spicy goodness that you’d expect from a roadside vendor in the bustling streets of Mumbai.
From the crispy, golden-fried potato fritters (vada) to the soft, pillowy pav (bread roll) and the bold chutneys that add layers of flavor, this recipe is a celebration of traditional Indian street cuisine. Whether you’re reliving fond memories of Mumbai’s street stalls or trying it for the first time, this vada pav promises to deliver an experience that’s every bit as delightful and satisfying as the original.
❤️ What Is Vada Pav?
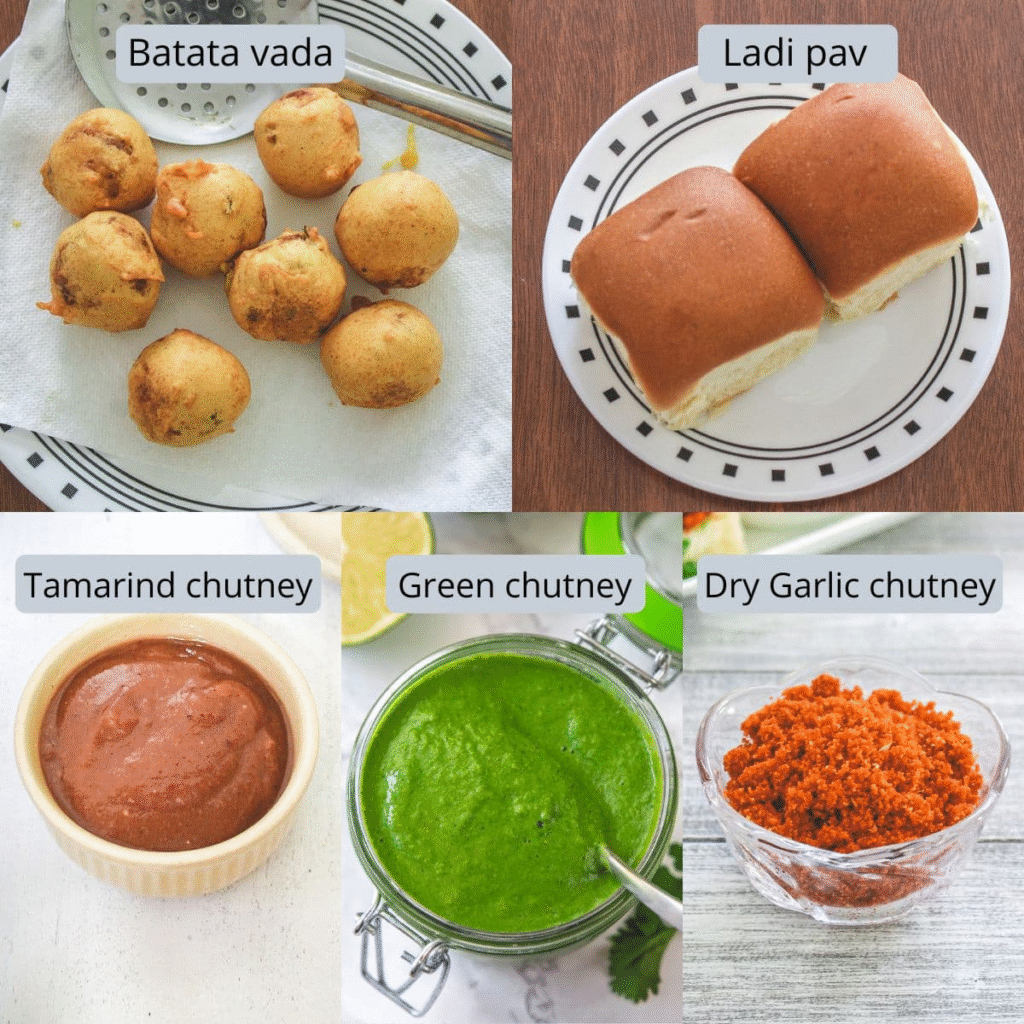
Vada = Profound fricasseed potato squander. Here spiced, squashed potato balls are coated with besan batter and deep-fried in hot oil. It is known as batata vada, where batata is the Marathi word for potatoes.
Pav = bun or bread roll. This pav is broadly known as ladi pav.
Basically, 3 chutneys (vada pav chutney aka dry garlic chutney, green chutney, and tamarind date chutney) are spread on the bun, and batata vada is stuffed between the bun fair like a burger. It is served with fricasseed green chili on the side.
Every merchant has a slight variety in making the vada pav recipe. But essential components are common. True (old-fashioned) vada pav recipe doesn’t utilize green chutney and tamarind chutney. I utilize them in my recipe as these chutneys provide a wonderful taste and flavor to the vada pav.
🧾 Elements For Making Vada Pav
- Batata vada: Underneath I have shared the step-by-step strategy to make it at domestic. If you need to utilize the easy route, at that point utilize ready-made (solidified ones or purchase from a new nibble shop).
- Pav: Ladi pav is effectively accessible in Indian basic need stores. These are the same pav that we utilize in pav bhaji.
- Tamarind date chutney: It is made from tamarind, date, jaggery, and a few flavors. It includes a pleasant, tart, sweet taste. You can make it at domestic ahead of time or purchase a jostle from the store.
- Green chutney: It is made from cilantro, green chilies, ginger, lemon juice, and a few flavors. It includes a new, shining, herby flavor. I incline toward making it at domestic for the new flavors. But of course, you can utilize store-bought chutney.
- Dry garlic chutney: This is a must vada pav chutney. It is made from dry coconut, garlic, and red chili powder. It includes a sharp, garlic flavor with a hot taste. Be that as it may, the flavor level can be balanced. Check out the points of interest in the chutney recipe post. Yes, it is promptly accessible in the store, but I profoundly prescribed making it at domestic for the best flavor. Fried green chili (not in the pic): It is discretionary. Numerous individuals like to chomp into fricasseed chili along with vada pav to include a few additional flavors.
👩🍳 How To Make Vada Pav Recipe? (Pics)
Make 3 Chutneys:
You can make them 1-2 days some time recently and store them in the cooler in an air proof holder. Or utilize store-bought ones.
1. Tamarind date chutney: Take around 30 minutes
2. Green chutney: Takes around 15 minutes
3. Dry garlic chutney: Takes around 15 minutes

Making Potato Mixture For Vada:
Boil the potatoes in moment pot or weight cooker. Once cool to touch, peel them and pound them utilizing a potato masher.
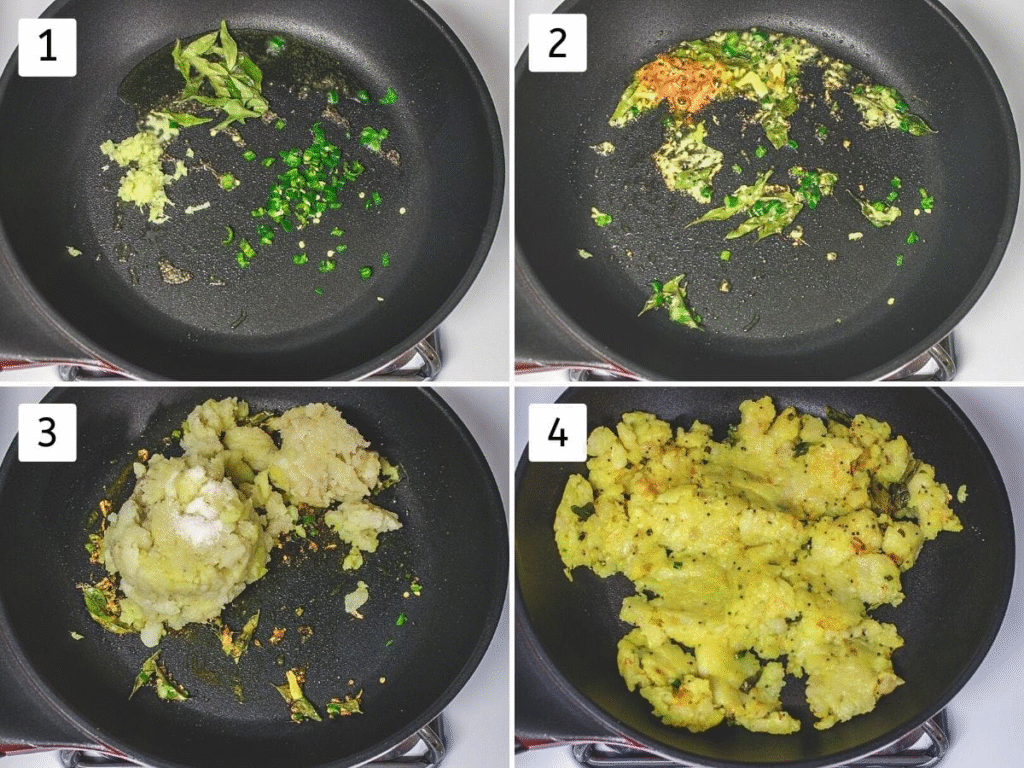
Step 1
Begin by warming many soupspoons of oil painting in a deep frying visage or skillet over medium heat. Allow the oil painting to toast up gently — this ensures the spices release their full flavor without burning. Once the oil painting is sufficiently hot, add the mustard seeds. Let them sizzle and pop, which indicates they’re tempering duly and releasing their nutty aroma.
This should take about 20- 30 seconds. As soon as the spluttering subsides, add in the lately prepared gusto- garlic paste, finely diced green chili, and a sprinkle of fresh curry leaves. Sauté the admixture for around 30 to 40 seconds, stirring constantly to help sticking. Continue cuisine until the raw smell of gusto and garlic disappears, and the admixture becomes sweet.
Step 2
At this stage, sprinkle in a pinch of asafoetida( hing) followed by a gusto of turmeric greasepaint. These spices will enhance the depth of flavor and bring a warm, earthy tinge to the dish. Stir the spices into the sautéed admixture, allowing them to blend unevenly with the oil painting and aromatics.
Step 3 & 4
Incontinently, subsequently, add the boiled and smoothly mashed potatoes into the visage. Season with swab according to your taste preferences. Use a spatula or rustic ladle to mix everything together completely, icing the spices cover the potatoes unevenly. Continue to cook the potato admixture on medium heat for about 2 to 3 twinkles. Stir sometimes to help sticking. As the admixture culinarians, it should begin to lose redundant humidity and turn slightly dry, forming a cohesive stuffing that is perfect for filling or serving as a side.
Steps 5 & 6
Once the potato admixture has cooked through and utmost of the humidity has faded, turn off the heat. Allow the visage to sit for a many moments so the residual heat settles. Also, mizzle lately squeezed bomb juice over the admixture This will add a bright, pungent flavor that impeccably balances the uproariousness of the spices.
Follow this by adding finely diced fresh cilantro( coriander leaves), which brings a burst of color and a stimulating herbal note to the dish. Mix everything completely to insure that the bomb juice and cilantro are unevenly distributed throughout the potato stuffing. At this point, give the admixture a quick taste test. Acclimate the seasoning if necessary by adding further swab or bomb juice according to your preference.
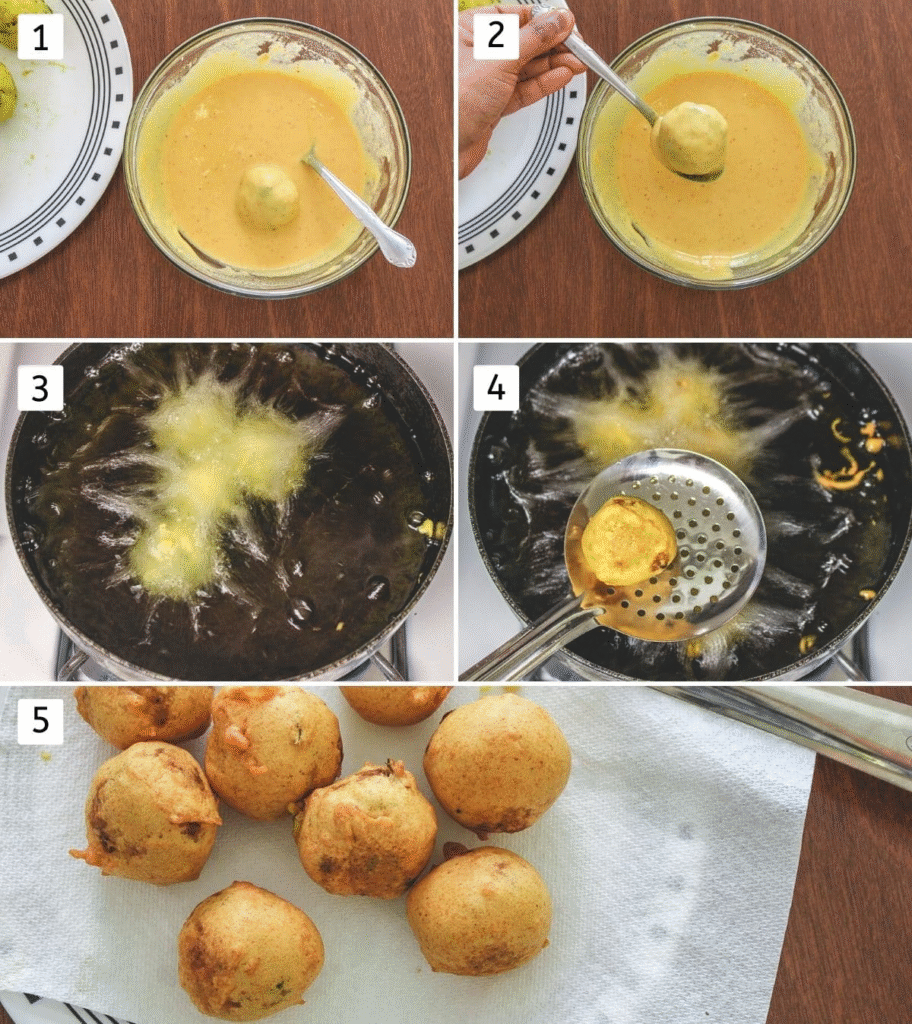
Step 7&8 Once you have removed the mixture from the heat, transfer it onto a large plate or flat surface. Allow it to cool down completely, giving it time to solidify and reach a manageable temperature. Patience is key at this stage to ensure that the mixture doesn’t remain too warm or sticky. Once it’s sufficiently cool, divide the mixture into 8 equal portions. To do so, you can either use a spoon or your hands to break it into even chunks. Then, gently roll each portion between your palms to form smooth, round balls. Be sure to take your time shaping them, ensuring each ball is uniform in size and smooth in texture.

Making Batter:
Step 1:
In a large mixing bowl, combine the dry ingredients: gram flour (besan), rice flour, salt to taste, a pinch of turmeric powder for color and earthy flavor, red chili powder for a bit of heat, and a small amount of baking soda (also known as cooking soda) to help the batter puff up lightly when fried. These ingredients form the base of a flavorful and crispy batter. Using a whisk or spoon, mix everything together thoroughly so that all the dry spices and flours are evenly distributed. Ensuring a uniform mixture at this stage helps prevent uneven seasoning or clumping when you add water later.
Step 2:
Next, gradually begin to add water to the dry mixture while stirring continuously. It’s important to add the water in small increments, mixing as you go, to avoid the formation of lumps. Continue stirring until a smooth, lump-free batter forms. The consistency of the batter is key: it should not be too watery or too thick. This balanced texture ensures the batter adheres well to whatever you’re coating, resulting in a light, crispy exterior when fried.

Frying Vada:
Heat the oil in a kadai or dish on medium warm for profound singing. Make beyond any doubt to include sufficient oil so that vada are submerged in the oil.
Steps 1 & 2
Once your oil painting has reached the proper frying temperature — hot but not smoking it’s time to start preparing the vadas for frying. You can check the readiness of the oil painting by dropping a small bit of batter into it; if it sizzles and rises to the face incontinently, the oil painting is ready. Take one of the set potato balls and precisely dip it into the batter you made before. Use your fritters or a ladle to gently turn the ball within the batter, icing its unevenly carpeted on all sides with a thick, smooth subcaste. The batter should cleave well to the potato ball without trickling excessively.
Step 3
Now, gently lift the batter-carpeted ball using your fingers or a ladle and precisely slide it into the hot oil painting. Be conservative to avoid splashes. Once the ball is in the oil painting, repel the appetite to stir or move it incontinently. Allow it to sit unperturbed for about 1 to 2 twinkles — this helps the batter set and prevents the coating from breaking piecemeal or dispersing in the oil painting. After this original period, gently stir or move the vadas around in the oil painting to insure they cook unevenly on all sides.
Step 4 & 5
Continue frying the vadas, turning them sometimes, until they turn a crisp and light golden- brown color on the outside. This should take several twinkle depending on the temperature of the oil painting. Once they’re unevenly fried and beautifully golden, use a slotted ladle to precisely lift them out of the oil painting, allowing any redundant oil painting to drain back into the visage. Transfer the fried vadas to a plate lined with paper apkins to soak up any remaining oil painting and keep them crisp.
Fried Green Chili: Make an opening in green chilies and broil in the oil until they have rankles on the surface. Expel it from the oil, sprinkle a few salt on best, and keep it aside to serve with vada pav.
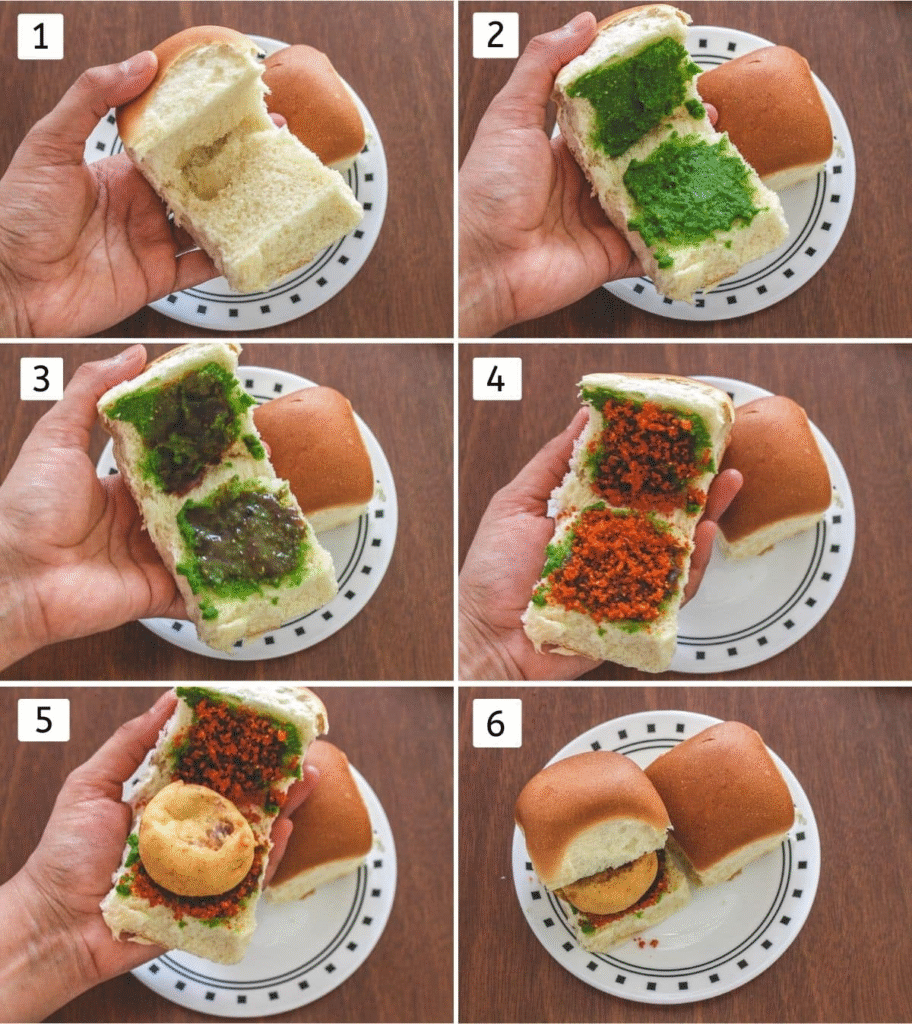
Assembling Vada Pav:
Step 1
launch by taking a fresh pav bun, a soft and ethereal Indian chuck roll that’s ideal for making road-style sandwiches. Using a sharp cutter, precisely slice the pav horizontally, as you would for a burger bun, making sure not to cut all the way through, leave one side attached. This hinge keeps the pav complete and makes it easier to hold when eating.
Step 2
Open the sliced pav gently and apply a generous subcaste of green chutney to the inner sides. This chutney, generally made with fresh coriander, mint leaves, green chilies, garlic, and bomb juice, adds a vibrant, pungent, and racy flavor that complements the potato filling beautifully. Use the reverse of a ladle or a adulation cutter to spread it unevenly.
Steps 3 & 4
Next, subcaste in some tamarind-date chutney on both sides of the pav. This chutney is sweet, pungent, and slightly earthy, balancing the heat of the green chutney. Also, sprinkle a generous pinch of dry garlic chutney( lasun chutney) over the chutneys. This coarse, racy greasepaint made from garlic, red chili, coconut, and groundnuts is an iconic part of Mumbai’s vada pav and adds a succulent punch of flavor. Be sure to cover both halves unevenly so every bite is packed with taste.
Step 5
Now, take one lately fried batata vada and place it in the center of the set pav. Press it down gently with your galettes or a spoon to flatten it slightly. This helps the vada sit further comfortably in the bun and makes it easier to eat without the filling slipping out.
Step 6
Close the pav gently, much like assembling a burger or sandwich. Press it slightly to hold everything in place. Your manual vada pav is now ready to be served! For an authentic touch, brace it with fried green chilies on the side — these are generally slit and snappily fried in hot oil painting until blistered, adding an redundant racy kick for those who dare. You can also serve redundant dry garlic chutney on the side for dipping or sprinkling.
💭 Expert Tips
Tips For Vada:
- The potato filling blend ought not to have as well much dampness or water. If your bubbled potatoes have more dampness in them at then point cook until it dries out so you can shape them into the balls.
- To dodge as well much dampness in the filling, attempt not to overcook the potatoes. They ought to be delicate, however firm.
- The batter consistency is the key to getting a culminate adjust of filling and external coating. If the player is as well lean at that point, you’ll get no taste of the external layer and feel like fair eating potato. If the batter is as well thick at that point the external layer can gotten to be difficult, chewy, and taste as well dough-like.
- Reheating: You can warm them in the stove or discuss fryer until fresh. Dodge utilizing the microwave as it makes them soggy.
Tips For Vada Pav:
- Use new ladi pav, as we are not toasting pav with butter or oil. If you’ve utilized stale pav at that point it may feel dry and brittle.
- Just in case your pav is not new, you can broil pav as below.
- Heat tava or skillet on medium warm. Include a tablespoon of butter.
- Once butter is softened, include 2-3 teaspoons of dry garlic chutney and mix.
- Now put the opening ladi pav (interior portion on tawa) on this blend. Pav will splash up all the butter and chutney. Toast it for a few time. At that point expel it to a plate.
- Proceed with the same amassing procedure.
