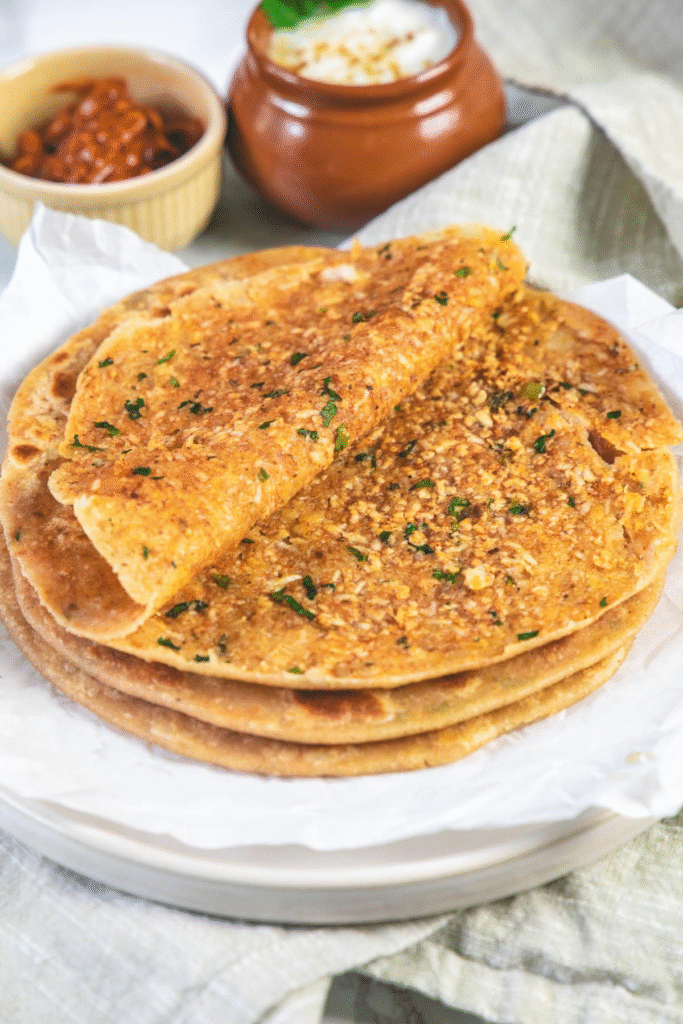
Paneer Paratha is a widely loved Indian flatbread that originates from the northern regions of India, particularly Punjab. This stuffed paratha is known for its rich, flavorful filling made from crumbled paneer (Indian cottage cheese), freshly chopped cilantro, finely chopped green chilies, and a blend of traditional Indian spices such as cumin, garam masala, and amchur (dry mango powder). The outer layer is crafted from whole wheat dough, rolled and cooked to golden perfection on a hot griddle with a touch of ghee or oil.
These Punjabi-style paneer parathas are more than just a breakfast dish — they’re a wholesome, satisfying meal that can be enjoyed at any time of day. When paired with a side of creamy yogurt, spicy pickles, or tangy chutneys, they become an irresistible combination that is both hearty and flavorful.
For a more elaborate and fulfilling meal, paneer parathas can also be served alongside protein-rich lentil or bean-based dishes such as toor dal (split pigeon peas), whole masoor dal (brown lentils), or even a comforting bowl of rajma (kidney beans). Whether served during a leisurely weekend brunch or as part of a festive spread, this dish brings warmth and tradition to the table with every bite.
The balance of soft, mildly spiced paneer encased in a crispy, golden flatbread makes paneer paratha a timeless favorite — a delightful representation of North Indian comfort food at its best.

❤️ You’ll Love This Paneer Paratha Recipe
Easy to make:
- For the paneer stuffing, you require to blend all the fixings and it’s prepared. It’ll take beneath 10 minutes.
- For the batter, I have utilized a kitchen help stand blender. So whereas it is running to manipulate the batter, I prep for the stuffing. Be that as it may, you can manipulate it by hand, and that takes just 5-10 minutes.
- Lastly, roll, stuff, and pan-fry the paneer paratha. Indeed in spite of the fact that there are numerous steps but it’s super simple to make.
Customizable: The stuffing can be made as per your enjoying taste. Alter the flavor level if making for kids or if you incline toward less hot nourishment in common.
Lunch box inviting: These paneer paratha can be pressed into kids’ or adults’ lunch boxes. Apply a liberal sum of butter or ghee on beat to keep the paratha delicate. Also, it tastes super yummy with butter/ghee. Don’t disregard to pack yogurt or dal in a partitioned holder to plunge your paratha.
Make ahead alternative: You can make the stuffing a day some time recently and store it in the ice chest. Too, you can work the mixture ahead of time and store it in the fridge (for up to 24 hours as it were). Numerous times I make stuffing and mixture for paneer paratha the night some time recently so I can make them rapidly in the morning for breakfast or lunchbox.
🧾 Ingredient Notes
Here is the pic of the fixings to make these scrumptious paneer paratha.
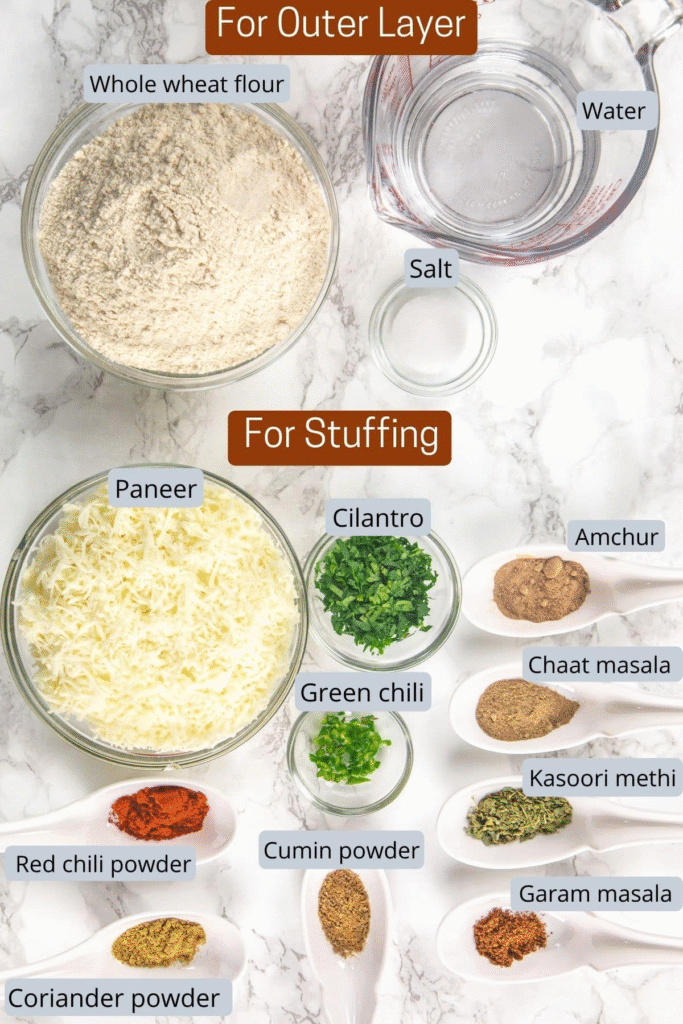
- For the external cover: Fair like any other paratha recipe, the batter is made from entire wheat flour (aka chapati atta), salt and water. A few include a couple of tablespoons of oil into the batter as well to make the external layer more soft.
- Paneer: Here I have utilized store-bought paneer and utilized the littler grates measure from the box grater. On the other hand, you can disintegrate the paneer. If I have made the hand crafted paneer at that point I would disintegrate it.
- Green chili: This can be skipped if you (or your kids) don’t like to chomp into chilies.
- Spice level: If making for kids who cannot endure the fiery nourishment at that point you can reduce/skip green chili and red chili powder.
👩🍳 How To Make Paneer Paratha? (Pics)
Making The Dough:
1) Begin by placing the chapati atta( whole wheat flour) and a pinch of swab into a mixing coliseum, rather one that comes with a dough hook attachment if you are using a stage mixer. Start the mixer on the smallest speed and gradationally begin to add water in a slow, steady sluice while the mixer is running.
2) As the flour starts absorbing the water, sluggishly increase the speed of the mixer. Continue mixing until the constituents start to form a cohesive dough. Once the dough starts coming together, mizzle about a tablespoon of oil painting over it. This will help in achieving a smooth texture and help sticking.
3) Now, either continue kneading with the dough hook or transfer the dough to a clean face and knead it manually using the win of your hand. The end is to make the dough soft and pliable by working it completely for several twinkles.
4) Once the dough becomes smooth and elastic, shape it into a round ball. Place this dough ball in a coliseum, cover it with a clean, damp kitchen kerchief or plastic serape , and let it rest at room temperature for about 10 to 15 twinkles. This sleeping period allows the gluten to relax, which makes rolling easier and gives a softer texture to the paratha.

Making Stuffing:
5) In a separate mixing coliseum, combine all the constituents needed for the filling. This may include mashed potatoes, finely diced onions, green chilies, fresh sauces like coriander, and spices similar as cumin, garam masala, swab, and chili greasepaint, depending on your form.
6) Use a ladle or your hands to completely mix all the filling constituents until they’re unevenly combined. Make sure there are no large lumps, and the admixture is invariant in texture.

Rolling Paratha:
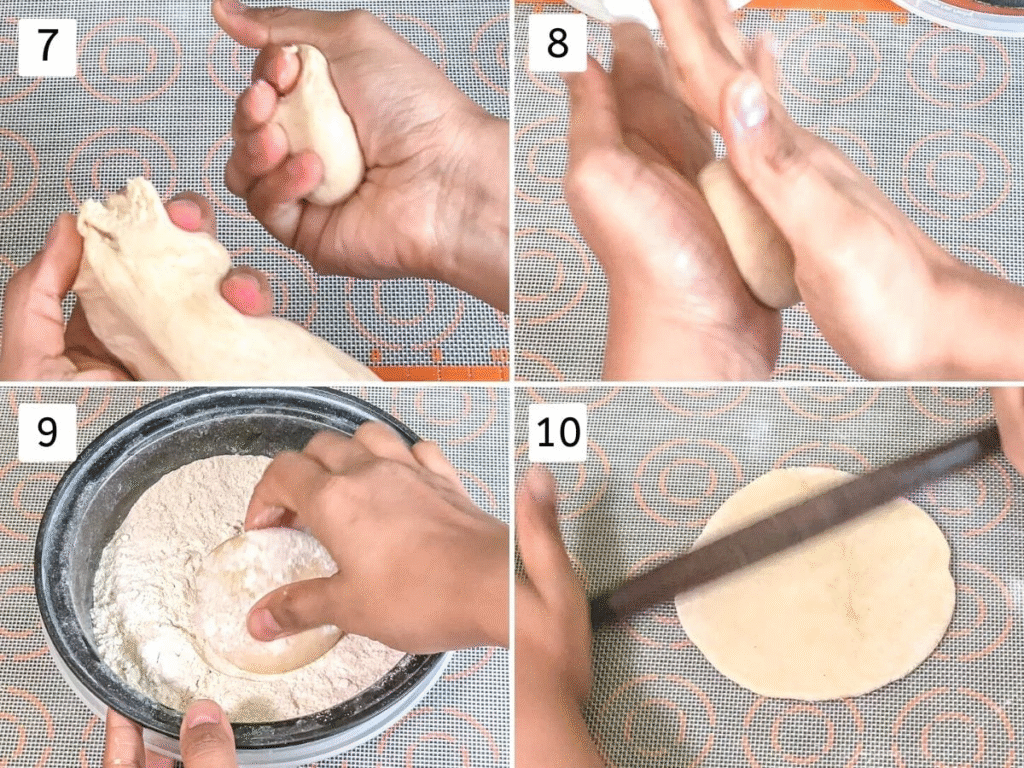
7) Once the dough has rested adequately, knead it gently once more to achieve a smooth and even consistency. Divide the dough evenly into eight portions. These will form the base for individual stuffed parcels.
8) Take one portion of the dough and roll it between your palms to form a smooth, round ball. Once the ball is nicely shaped, gently flatten it using your fingers or palms to create a small disc-like shape. Meanwhile, preheat a tawa or flat griddle over medium-high heat so it’s ready when you need it.
9) Lightly coat both sides of the flattened disc with dry flour. This helps prevent sticking during the rolling process.
10) Using a rolling pin, roll out the disc into a circle approximately 4 inches in diameter. Try to keep the thickness even throughout to ensure uniform cooking later.
Stuff, Seal, and Shape
11) Spoon a generous amount of the prepared stuffing and place it in the center of the rolled-out dough. Don’t overfill to avoid tearing.
12) Carefully gather the edges of the circle towards the center, pleating as you go to encase the filling. Use your fingers to gently bring all the edges together.
13) Carefully bring the edges of the dough together, gently pressing the center to seal it securely. This step is crucial to ensure the paneer filling remains inside during the rolling process and doesn’t spill out. Apply just enough pressure to close the dough evenly without tearing it.
14) And utilizing the fingers press the fixed portion softly to equitably disseminate the mixture and make the circle a small greater in size.

15) Lightly dust both sides of the prepared dough with dry flour. This prevents it from sticking to the rolling pin or surface during the rolling process. Ensure even coverage without using excessive flour, which could make the paratha dry.
16) Begin rolling the dough into a circular shape using a rolling pin, applying gentle and even pressure. If you feel any resistance or notice sticking, sprinkle a bit more dry flour over the surface. Be cautious not to press too hard, as this might cause the dough to tear and the filling to leak out.
17) Continue rolling until you achieve a flat, circular disc about 7 to 8 inches in diameter. Aim for consistent thickness across the surface to ensure even cooking later. The paratha should not be too thick or too thin—just enough to cook through without breaking apart.

Cooking Paneer Paratha:
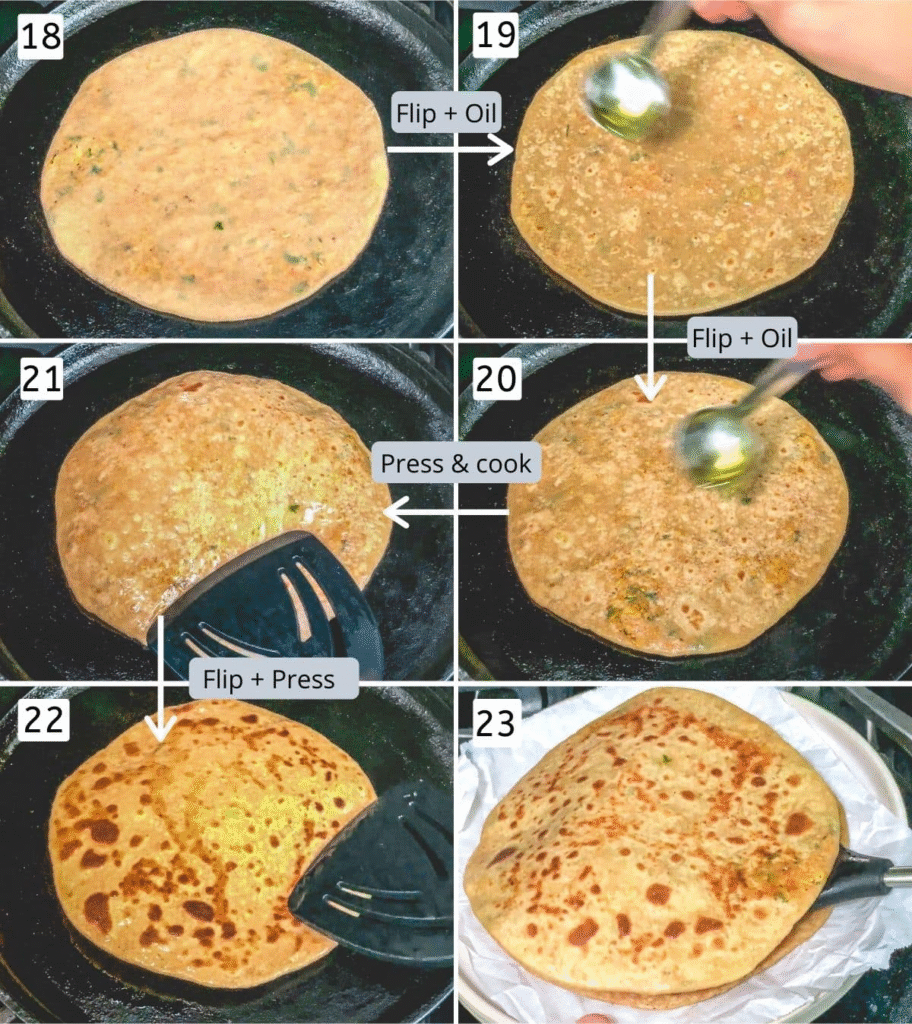
18) Carefully place the rolled paratha onto a preheated tawa (griddle). Allow it to cook on one side for a couple of minutes. You’ll begin to notice tiny bubbles forming on the surface, indicating that it’s time to flip.
19) Once the underside starts developing light golden brown spots, flip the paratha using a spatula. Drizzle about a teaspoon of oil over the surface and spread it gently using the back of the spoon or spatula for even coverage.
20) Flip the paratha once more and apply oil again.
21) Press delicately utilizing a spatula and cook until the foot side has brilliant brown spots and no more crude doughy parts.
22) Flip and once more press to cook another side.
23) Once brilliant brown from another side, evacuate it to a plate and rehash the same for the rest of the paneer paratha. Apply butter or ghee to the paratha and at that point serve.
💭 Expert Tips For BEST Paneer Paratha
- The batter has to be smooth and delicate. If it is difficult and tight at that point you won’t be able to roll the paratha. Additionally, if it is as well delicate and sticky at that point once more it’ll be difficult to roll the paratha.
- The mixture ball and the measure of the stuffing parcels both have to be the nearly same estimate. This way you’ll get an break even with sum of mixture and stuffing in each bite.
- Make beyond any doubt there are no discuss pockets whereas fixing the batter after stuffing. Those discuss pockets will pop whereas rolling paratha and begin to break or tear from there.