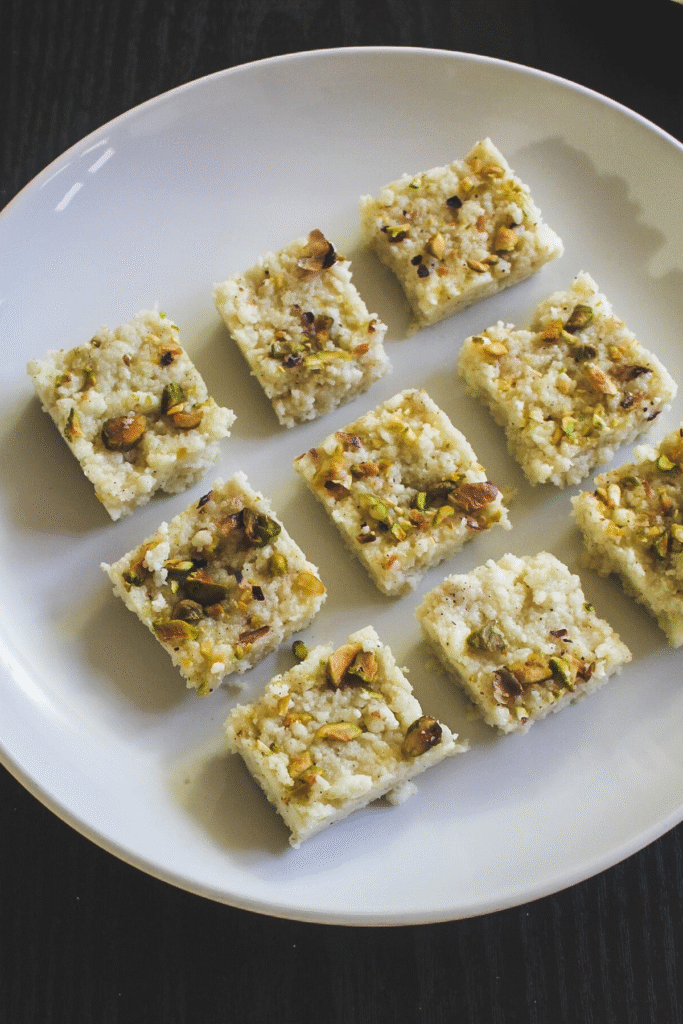
This Kalakand is truly a melt-in-your-mouth delight, and without a doubt, one of the best you’ll ever experience! With its rich, moist texture and signature grainy consistency, each bite delivers a perfectly balanced sweetness that lingers gently on the palate. The flavor is creamy and luxurious, yet light enough to make you crave more. What makes this sweet even more special is how incredibly simple it is to prepare, using just a handful of ingredients and minimal effort. Whether you’re a seasoned cook or just starting out in the kitchen, this recipe is foolproof and perfect for all skill levels.
Ideal for festive occasions like Diwali, Holi, or Eid—or even for a cozy family gathering—this homemade kalakand brings the authentic charm of traditional Indian mithai right into your home. It’s not just a sweet, it’s a nostalgic experience that captures the essence of celebration, love, and warmth. Make it a part of your festive spread and watch how it becomes the centerpiece, winning hearts with every bite!
❤️ You’ll Love This Kalakand Recipe
This is the moment form of kalakand recipe without compromising the taste. The conventional strategy of making kalakand recipe is exceptionally time-consuming where drain is stewed for hours till it gets thick and at that point alum (phitkari) is included to get the grainy surface. And at that point once more stewed after including sugar until it gets barfi consistency.
Unlike the conventional strategy, this moment kalakand sweet comes together in 20 minutes only.
Here I have made new paneer (Chenna). Or take s easy route, you can utilize store-bought paneer.
Trust me, the taste and surface or kalakand are precisely the same as you get in Indian sweet stalls.
There is another moment form of kalakand where condensed drain is utilized. Here this one is made without condensed milk.
This kalakand sweet is more often than not made and served amid celebrations like Diwali, Holi, Eid, Raksha Bandhan, etc or on extraordinary occasions.
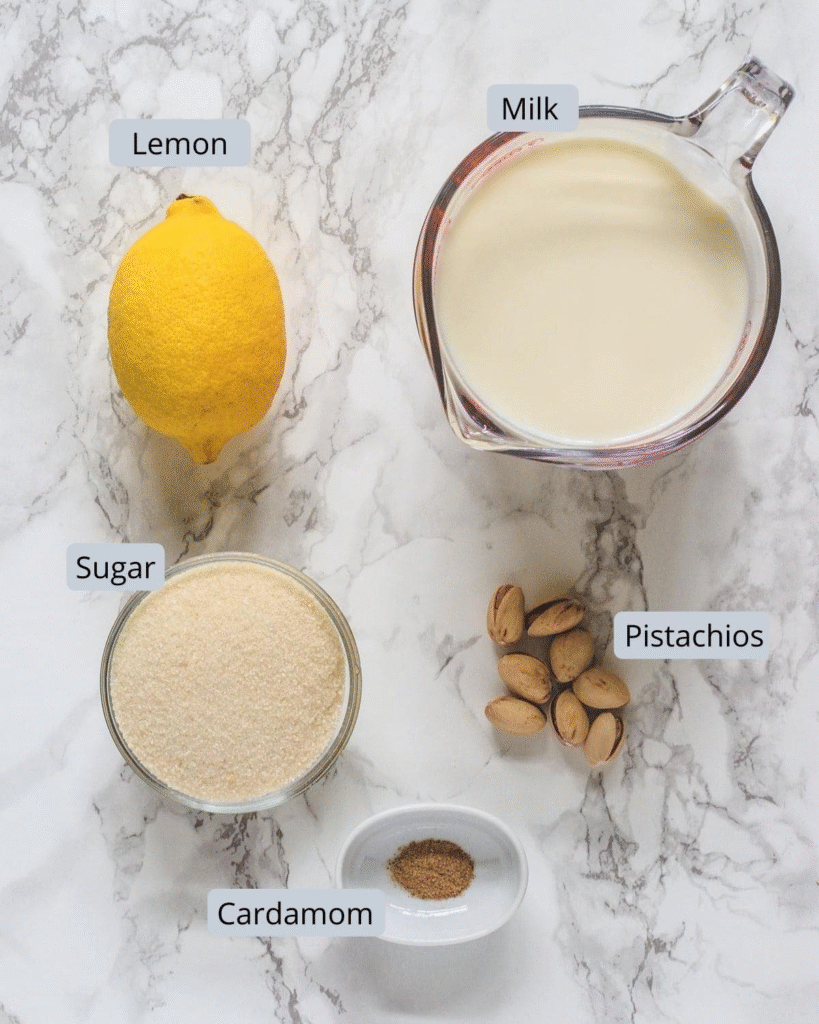
🧾 Ingredients For Kalakand Sweet
Here is the pic of the fixings utilized in making kalakand recipe. Exceptionally few things on the list, but the result is superb.
- Milk: It is utilized two times. To begin with, utilized in making new paneer. If you are utilizing store-bought paneer at that point you’ll utilize as it were in a moment time. Moment, it is utilized in cooking along with paneer, sugar.
- I profoundly prescribe utilizing full-fat entirety milk.
- Pistachio: I have utilized it in the garnishing the barfi pieces. You can utilize your choice of other nuts like almonds, cashews, etc.
How To Make Kalakand Recipe? (Pics)
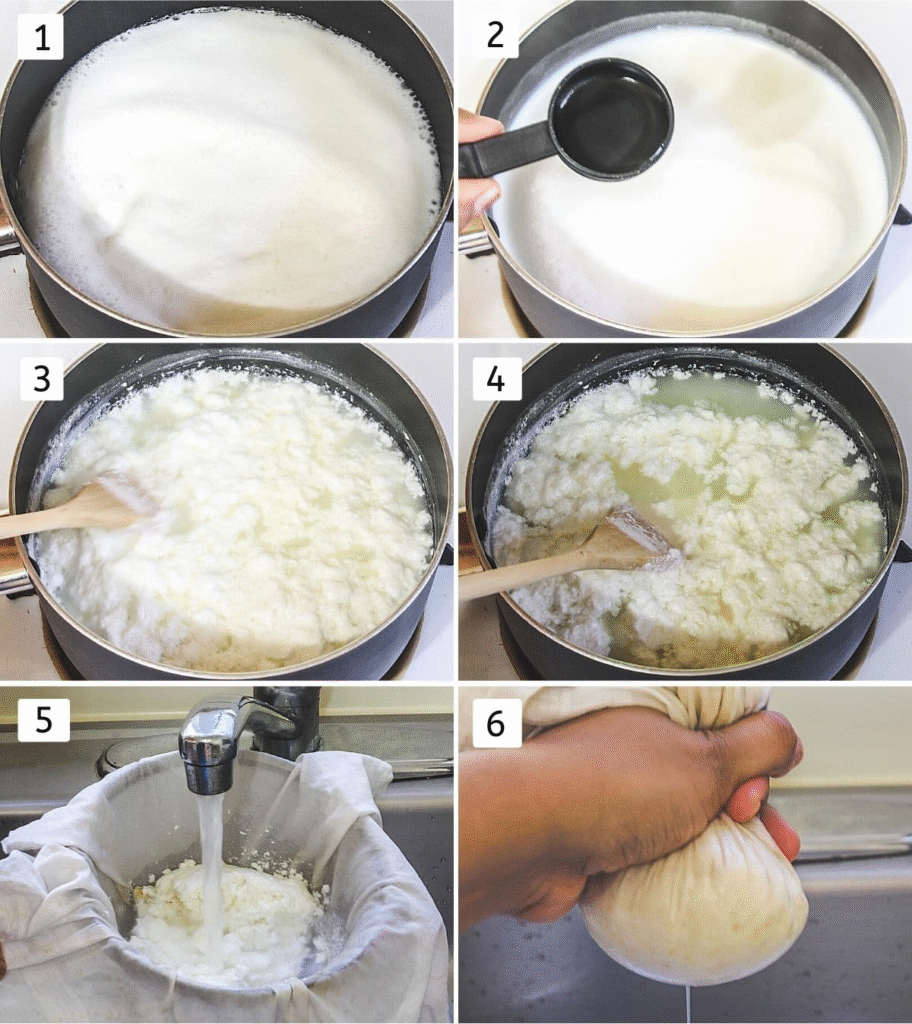
1) Begin by making cheena (new paneer) to begin with. If utilizing store-bought paneer, it would be ideal if you skip this chenna making process.
– Get ready a strainer for straining by lining a expansive fine-mesh sifter with a few layers of cheese cheesecloth or utilize man’s hanky or lean cotton cloth. Set over a expansive bowl.
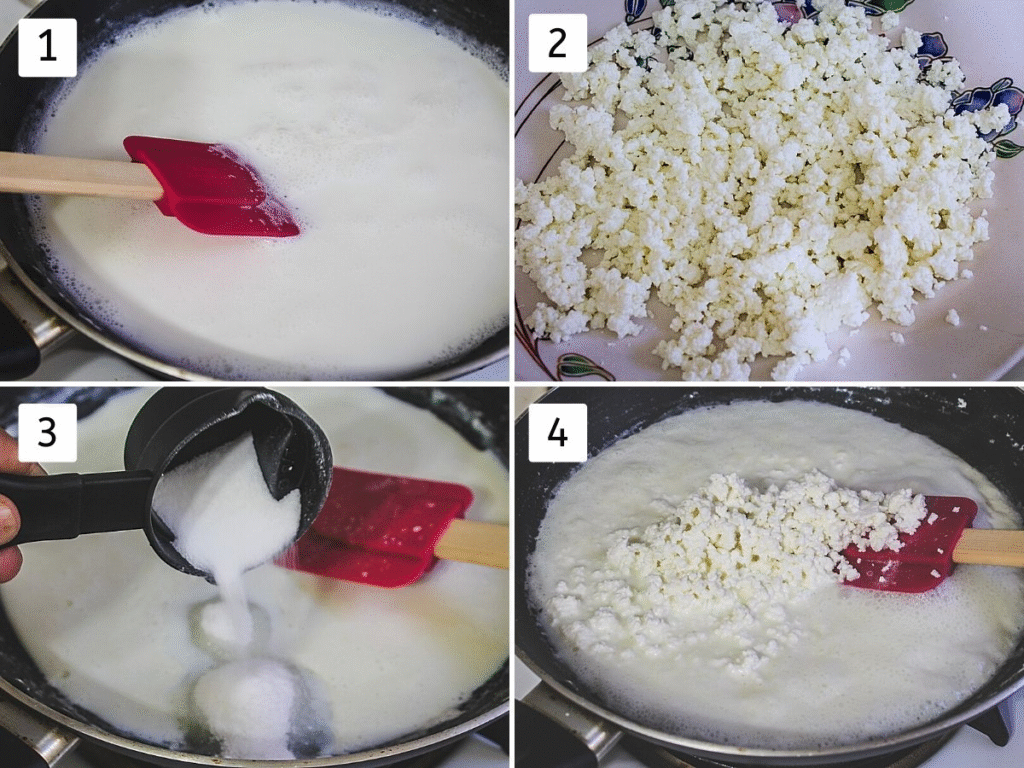
– Take 3 mugs of milk in a overwhelming foot dish and bring it to a boil.
2) Turn off the warm and begin including lemon juice and keep stirring.
3) As you mix, milk begins to sour. If it does not turn sour totally at that point include small more lemon juice and stir.
4) Presently the milk solids and greenish whey are isolated. Strain the blend utilizing a arranged strainer.
5) Instantly wash the chenna beneath running cold water to halt the encourage cooking prepare, additionally expel the citrus taste from it.
6) Assemble the cloth edges and light press it till it is no more dribbling. No require to hang or put the weight on it. Fair pressing will do the job.
1) Presently take remaining 1 ½ mugs of milk in a wide mouth pan and bring it to a bubble and stew for 5-6 minutes or till it thickens. Do blend to make beyond any doubt that it is not staying to the pan.
2) In the meantime, deteriorate the paneer completely and set it away in a clean coliseum for after use. insure the texture is fine and indeed, as this will help it blend seamlessly with the rest of the admixture.
3) At this stage, add the measured quantum of sugar into the stewing admixture. Stir it gently but constantly to allow the sugar to dissolve fully. Let it cook over low to medium heat for another 2 to 3 twinkles, giving the flavors enough time to combine well.
4) Now, add the atrophied paneer to the candied admixture. Stir gently to integrate the paneer unevenly throughout. This will help in creating a invariant texture and rich taste in the final dish.
5) Keep cooking the admixture over a gentle honey, stirring it without pause to insure indeed thickness and help it from sticking to the bottom of the visage. Keep the honey on low to help sticking or burning. Stirring helps to exclude redundant humidity gradationally. Cook until all the liquid evaporates, the admixture thickens, and it no longer appears gamesome. The final result should be a dry, rich, and scrumptious admixture ready to be served or used in farther medication.
6) Wondering how to tell when the mixture is close to being done? Refer to the image marked as (6). You’ll notice that the mixture has thickened, yet small bubbles continue to appear around the edges. This is a clear indication that it’s not fully cooked yet. At this point, it’s important to continue simmering the mixture while stirring regularly to help the excess moisture evaporate completely. Patience during this stage ensures a perfect texture.
7) Now, take a look at the picture labeled (7). You’ll observe a significant change — the mixture has become dense and smooth, and there are no more bubbles forming along the sides. This is your cue that the mixture is properly cooked and ready for the next step. The disappearance of bubbles indicates that all the moisture has been absorbed or evaporated.
8) Once the mixture has reached this final stage, turn off the heat immediately. While it’s still hot, sprinkle in the cardamom powder. This aromatic spice adds a warm and fragrant flavor to the kalakand. Mix thoroughly so that the cardamom is evenly distributed throughout the mixture, enhancing its overall taste.

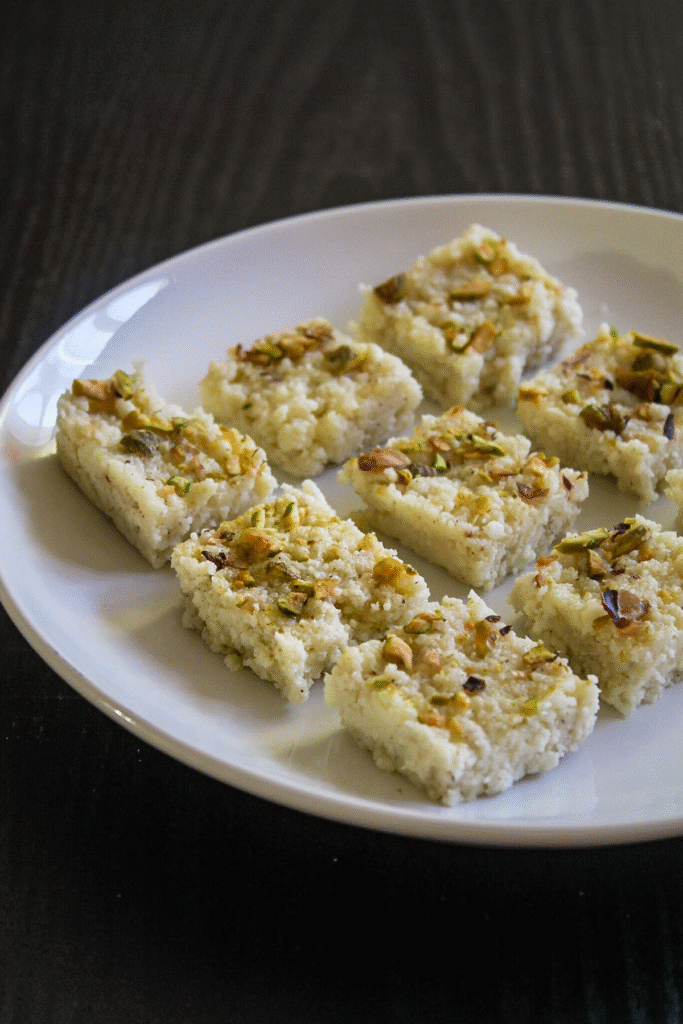
9) Oil the plate or container with ghee. In that pour the blend and spread out equally. Sprinkle the chopped pistachios on best. Utilizing hands, gently press it so pistachios will adhere to the kalakand.
10) Allow the kalakand to cool down completely at room temperature. Let it rest undisturbed until it sets firmly into shape. Once cooled and solidified, take a sharp knife and carefully cut it into neat square or rectangular pieces. Gently lift each piece out of the tray, taking care not to break them. Your homemade kalakand is now ready to be served — a delicious, melt-in-the-mouth treat perfect for festivals, celebrations, or simply indulging your sweet tooth.

🥣 Storage Instructions For Kalakand
- Kalakand, a beloved Indian sweet, is best enjoyed fresh and tends to maintain its optimal taste and texture for only a few hours when kept at room temperature. Beyond that, its quality may begin to deteriorate, especially in warm or humid conditions. To keep the sweet fresh and safe for consumption, it’s best to store it in the refrigerator where it will maintain its quality and flavor.
- When placed in an airtight container and refrigerated properly, Kalakand can stay fresh for up to a week without compromising much on flavor or consistency. This method of storage helps prevent spoilage and maintains its soft, grainy texture.
- Particularly if you reside in a region with high temperatures or humidity, refrigeration is not just a suggestion—it becomes essential. The warm and moist air can accelerate bacterial growth and spoil dairy-based sweets like Kalakand much faster. Therefore, to enjoy this traditional delicacy for a longer duration, always opt for refrigeration in such climates.
📖 Variations For Kalakand Sweet
- To elevate the flavor profile and aroma of your kalakand, consider adding fragrant floral essences such as rose water or kewra water. These traditional natural extracts infuse the sweet with a delicate and refreshing scent that beautifully complements the creamy texture of the dessert. Just a few drops are enough to impart a subtle yet distinctive aroma that enhances the overall sensory experience, making your kalakand stand out with a gentle floral undertone.
- Another wonderful way to enhance both the color and taste of your kalakand is by incorporating saffron. Begin by soaking a small pinch of saffron strands in warm milk, allowing the vibrant golden hues and unique flavors to fully infuse. Once the milk takes on a rich yellow tint, add it gradually to your kalakand mixture during cooking. This not only imparts a beautiful, appetizing yellow color but also lends a fragrant, slightly sweet, and luxurious taste that elevates the traditional milk-based sweet to a more festive and elegant treat.
- Make chocolate kalakand by including a tablespoon of cocoa powder as before long as it begins to thicken. You may require to increment the sugar sum by 1-2 tablespoons
- Make rose kalakand by including a tablespoon of rose syrup.
- To make gur kalakand, include jaggery powder instep of sugar.
- You can make mango flavored kalakand one by including 1 cup of mango puree. In this case, you require to increment the cooking time as mang mash too has moisture.