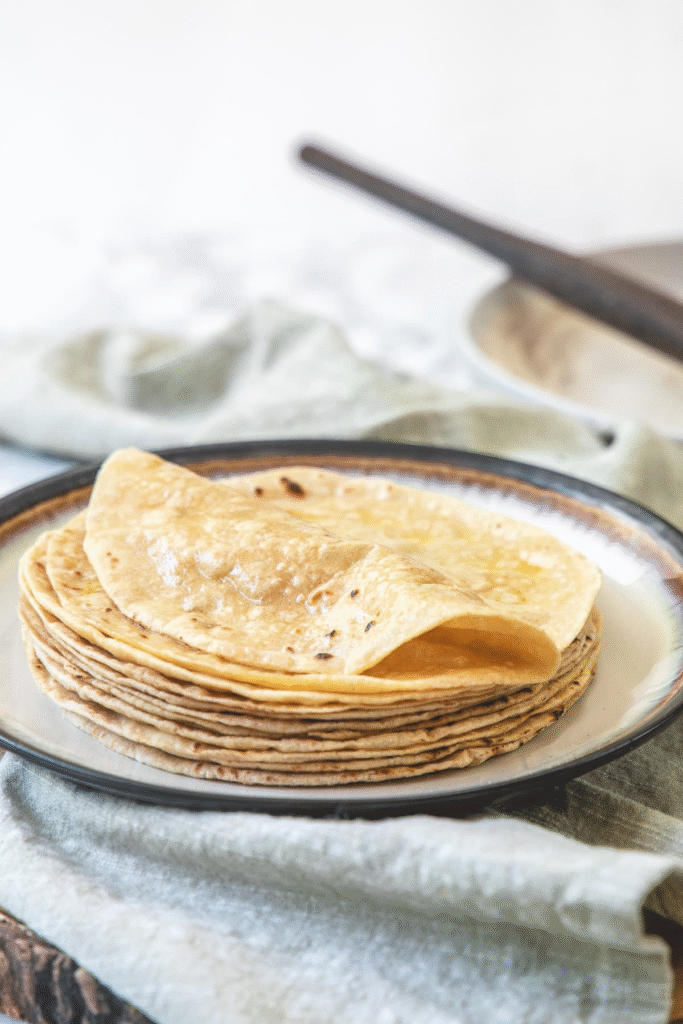
Roti, also called rotli in Gujarati or phulka in many parts of India, is a soft, round flatbread that’s a daily essential in countless Indian households. It’s comforting, simple, and incredibly versatile. With just three basic ingredients—flour, water, and a pinch of salt—you can create this wholesome bread right in your kitchen. A touch of ghee brushed over the top adds that final hint of richness.
Whether you’re a beginner or want to improve your technique, this guide will walk you through how to make roti that’s soft, fluffy, and puffed up just right, every single time. Read on for foolproof tips and tricks!
What is Roti?
Roti is a classic Indian flatbread crafted from whole wheat flour, locally known as gehu ka atta or chapati atta, and is a staple in countless Indian households. It is a staple in many Indian households and is known for its simplicity and wholesomeness.
The dough is prepared by gradually mixing water into the flour, sometimes with a pinch of salt, and kneading it into a soft, pliable consistency. After resting, divide the dough into uniform, small portions by rolling it into evenly sized balls
Each dough ball is flattened and gently rolled out into a round shape using a chakla (rolling board) and a belan (rolling pin). The rolled-out discs are then placed on a hot tawa (griddle) and cooked lightly on both sides.
To achieve the perfect puff, the partially cooked roti is transferred directly to an open flame, causing it to balloon with steam – a sign of soft and well-kneaded dough.
After cooking, a light smear of ghee is spread over the roti, enhancing its flavor and giving it a touch of richness. It pairs beautifully with a variety of dishes, including vegetable curries, dals, or dry sabzis.
Unlike parathas, which are often layered and cooked with oil or ghee, this type of roti—often called phulka—is oil-free and light, making it a healthy and easily digestible choice. It’s a daily comfort food in many Indian homes, celebrated for both its nourishment and versatility.
Roti, Rotli, Phulka, Or Chapati?
Throughout India, this cherished flatbread is known by various regional names—rotli in Gujarat, phulka in Maharashtra, and chapati in northern states—yet its soul and simplicity remain unchanged across cultures.
The base dough is universally simple: made with whole wheat flour, a pinch of salt, and enough water to bring it all together into a soft, pliable ball. The variation lies not in the ingredients but in regional preferences for thickness and cooking technique.
For instance, Gujarati rotli is known for its paper-thin, delicate texture, while North Indian rotis or chapatis are typically a bit thicker, offering a slightly chewier bite. Then there’s the method of cooking—some prefer to cook the flatbread on a hot tawa (griddle) briefly before puffing it directly over an open flame, as seen with phulkas and rotlis. This gives them a signature balloon-like puff and soft texture.
On the other hand, certain types of chapatis or thicker rotis are cooked entirely on the tawa. To encourage puffing, a gentle press with a cloth or spatula helps. In some households, a touch of oil is added to the tawa while cooking—blurring the line between chapati and paratha, and lending a slightly crispier finish
🧾 Ingredient Notes
Take a look at the essential ingredients you’ll need to prepare soft, homemade rotis—simple staples found in every Indian kitchen
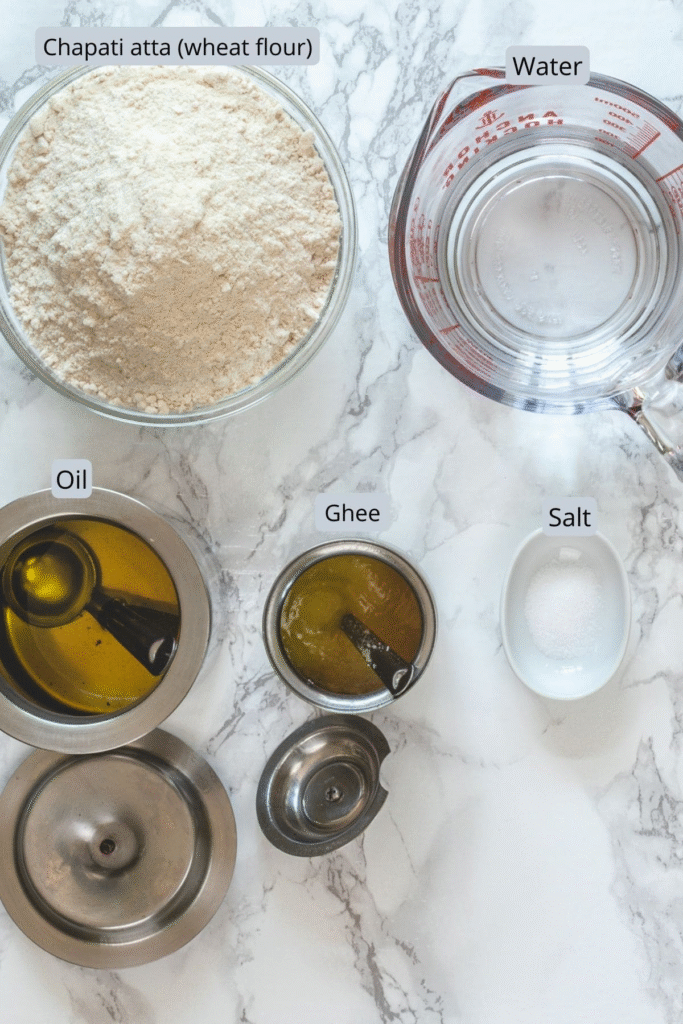
- Whole wheat flour (atta): The whole wheat flour used in Indian kitchens—known as atta—is quite different from the typical whole wheat flour found in American supermarkets.
- Atta is traditionally milled from a semi-hard variety of wheat, commonly known as durum wheat, which is naturally high in protein. What sets it apart is the method of milling. In India, atta is ground using traditional stone mills, also called chakki. This stone-grinding process generates heat through friction, which gently toasts the wheat during grinding. As a result, the flour develops a distinct nutty aroma and deeper flavor, which is why rotis and other Indian flatbreads made from chakki atta have such a unique taste.
- Growing up in India, I remember my mother grinding fresh wheat at home using a stone mill (ghanti). Some families still take their wheat to a local mill and have it ground fresh every week for that authentic flavor and texture.
- However, in the USA, fresh chakki-ground atta isn’t easily available. Instead, I rely on Indian grocery stores to buy ready-made chapati atta. My go-to choices are sharbati atta—a soft, high-quality wheat flour—or trusted brands like Royal Chakki Atta and 24 Mantra Organic Atta, which come close to the traditional taste and texture.
- Salt: This is a personal preference. In my mother’s kitchen, a pinch of salt is always added while kneading the dough to enhance the flavor. However, my in-laws prepare their rotis without any salt, letting the wheat’s natural taste shine through.
- Water: Use either lukewarm or room temperature water to bring the dough together. Using warm water while kneading the dough results in a softer, more pliable texture—this ultimately leads to rotis that puff up beautifully and turn out soft and fluffy
- Oil: Just a few drops of oil are applied after kneading to make the dough smooth and pliable. It also prevents the surface from drying out while the dough rests.
- Ghee: Traditionally, a dollop of ghee is brushed on top of the hot phulka right after it’s off the flame, adding a rich aroma and flavor. For a vegan version, feel free to skip this step or replace it with a plant-based alternative like vegan butter or oil.
👩🍳 How To Make Roti Recipe? (Stepwise Photos)
Kneading The Dough:
- You can either knead the dough manually or rely on a stand mixer like KitchenAid for convenience.
- If you’re preparing a small portion, it’s best to go the traditional route and knead the dough by hand—it gives you better control and texture.
- However, when using a stand mixer, make sure to use at least 2 cups of flour. Using less than that may not provide enough volume for the dough hook to work effectively. Feel free to scale up, but don’t go below this minimum quantity
1) Add Ingredients to Bowl: Start by placing whole wheat flour (chapati atta) and salt (if you’re using it) into the bowl of your stand mixer.
2) Start Mixing on Low Speed: Attach the dough hook and set the mixer to the lowest setting (usually “stir”). While the mixer is running, gradually pour in the water from the side of the bowl.
3) Form the Dough: Once all the water has been added, slightly increase the speed (to level 2 or 4) and allow the mixer to bring the dough together. Pause occasionally to check the consistency—if it looks dry or crumbly, add a splash of water; if it’s sticky, sprinkle in a bit more flour. Continue kneading until you get a soft, cohesive dough.
4) Add a Touch of Oil: Drizzle about ½ teaspoon of oil over the dough.
5) Final Kneading: Use your palm to knead the dough 2 to 3 times just to smooth it out. The oil helps to keep the surface from drying out while the dough rests.
6) The dough should have a soft, supple, and elastic texture. If it turns out stiff or dry, that’s a sign you may have added too little water. On the other hand, if it feels overly sticky or wet, you’ve likely added too much water. Adjust as needed to achieve the right consistency.
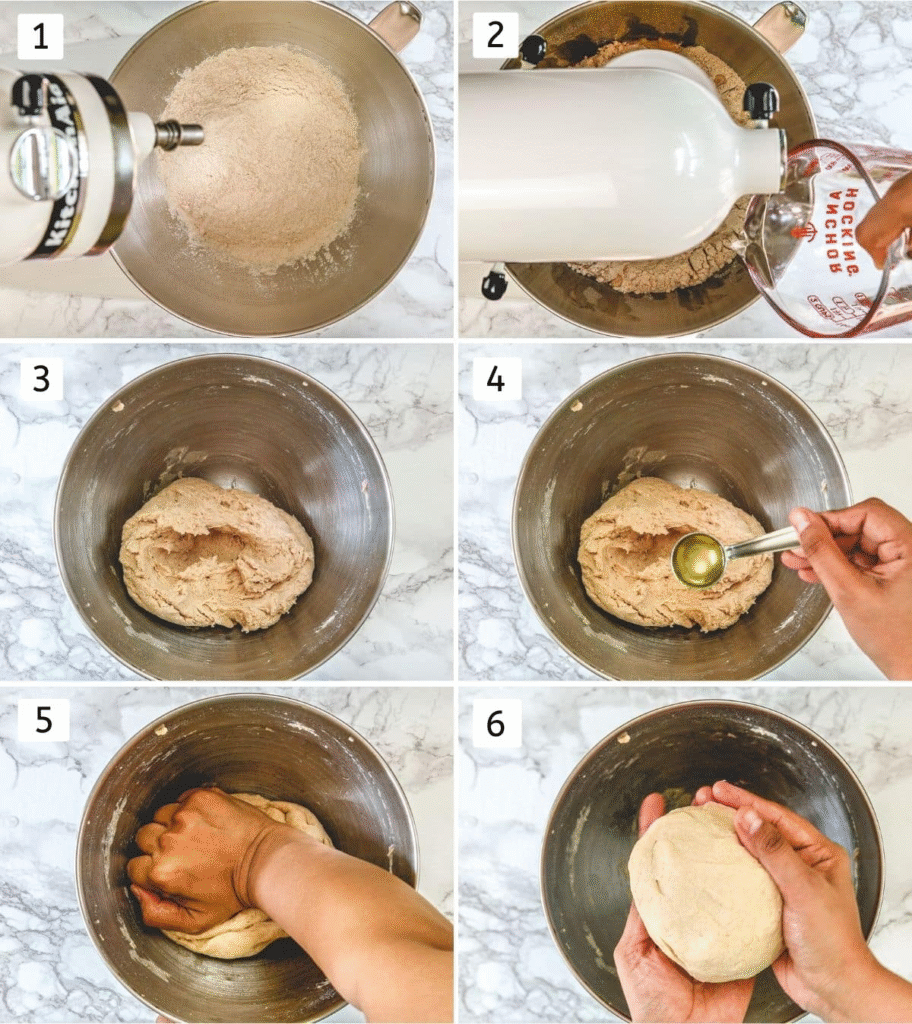
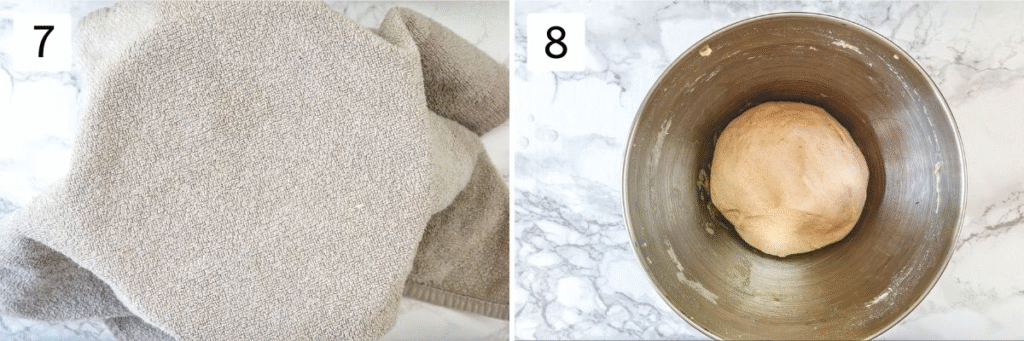
7) Once kneaded, cover the dough with a clean cloth or an inverted plate and allow it to rest for at least 10–15 minutes. You can extend this resting time up to 45 minutes for even better results—this helps the gluten relax, making the dough easier to roll and yielding softer rotis.
8) Post-Rest Touch-Up: If salt was added, you might see faint white specks on the surface after resting—that’s completely normal. Simply knead the dough once or twice to bring it back to a smooth finish before rolling.
Note: I’m preparing traditional Gujarati rotli, which are rolled out very thin. From 2 cups of flour, you can expect to make around 20 rotlis. However, if you’re making slightly thicker rotis like the North Indian style, the same quantity of flour will yield approximately 12 to 15 rotis, depending on the size and thickness.
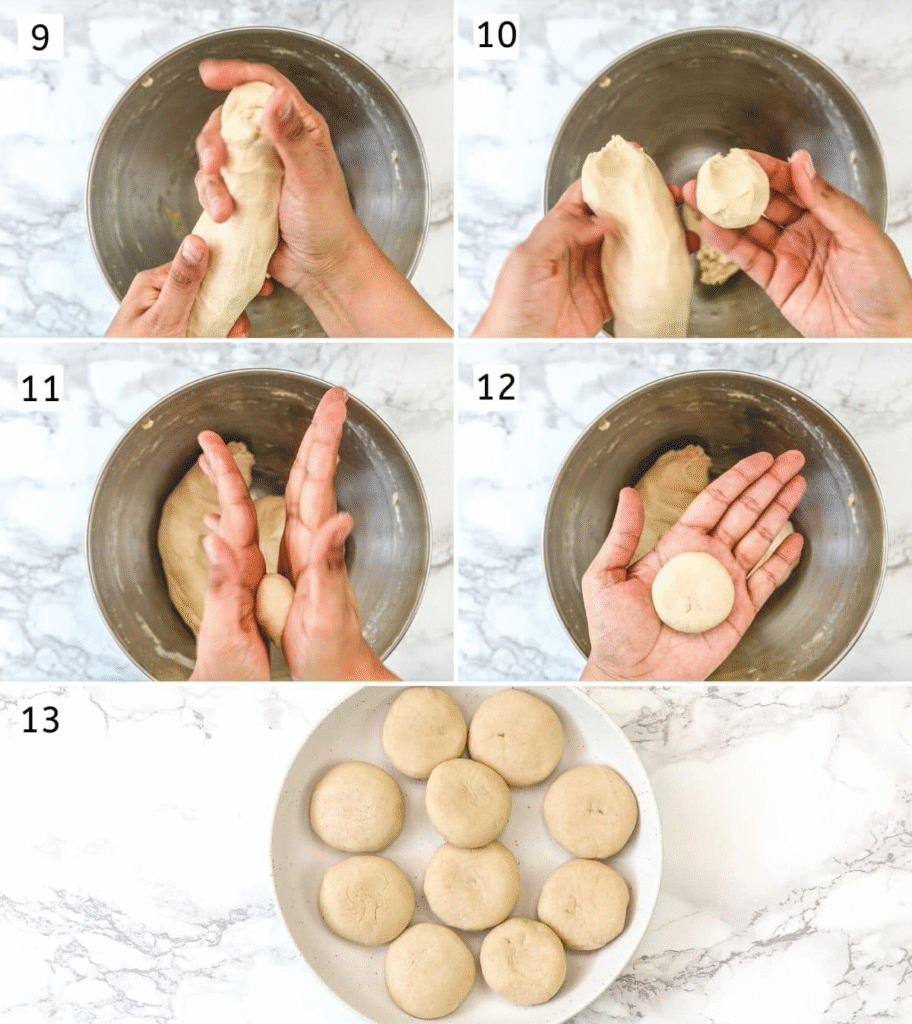
9) Split the prepared dough into two equal halves. Shape one portion into a smooth log by gently rolling it back and forth between your palms or on the countertop until it forms a uniform cylinder.
10) With your fingertips, gently break off small, even-sized pieces from the rolled log to create individual dough portions.
11) Roll each piece between your palms until it forms a smooth, round ball without any cracks.
12) Gently flatten the dough ball by pressing it between your palms to create a slightly thick disc.
13) Continue shaping the remaining dough in the same way. Place the prepared discs on a plate and keep them covered with a clean cloth or lid to prevent them from drying out while you roll and cook each roti.
Rolling The Roti:
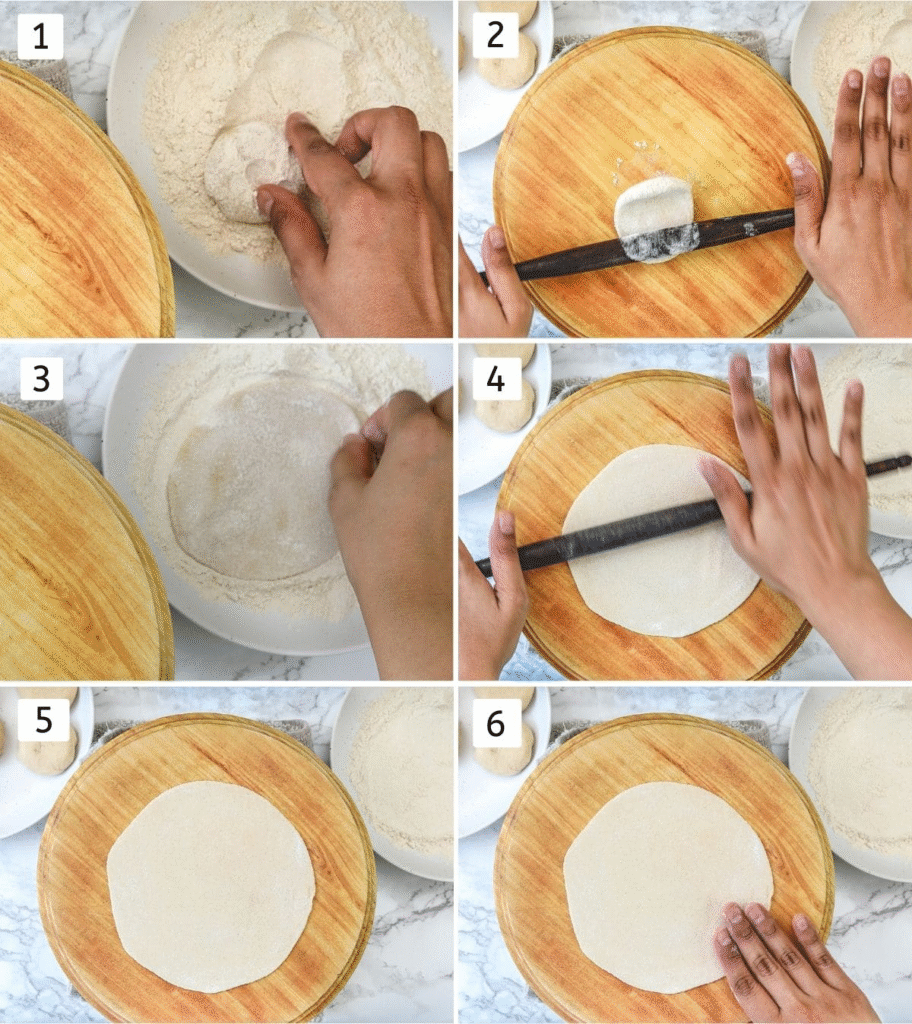
1) Lightly coat both sides of the flattened dough disc with dry flour to prevent sticking while rolling.
2) Begin rolling the dough into a circular shape. Ideally, the disc should naturally rotate as you roll—this skill develops with time and practice. Don’t worry if it doesn’t turn on its own; simply adjust it by hand to keep it moving and prevent sticking to the rolling surface.
3) About halfway through rolling, dust both sides with a little more dry flour. Be cautious not to overuse it—excess flour can make the roti dense and may burn on the pan, leaving dark patches.
4) Continue rolling until the roti reaches around 6 inches in diameter and has an even thickness throughout..
5)Avoid rolling it too thick, as this will slow down cooking and may leave the rotis rubbery or chewy.
6) If you’re new to rolling rotis, feel the surface with your fingertips to check for uneven thickness. If you find thicker or thinner spots, adjust by gently rolling those areas to achieve a uniform surface.
Cooking Roti On Tawa:
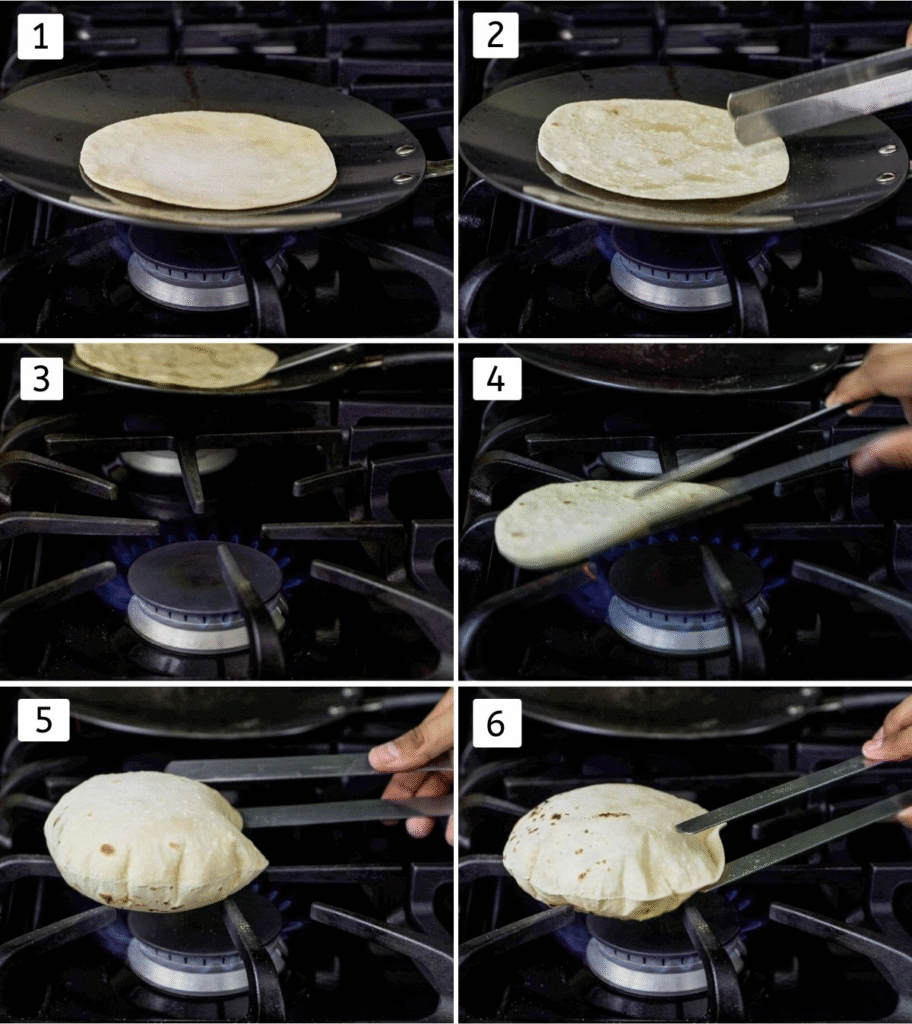
1) Preheat your tawa (flat skillet) over medium-high heat. Once it’s hot enough, gently place the rolled roti on the tawa. Within 30 seconds, you’ll start to see small air pockets forming on the surface.
2) Flip the roti using tongs. You’ll notice some light brown spots on the bottom. The bubbles on top will begin to enlarge as this side cooks. Let it cook for about 30 seconds—no more.
3) Gently remove the tawa from the flame and place it on a cooler part of the stove or an unused burner. Then, turn the main burner to high heat to prepare for the next step.
4) Using tongs, flip the roti so the side that was facing up now touches the open flame. Place it directly on the flame for it to puff up beautifully.
5) Almost instantly, the roti will balloon up from the steam building inside.
6) As soon as it puffs fully, gently flip it over using the tongs. Let the other side cook directly on the flame for just 2–3 seconds. Be extremely cautious at this stage, as the roti can tear and release hot steam that may burn your fingers.
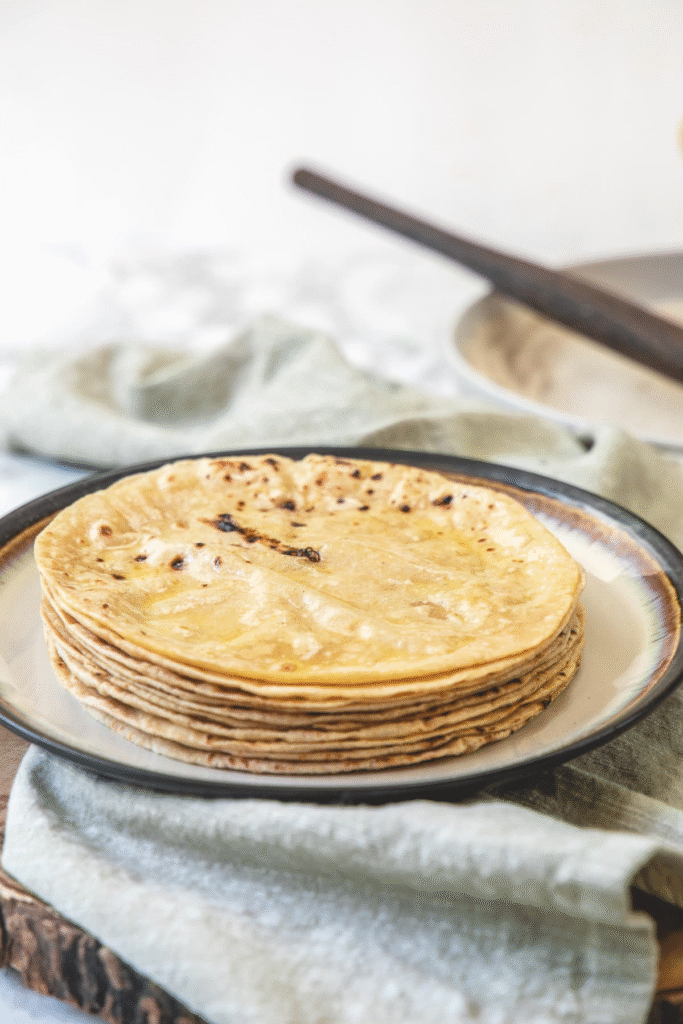
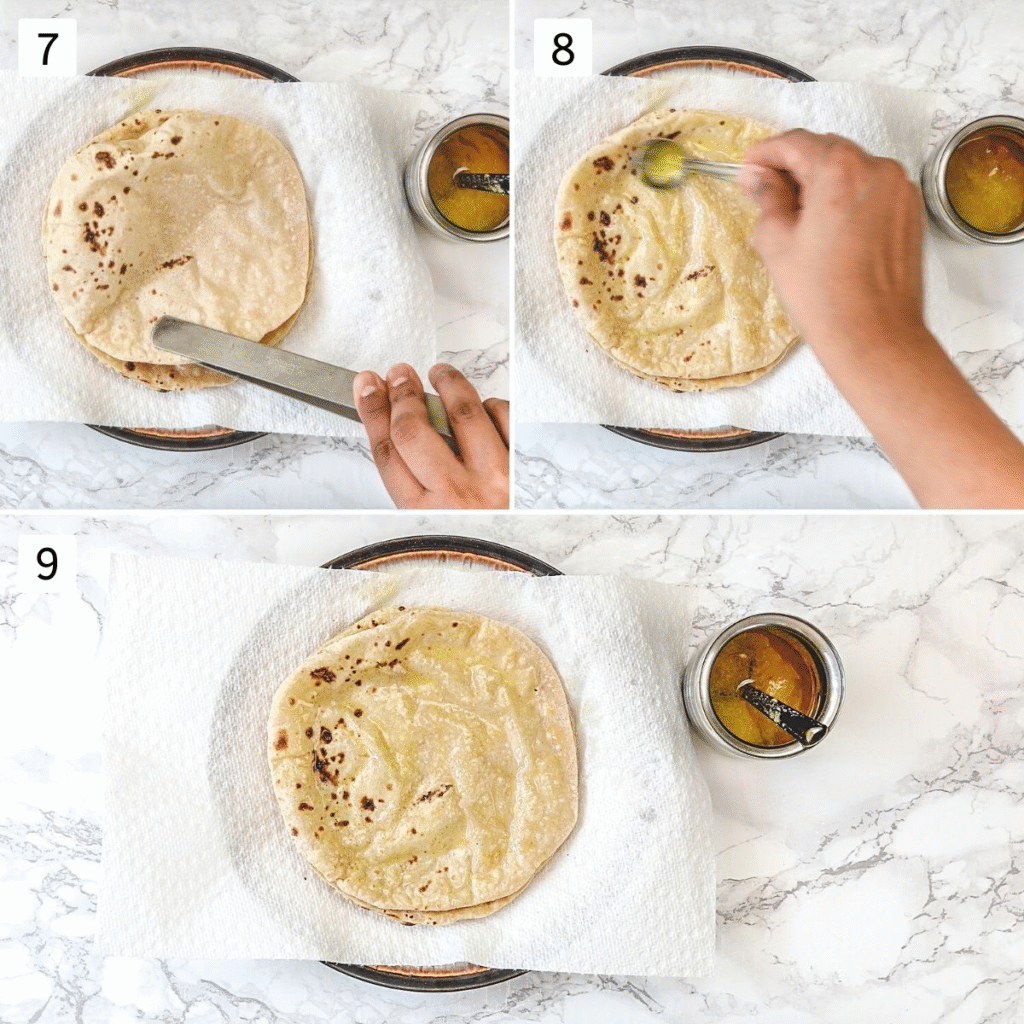
7) Once both sides are cooked, transfer the phulka to a plate lined with a clean cotton cloth or paper towel. This helps absorb excess moisture and keeps the rotis soft without making them soggy.
8) While still warm, lightly brush each roti with ghee. This helps retain the steam within, ensuring the phulkas stay moist and soft for an extended period.
9) Lower the heat to medium-high and carefully place the tawa back onto the stovetop. Continue the same process for the remaining dough balls, stacking the finished rotis one over the other to retain warmth and softness.
💭 Expert Tips To Make BEST Roti
Crafting soft, round rotis is an art that improves with time and repetition. If you’re just starting out, don’t worry—everyone begins somewhere! The tips below will help set you on the right path. With each attempt, you’ll find your technique getting better and your rotis turning out softer and more uniform. Practice truly makes perfect!
Roti Dough Tips
- Kneading the dough with warm water results in softer and fluffier rotis, especially helpful for beginners. Once you get the hang of it, using room temperature water works just as well and won’t affect the texture significantly.
- When kneading dough by hand, always add water little by little. Dumping it all in at once can result in a sticky mess that’s tough to work with and hard to fix.
- Once the dough has roughly formed, begin the kneading process: stretch it out with the heel of your palm, fold it back, and repeat the motion. This process develops the gluten, making the dough elastic, soft, and easy to roll.
- The final dough should be smooth and supple, not too wet or sticky, and definitely not tight or hard. If the dough feels sticky to the touch, sprinkle in a bit of dry flour and knead again. On the other hand, if the dough feels stiff, add a tablespoon of water at a time and knead until you get the right consistency.
- Adding a few drops of oil and gently massaging the dough toward the end of kneading makes a big difference. It helps create a silky, uniform dough texture, making it much easier to roll out rotis with smooth, crack-free edges and an even shape.
- Whether you’re using a stand mixer or your hands, knead the dough thoroughly until it’s smooth and pliable. This is essential for forming gluten, which gives your rotis their signature softness.
- Don’t skip the resting step—let the dough sit covered for at least 15 minutes. This allows the gluten to relax and the moisture to distribute evenly, which results in soft, easy-to-roll, and puffier rotis.
Rolling Tips:
- Place a clean kitchen towel or napkin underneath the rolling board (chakla) to keep it steady and prevent it from slipping while you roll. A stable surface ensures better control and uniform shaping.
- Ensure that both the dough balls and the flattened discs are smooth and without any cracks before rolling. This helps you achieve evenly shaped rotis with neat, round edges and prevents tearing while rolling.. Starting with smooth dough helps achieve nicely rounded rotis with clean edges as you roll.
- Aim for an even thickness throughout the roti. Consistent pressure while rolling helps it puff up properly when cooked. If some parts are thicker than others, those sections might remain undercooked and won’t puff.
- Avoid rolling the roti too thin—it shouldn’t resemble paper. An overly thin roti tends to harden like a papad after cooking.
- When dusting with dry flour to stop the dough from sticking, use only a light sprinkle—just enough to form a thin layer that keeps it from clinging, without coating it too heavily.
Cooking Tips:
- Make sure the tawa is thoroughly preheated before laying the roti on it—this helps it cook evenly and puff up beautifully.. If it’s not hot enough, the roti will take longer to cook and may turn tough or chewy.
- Carefully place the rolled roti onto the hot tawa, making sure it lies flat and touches the surface evenly without any air pockets. There should be no trapped air between the surface of the tawa and the roti; otherwise, it may cook unevenly.
- For puffing the roti on direct flame, turn the heat up to high. The intense heat encourages it to puff quickly and evenly.
- Use the suggested cooking times in recipes as a flexible reference point. Depending on how thick or thin the roti is rolled, the type of tawa you use, and the strength of your flame, cooking time can differ slightly. Don’t hesitate to tweak things—practice and observation are key to mastering soft, fluffy rotis.
🥣 Storage & Reheating Rotli
- oti can remain fresh at room temperature for an entire day if stored properly in an insulated or airtight container.
- To prevent the rotis from becoming soggy, place a paper towel at the bottom of the container—it helps absorb excess moisture.
Reheating Tip: When I make rotis in the morning to eat for lunch, I usually skip reheating altogether and enjoy them at room temperature, which preserves their softness. However, for rotis that are a day old, I recommend reheating them in the microwave for just a few seconds. Be sure to eat them immediately after reheating, as they tend to dry out and become chewy if left to sit.
Packing Roti for lunch
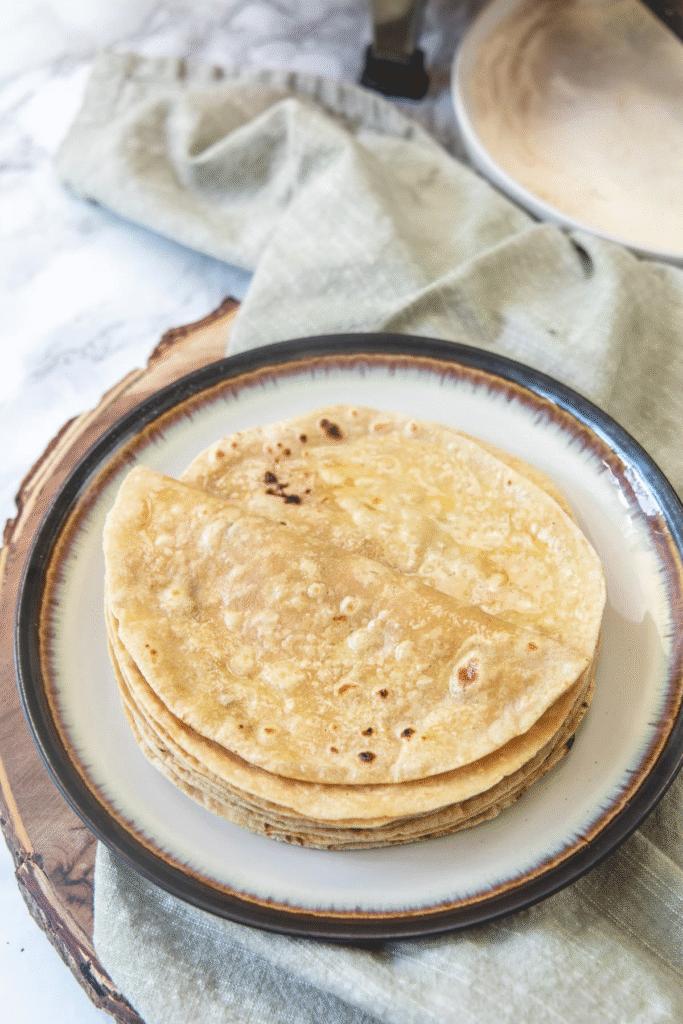
- As you finish cooking each roti, stack them one by one on a plate lined with a paper towel. Once all the rotis are ready, transfer the entire stack—along with the paper towel—into a round container.
- Allow the rotis to cool slightly by leaving the lid loosely covered for 5–10 minutes. This helps release steam and prevents sogginess.
- After cooling, place another paper towel over the top of the stack and seal the container with the lid. The top paper towel will help soak up any residual moisture.
- Avoid folding or rolling the rotis—keep them flat. For best results, use a round, shallow takeout container similar to those used for curry or dal from Indian restaurants.
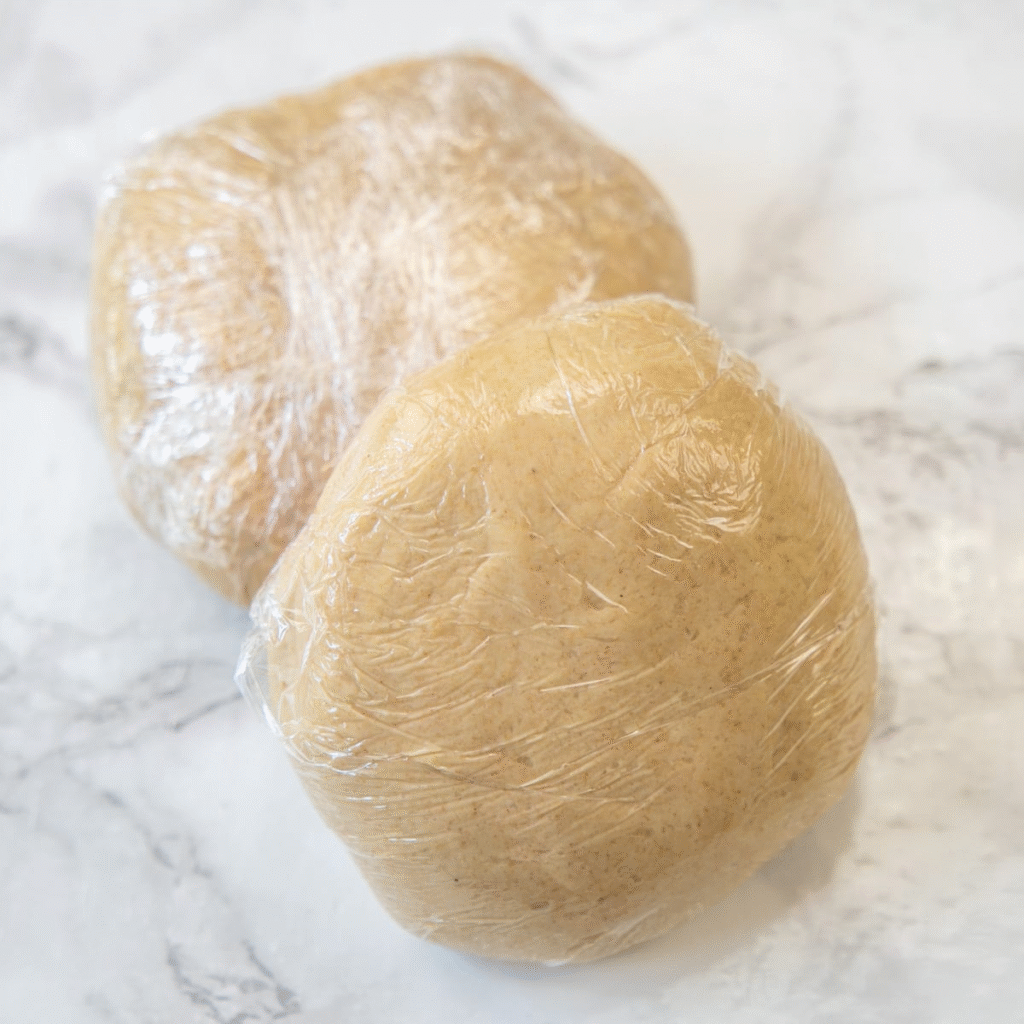
Storing the Roti dough
- Wrap the prepared roti dough tightly in plastic wrap and refrigerate it for up to 24 hours only. If I plan to make rotis early in the morning for lunchboxes, I prefer to knead the dough the night before and refrigerate it overnight. The next morning, I allow the dough to come to room temperature before rolling and cooking the rotis.
- For longer storage, you can freeze the dough. When properly wrapped in plastic and stored in an airtight container, it stays good in the freezer for up to 3 months. I often make a large batch of dough using my KitchenAid stand mixer, then portion it out and freeze smaller sections that I’ll use over the next couple of weeks.
- To thaw, place the frozen dough portion on the kitchen counter for about an hour or let it sit in the refrigerator for several hours until it softens completely. Once thawed and at room temperature, it’s ready to be rolled into rotis as usual.