
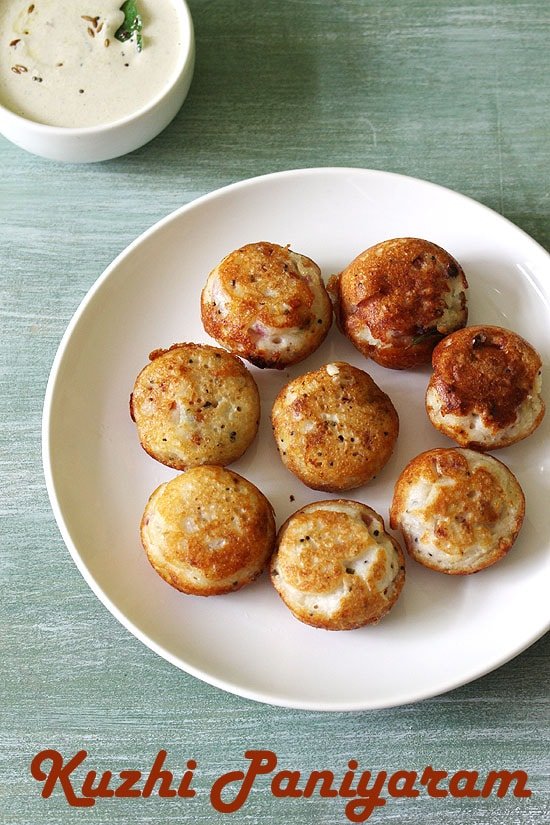
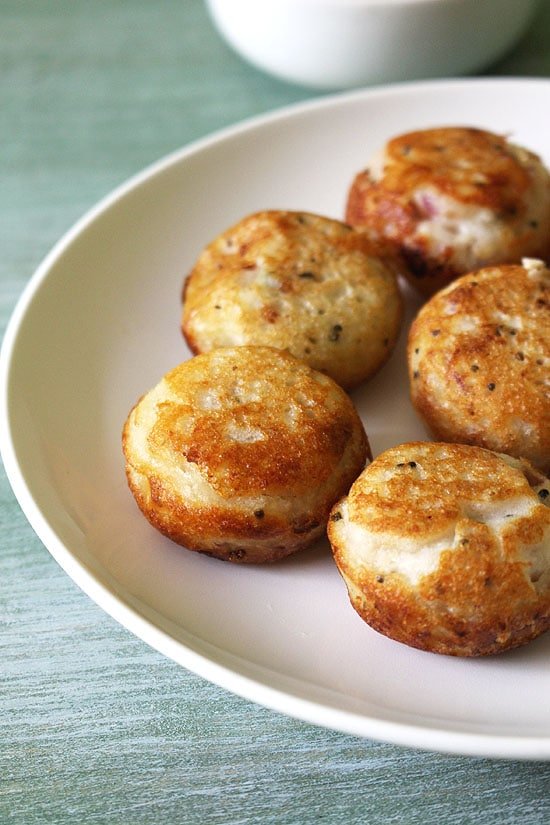
Kuzhi Paniyaram is a popular South Indian delicacy known for its crispy exterior, soft interior, and rich, savory flavor. Made from leftover idli or dosa batter, this dish is often served with coconut or tomato chutney and makes a perfect breakfast, evening snack, or light meal.
You might hear it referred to by different regional names—appe in Marathi, ponganalu in Telugu, or paddu in Kannada—but the preparation method stays more or less the same across the board.
There are many ways to prepare paniyaram. You can make them sweet, savory, or plain depending on the occasion and your taste preference. In comparison, the plain ones are similar to mini idlis, but they stand out with their crispy, golden-brown crust.
Today, we’re going for a savory version loaded with flavor, enhanced with chopped onions, green chilies, fresh coconut, and a touch of spice.
To prepare this dish, you’ll need a special cooking pan with small, round cavities. In South India, it’s known as paniyaram chatti, and it’s a staple in most kitchens. If using a cast iron pan for the first time, make sure it’s well-seasoned before use to prevent sticking.
Before getting started, if you’re using a cast iron pan for the first time, ensure it’s properly seasoned to avoid the batter from sticking.
Since we’re using leftover batter, it’s important to let it come to room temperature before cooking. Cold batter can lead to uneven cooking and may leave the center undercooked. Letting the batter rest at room temperature ensures evenly cooked, fluffy paniyarams every time.
Ingredients
- 2 cups Idli/Dosa Batter: Use leftover idli or dosa batter for best results—slightly fermented batter adds a wonderful tang and softness to the paniyaram.
- 1 tablespoon Oil: This oil is for preparing the tempering that enhances the flavor and texture of the batter.
- 1 teaspoon Mustard Seeds: Imparts a gentle nuttiness and brings a distinct crackle when added to hot oil during tempering.
- One teaspoon Urad Dal (split, skinless black gram): When lightly fried, urad dal develops a golden hue and contributes a pleasant crunch along with a rich, nutty fragrance to the recipe.
- 1 teaspoon Ginger Paste or Freshly Grated/Crushed Ginger: Ginger gives a warm, slightly spicy undertone, aiding digestion and balancing the flavors.
- 2 Green Chilies, Finely Chopped: These chilies lend a gentle heat—adjust quantity as per your spice preference.
- 10–12 Curry Leaves: Fresh curry leaves play a crucial role in delivering the authentic aroma and rich flavor characteristic of traditional South Indian dishes.
- 1 Medium or ¾ Cup Red Onion, Chopped: Use finely chopped red onions for their mild sweetness and crunchy texture when cooked.
- Salt, to Taste: Taste the batter before adding salt, especially if it already has salt from its initial preparation.
- 3 tablespoons Coconut (Fresh or Frozen): Adds natural sweetness and soft bite to the paniyaram—use fresh grated coconut if available, or thaw frozen coconut before use.
- 3–4 tablespoons Oil, for Cooking Paniyaram: This oil is used to grease the paniyaram pan molds, ensuring they cook evenly and turn golden with a crisp outer layer.
Step-by-Step Instructions:
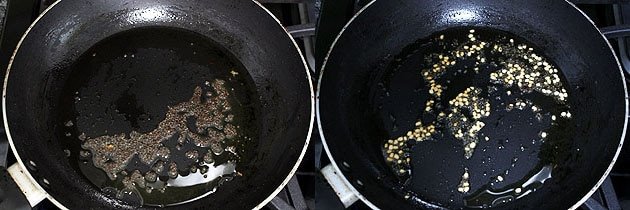
1) Begin by heating the oil in a pan over medium flame. Wait until the oil is sufficiently hot before proceeding to the next step. This ensures the tempering ingredients release their full flavor.
2) Add the mustard seeds to the hot oil and allow them to crackle and pop. The popping noise signals that the mustard seeds have tempered correctly, releasing a delicate nutty fragrance into the oil.
3) Then, gently add the urad dal to the pan and cook it while stirring until it turns lightly golden. Stir continuously until the dal turns a light golden brown color, taking care not to let it burn, as it adds a lovely crunch and flavor to the dish.
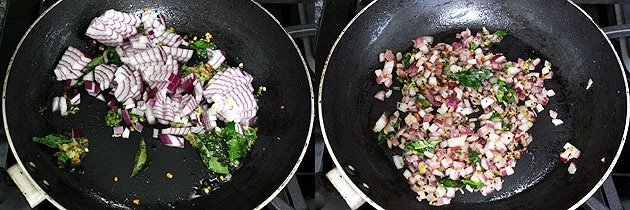
4) Now, introduce the ginger paste, chopped green chilies, and fresh curry leaves to the pan. Stir these ingredients together and cook them for about 40 to 50 seconds, or until the raw pungency of the ginger dissipates and the aroma of the spices fills the kitchen.

5) Add the chopped onions to the tempering, followed by a light sprinkle of salt. The salt helps to soften the onions and draws out their natural moisture, enhancing their sweetness.
6) Mix well and continue cooking the onions until they turn soft and translucent. This stage typically takes a few minutes, during which the onions release their sweetness, blending perfectly with the spices.
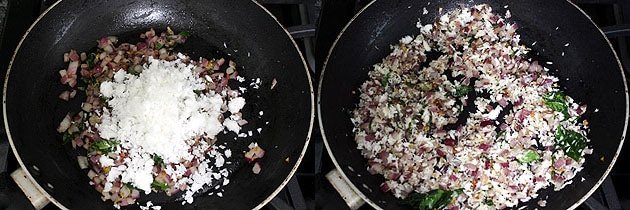
7) Add the freshly grated or thawed coconut to the pan. The coconut adds a subtle sweetness and texture, enriching the overall flavor profile of the mixture.
8) Stir everything together and cook for just 2 to 3 minutes to allow the flavors to meld. Avoid overcooking the coconut to maintain its fresh texture. After this, switch off the stove and allow the mixture to cool slightly before mixing it into the batter.
9) Transfer the idli or dosa batter into a large mixing bowl. If you’re using batter that was refrigerated, make sure it has reached room temperature for better fermentation activity and fluffier paniyarams. Remove it from the fridge ahead of time if necessary.
10) Pour the cooled onion and coconut tempering into the batter. This step incorporates all the flavorful ingredients evenly throughout the batter.
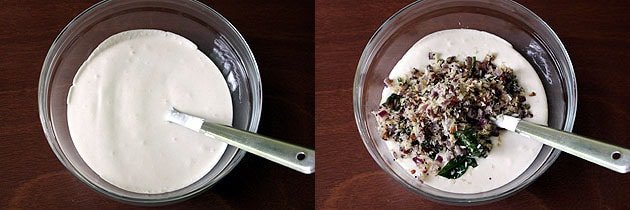
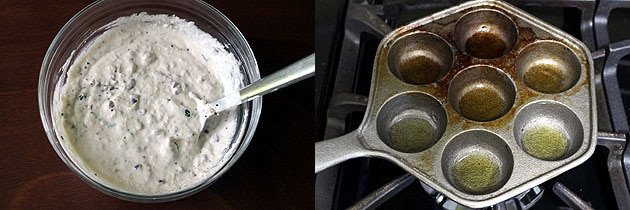
11) Blend the batter and the tempered mixture thoroughly until they are evenly incorporated. Ensure there are no lumps and the mixture is uniform for consistent cooking results.
12) Preheat your paniyaram pan (also known as an appe pan) over medium heat. Drizzle about a teaspoon of oil into each cavity to prevent sticking and to help develop a crispy exterior.
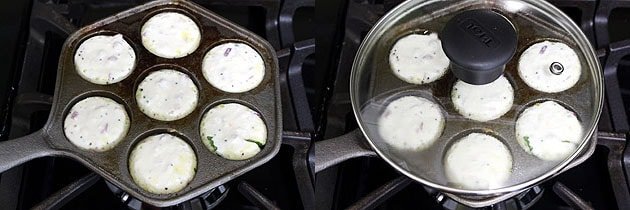
13) Once the pan and oil are hot, carefully spoon the batter into each mold, filling them about three-quarters full. This allows the batter to expand as it cooks, ensuring the paniyarams puff up nicely.
14) Cover the pan with a lid and cook the paniyarams on medium-low heat for approximately 2 to 3 minutes. Cook until the bottoms are golden brown and firm to touch, indicating that they are cooked through on one side.
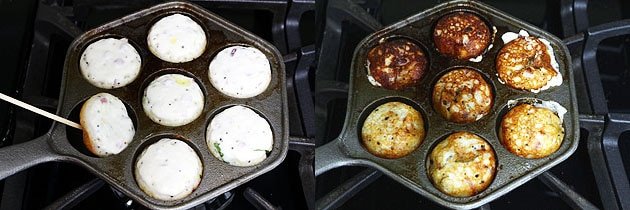
15) Using wooden skewers, chopsticks, or a small fork, gently flip each paniyaram over to cook the other side. Take care to flip them one by one to maintain their round shape and avoid breaking.
16) Keep cooking the other side until it develops a similar golden-brown crust and cooks through completely. This usually takes another 2 to 3 minutes. When cooked, gently lift the paniyarams out of the pan and arrange them on a serving dish.
Serving suggestions for Paniyaram:
Kuzhi Paniyaram pairs wonderfully with a variety of chutneys that complement its flavors perfectly. Popular choices include tangy tomato chutney, creamy peanut chutney, and refreshing coconut chutney. These accompaniments not only add layers of taste but also enhance the overall eating experience, making each bite more delightful. Feel free to experiment with your favorite chutneys or even serve it alongside a bowl of hot, flavorful sambar for a complete South Indian snack or meal.
Expert Tips for Perfect Kuzhi Paniyaram Every Time:
1) Use Well-Fermented Batter:
The key to fluffy and soft paniyarams lies in using properly fermented idli or dosa batter. If the batter is too fresh, the paniyarams might turn dense and heavy. Let the batter ferment at room temperature for at least 8-12 hours or overnight. It should have a slight tangy aroma and be airy and bubbly when ready.
2) Batter Consistency Matters:
Make sure your batter has a balanced consistency—neither too thick nor too watery—to achieve the best results. Ideally, it should have a pourable consistency, similar to pancake batter. If the batter is too thick, add a tablespoon or two of water and mix gently. Too thin a batter will not hold shape in the paniyaram pan and may spread unevenly.
3) Tempering for Flavor:
Tempering (tadka) is an essential step that elevates the flavor of the paniyaram batter. The mustard seeds, urad dal, curry leaves, and ginger infuse the batter with authentic South Indian taste. Make sure to sauté these ingredients well, but avoid burning the urad dal as it can turn bitter.
4) Control the Heat:
Cooking paniyarams requires moderate heat. Overheating the pan can cause the paniyarams to develop a browned exterior while staying undercooked in the center. On the other hand, low heat will result in longer cooking times and less crispy texture. Adjust your stove to medium or medium-low to get the perfect golden crust.
5) Oil for Crispy Exterior:
Don’t skimp on oil! Greasing each cavity of the paniyaram pan generously ensures the paniyarams develop a crispy and golden exterior. You can use neutral oils like sunflower or vegetable oil. Some also prefer using coconut oil for extra aroma.
6) Flipping Technique:
Flipping paniyarams may seem tricky at first, but with practice, it becomes easier. Use wooden skewers, chopsticks, or even a small fork to gently turn each paniyaram. Flip them one at a time to prevent breaking and maintain their round shape.
7) Add-ins and Variations:
Customize your paniyaram by adding finely chopped vegetables like carrots, bell peppers, or spring onions to the batter for extra nutrition and color. You can also add a pinch of asafoetida (hing) during tempering for enhanced digestion and flavor.
8) Serving Suggestions:
Serve fresh and hot paniyarams to enjoy the perfect balance of crispness and softness. Pair them with traditional chutneys such as coconut chutney, tomato chutney, or peanut chutney. To make it a more filling meal, pair the paniyarams with a warm bowl of flavorful sambar.
9) Storage and Reheating:
Store leftover paniyarams in an airtight container and place it in the refrigerator for up to 2 days. To reheat, warm them in a hot skillet or air fryer to restore their crispy exterior. Avoid microwaving because it makes them soggy.