
No Bake Brownies are bound to become your new go-to treat! Not only are they incredibly easy to make—no oven required—but they’re also packed with deep, rich chocolate flavor that satisfies every craving.
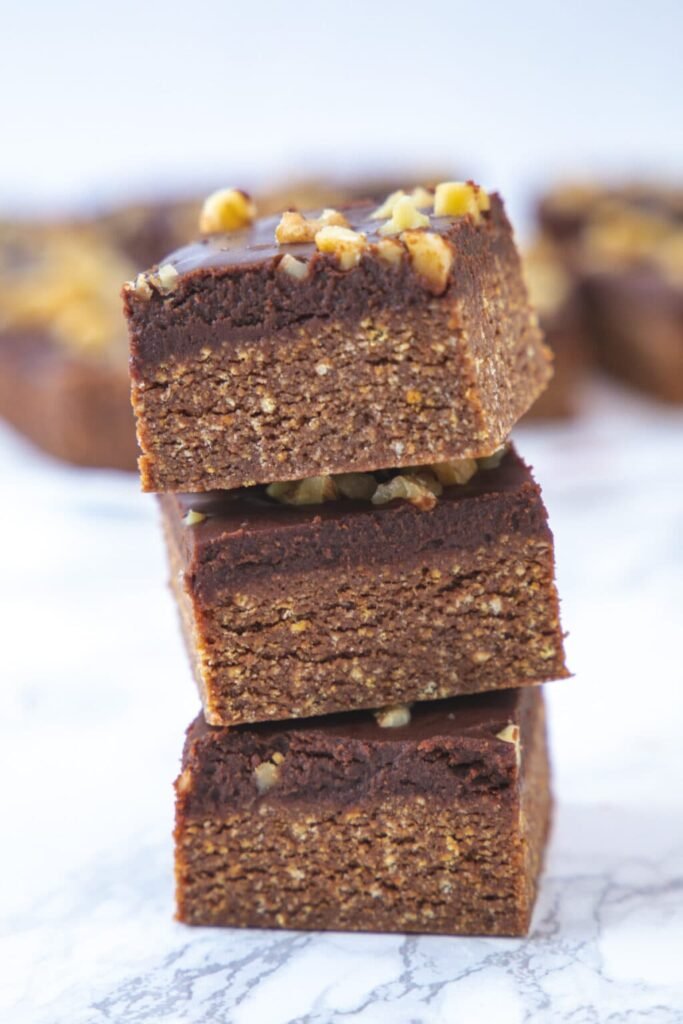
These No Bake Brownies offer the perfect combination of chewy and fudgy textures, giving you that classic brownie feel without the hassle of baking. Made with simple pantry staples and ready in no time, they’re ideal for when you want a quick dessert fix. Whether you’re whipping them up for a party, a late-night snack, or a weekend indulgence, these No Bake Brownies are guaranteed to impress with their decadent, melt-in-your-mouth goodness.
You’ll Love This No-Bake Brownies
- Mix, Spread & Chill — it truly doesn’t get easier than this when it comes to whipping up a delicious batch of No Bake Brownies. With no oven time required, these brownies are a dream come true, especially on hot summer days when you want a chocolatey treat without turning up the heat.
- The process is incredibly simple: just mix the ingredients in a bowl, spread the mixture evenly into a lined pan, and pop it into the fridge to chill. Once firm, slice into decadent squares and savor every fudgy bite. No fancy techniques, no baking, just pure, chocolate-filled satisfaction.
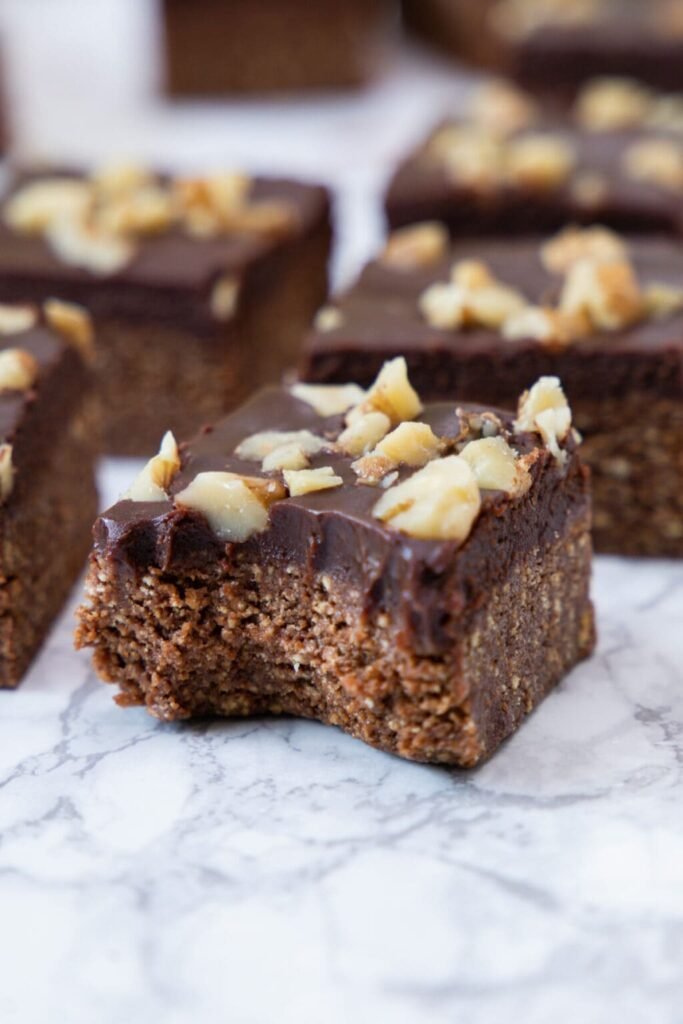
- To take things up a notch, I love adding a smooth layer of rich chocolate ganache on top. While this step is entirely optional, it adds a luscious finish and makes the brownies look and taste even more indulgent.
- For added crunch and texture, I like to sprinkle chopped walnuts over the top. The contrast between the fudgy base and the nutty topping makes every bite more exciting. Of course, you can customize it further with your favorite nuts, seeds, or even a sprinkle of sea salt.
- These No Bake Brownies are not the typical “vegan date-based” versions you often find online. That’s right—no dates here! This recipe keeps it classic, indulgent, and incredibly satisfying without relying on natural sweeteners or vegan alternatives.
- Plus, this recipe is a fun way to bond with your kids in the kitchen. It’s so easy that children can help measure, mix, and press the mixture into the pan. Create sweet memories together while making a dessert that everyone will love.
Ingredient Notes For No Bake Brownies:
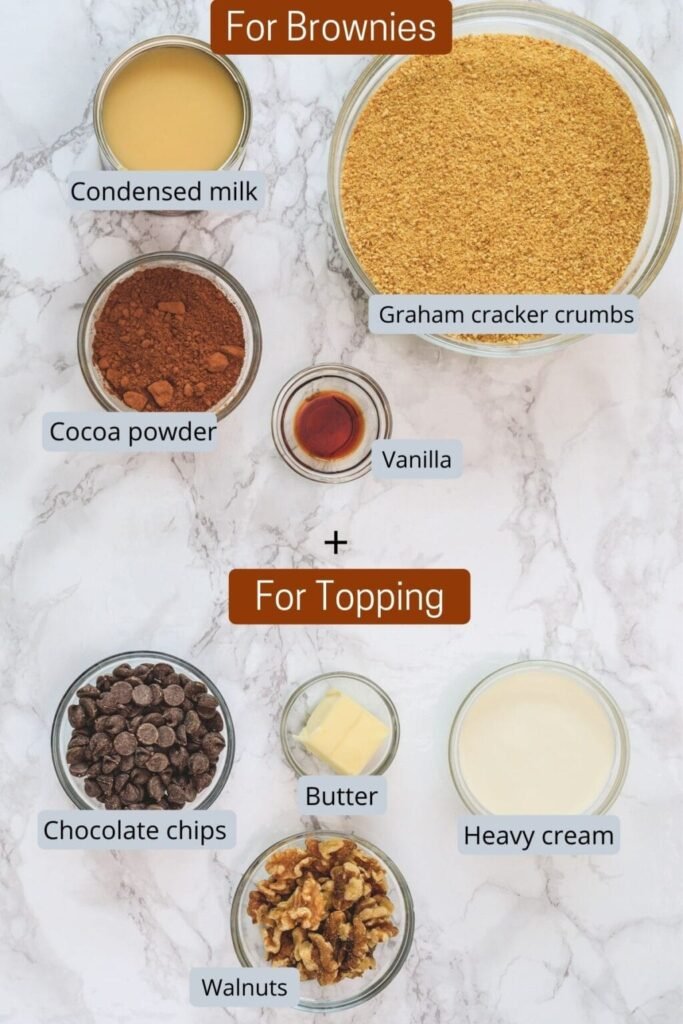
- Cocoa Powder: Always opt for high-quality cocoa powder when making No Bake Brownies. The depth of flavor and overall richness of your brownies will largely depend on the brand and quality of cocoa you choose. A simple rule to follow: use the cocoa powder from a brand whose chocolate you genuinely enjoy eating.
- In my earlier days of baking, I often used Hershey’s cocoa powder, which delivers consistent and reliable results with a pleasant chocolatey taste. However, as my baking journey evolved, I started favoring Ghirardelli unsweetened cocoa powder for its deeper, smoother, and more refined flavor. The quality of cocoa truly sets the tone for the entire batch, so don’t hesitate to splurge a little on a brand you trust.
- Graham Cracker Crumbs: Graham cracker crumbs form the structure and body of no-bake brownies, giving them that chewy, dense bite. You can conveniently purchase pre-crushed graham cracker crumbs at most grocery stores. But if you prefer a more hands-on approach or want to use up a box already in your pantry, simply crush the graham crackers at home using a rolling pin or food processor until fine.
- Don’t have graham crackers? No worries. You can substitute with crushed digestive biscuits, crispy vanilla wafers, chocolate cookies, or even Nilla wafers for a different twist. The key is to choose something crisp and dry that complements the chocolate base while adding subtle flavor and texture.
- These two ingredients—premium cocoa and crunchy crumbs—work in harmony to create no-bake brownies that are rich, chewy, and incredibly satisfying without ever needing to turn on your oven.
How To Make No-Bake Brownies?
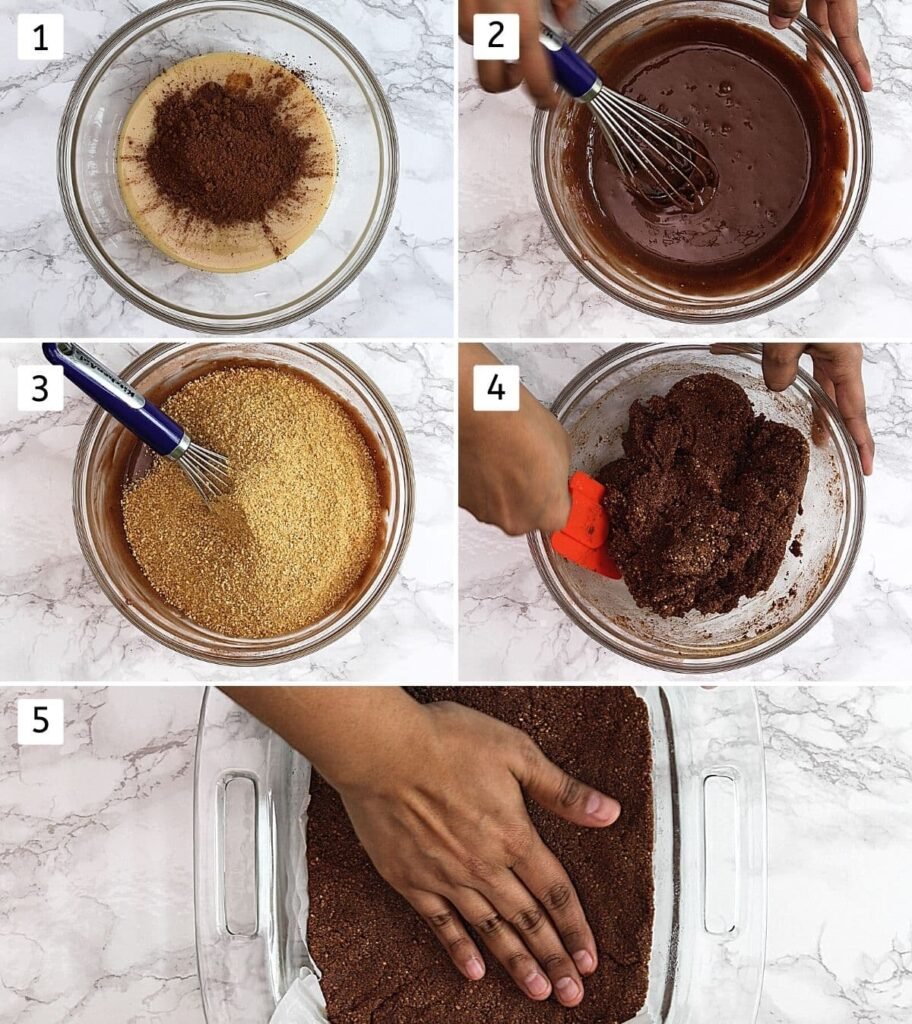
1) Combine Wet Ingredients & Cocoa Powder:
In a large mixing bowl, add sweetened condensed milk, pure vanilla extract, and unsweetened cocoa powder. These ingredients form the rich, chocolatey base of the brownies. Use a good-quality cocoa for best flavor.
2) Mix Until Smooth:
Whisk the mixture until everything is fully combined. If the mixture feels too stiff or thick to mix easily, warm it in the microwave for about 20–30 seconds. This softens it slightly, making it easier to whisk into a smooth, glossy chocolate mixture.
3) Add Dry Ingredients:
Next, stir in the graham cracker crumbs. These help give the brownies their structure and signature chewy bite. You can either purchase pre-made graham cracker crumbs or make your own by crushing whole crackers using a food processor or a rolling pin.
4) Mix Into Dough:
Begin mixing with a whisk, but as the mixture thickens, switch to a spatula or even your hands. Continue mixing until it forms a cohesive, thick dough-like consistency that holds its shape well.
5) Prepare Pan & Shape Brownies:
Lightly grease an 8×8-inch square baking pan with butter or cooking spray. Line it with parchment paper for easy removal later. Transfer the brownie mixture into the pan and use your hands or a spatula to press it down evenly and firmly into all corners. Smooth the surface and refrigerate the pan while you prepare the ganache.
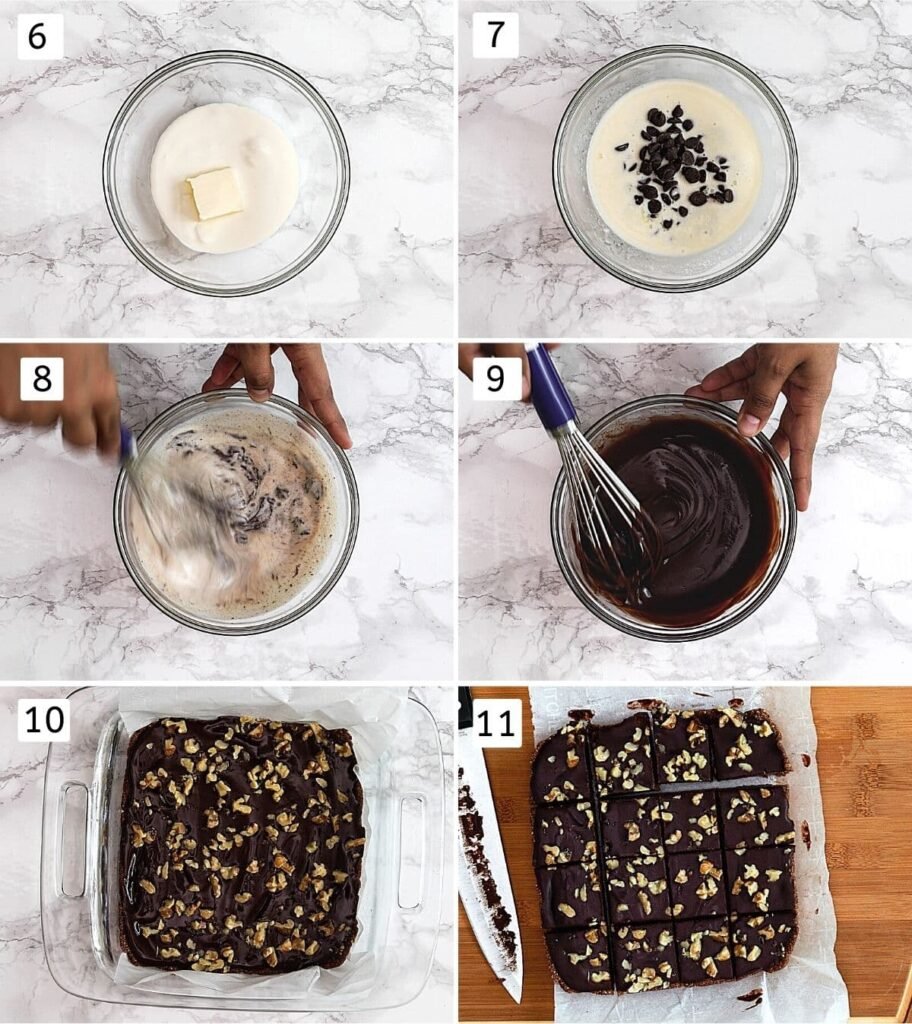
6) Heat Cream & Butter:
Place heavy cream and unsalted butter in a microwave-safe bowl or saucepan. Warm the mixture until it just starts to simmer—avoid prolonged boiling. Stir well until the butter is melted and fully blended into the cream.
7) Add Chocolate Chips:
Pour the hot cream mixture over a bowl of semi-sweet or dark chocolate chips. Let it sit undisturbed for 2–3 minutes. This resting time helps the chocolate soften gently from the heat.
8) Begin to Whisk:
Start whisking the chocolate and cream together. At first, the mixture may appear separated or grainy, but don’t worry—that’s normal.
9) Whisk Until Smooth:
Keep stirring gently and steadily—soon the mixture will turn into a smooth, shiny ganache with a rich chocolatey sheen. This step is key to getting that professional-looking, decadent topping.
10) Assemble & Garnish:
Pour the warm ganache over the chilled brownie base, spreading it evenly with a spatula. While it’s still wet, sprinkle chopped walnuts over the top for added texture and nutty crunch. You can also use almonds, pistachios, or leave it plain if preferred.
11) Chill & Serve:
Place the pan back into the refrigerator for at least 2 hours, or until the ganache is fully set. Once chilled and firm, lift the brownie slab out using the parchment paper, slice into 16 neat squares, and enjoy your rich, fudgy no-bake brownies!
Expert Tips For No-Bake Brownies
- Line the pan with parchment paper: Always use parchment paper to line your 8×8-inch square pan so the brownies come out easily. Make sure to leave some extra paper hanging over two opposite sides. This creates easy handles that help you lift the chilled brownies out smoothly in one piece.
- Warming the mixture (if needed): Depending on your kitchen’s temperature, the condensed milk and cocoa mix might be too thick to mix well. If you’re in a place with controlled temperature, like a home with air conditioning or heating, it’s usually better to warm the mixture. You can do this by microwaving it for about 20 to 30 seconds or until it’s easier to stir. Alternatively, you can gently warm it on the stove over low heat.
- Chill after adding ganache: Once you’ve spread the thick chocolate ganache evenly over the brownie base and added your favorite toppings, like chopped walnuts, put the pan in the fridge. Let it chill without moving for 2 to 3 hours so everything sets properly before cutting.
- Storage Tip: Store your No Bake Brownies in an airtight container and refrigerate them to maintain their chewy texture and freshness. They stay fresh for up to a week. Store them in a single layer. If you need to stack them, put a piece of parchment paper between each layer to stop them from sticking together.
Serving Suggestions For No Bake Brownies:
- Once your No Bake Brownies are fully chilled and set, it’s time to slice and enjoy! Use a sharp knife for clean, neat squares—wipe the blade between cuts for best results. These rich, fudgy bars are perfect as an after-dinner dessert, a mid-day chocolate fix, or a festive treat for birthdays and potlucks. Serve each piece as-is, or elevate the experience by topping it with a scoop of vanilla ice cream and a drizzle of leftover ganache or chocolate syrup. For a crunch contrast, sprinkle chopped nuts, crushed cookies, or sea salt flakes just before serving.
- You can also get creative with presentation! Try cutting the brownies into bite-sized cubes and serving them in mini cupcake liners for parties. Or make brownie pops by inserting small wooden sticks before chilling—kids especially love this version!
Storage Instructions For No Bake Brownies:
- No-Bake Brownies need to be stored in the fridge to stay firm and fresh. Place them in an airtight container, putting one layer inside at a time. If you stack the layers, put a piece of parchment paper between each one to stop them from sticking. When stored this way in the fridge, they will stay fresh for up to a week.
- To keep them longer, freeze the brownies in an airtight container for up to a month. Thaw before serving. Wrap each piece tightly with plastic wrap and put them in a freezer-safe bag or container. To eat them, let them thaw in the fridge for a few hours or at room temperature for about 15 to 20 minutes.
- Whether you eat them straight from the fridge or let them warm up a little, these soft and chocolatey no-bake brownies are great for satisfying any sweet craving—without needing an oven!