This eggless Marble Cake is more than just a treat—it’s a celebration of flavors and textures that come together in the most delightful way. Each bite offers the perfect harmony between the comforting warmth of vanilla and the deep, indulgent taste of chocolate. The cake boasts a tender crumb that is irresistibly moist, surprisingly airy, and feather-light, despite having no eggs at all.
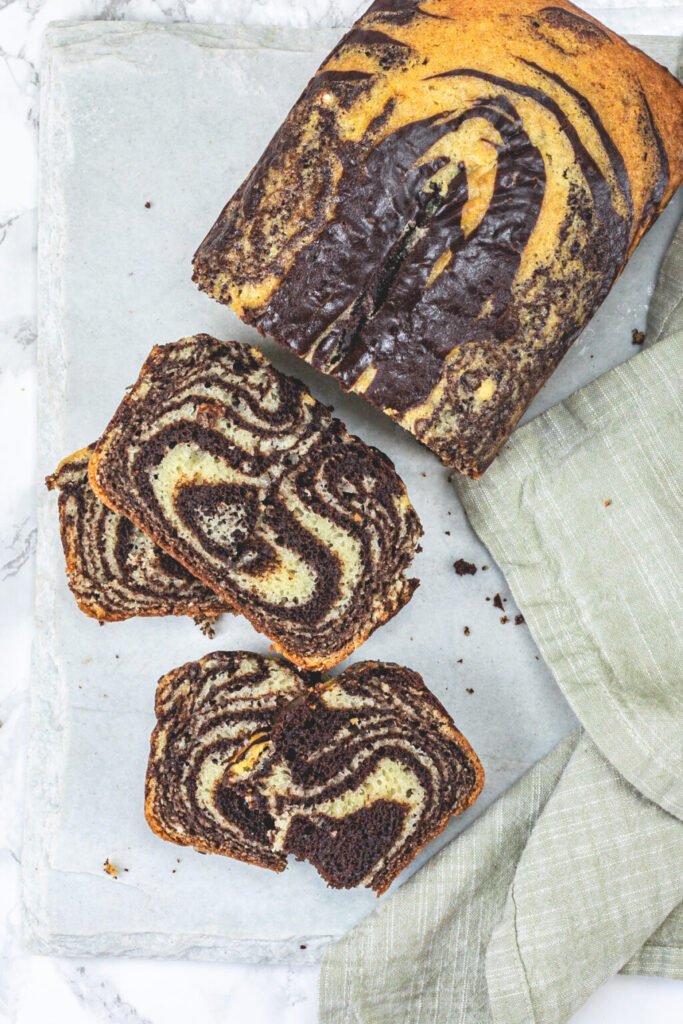
The beautiful Marble Cake not only looks stunning but also ensures that you enjoy both flavors in every slice. Whether you’re enjoying it as a cozy tea-time snack, serving it as an elegant dessert after dinner, or packing it in a lunchbox for a mid-day treat, this cake fits every occasion. What makes this marble cake extra special is the artistic swirl of two batters—classic vanilla and luscious chocolate—creating a stunning marbled pattern that looks just as good as it tastes.
Inspired by the beloved Starbucks marble loaf cake, this homemade version captures the same rich taste and tender texture—only without the use of eggs. Despite being eggless, it doesn’t fall short in flavor or fluffiness. You won’t even miss them! Whether you’re baking for someone with dietary restrictions or simply out of eggs, this recipe proves that eggless baking can be just as delicious and satisfying.
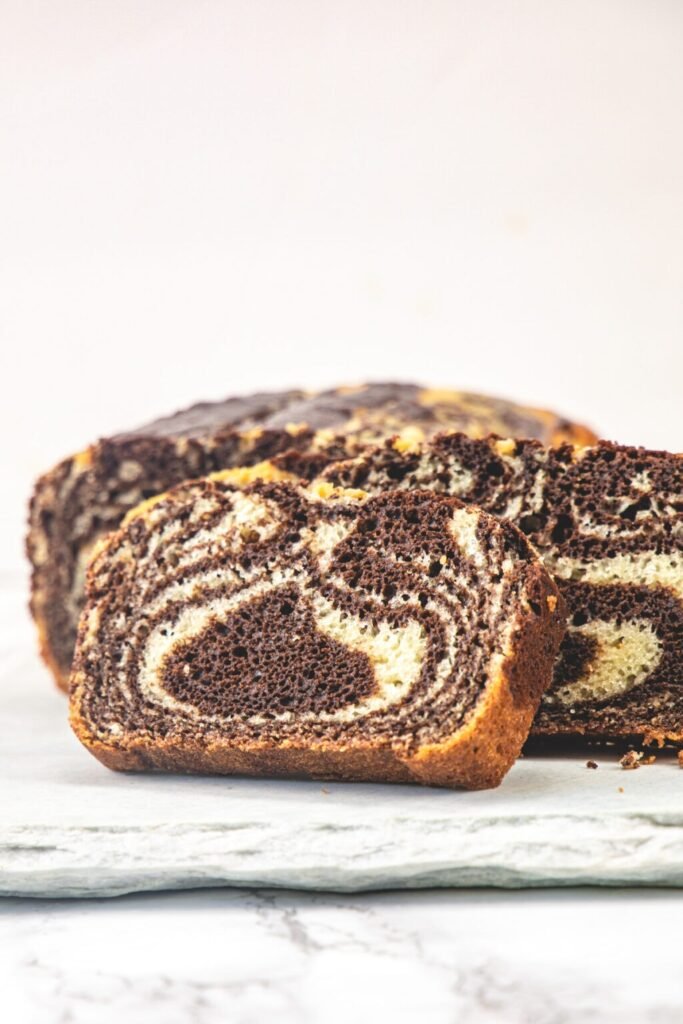
With every cut, you’ll experience the subtle sweetness of vanilla intertwined with the bold intensity of cocoa—truly the best of both worlds. The cake stays moist for days, making it ideal for batch baking or preparing ahead for picnics, parties, or casual get-togethers. It pairs beautifully with a hot cup of coffee, chai, or even a scoop of vanilla ice cream.
Unlike traditional marble cakes, this version uses simple pantry staples and requires no fancy tools or mixers. Just whip up two quick batters, swirl them together in a loaf pan, and let your oven do the magic. The result? A bakery-style loaf that’s tender, aromatic, and loaded with homemade charm.
Whether you’re a beginner baker or a seasoned pro, this eggless marble cake is sure to become a go-to in your baking repertoire. It’s fuss-free, egg-free, and guaranteed to impress.
You’ll Love This Recipe
- Quick to Make: This eggless Marble Cake is much quicker to whip up compared to a traditional round, layered cake. There’s no need for multiple tins, frosting, or fancy decorations. Just pour, swirl, and bake! Despite its simplicity, the finished loaf looks beautifully elegant with its natural marbled design—no extra effort needed.
- One Batter Only: What makes this recipe even more efficient is that you don’t need to prepare two separate batters. The chocolate portion is made directly from the vanilla batter by mixing in cocoa powder. It saves time and cuts down on cleanup, making baking even easier. It’s smart baking without compromising on flavor or texture.
- By Hand: You won’t need any special equipment here. You can easily mix the batter by hand with just a whisk or spatula—no gadgets needed. No electric mixer, no fuss—just everyday kitchen tools and a few minutes of your time. It’s perfect for beginner bakers or anyone wanting a no-hassle baking experience.
- Taste & Texture: This eggless Marble Cake hits all the right notes when it comes to flavor and feel. Every bite delivers a swirl of smooth vanilla and rich chocolate, striking a delicious balance between the two. The texture is unbelievably soft, light, and fluffy with a moist, tender crumb that stays fresh for days. It’s the kind of cake that melts in your mouth and leaves you wanting another slice.
Ingredient Notes For Marble Cake:
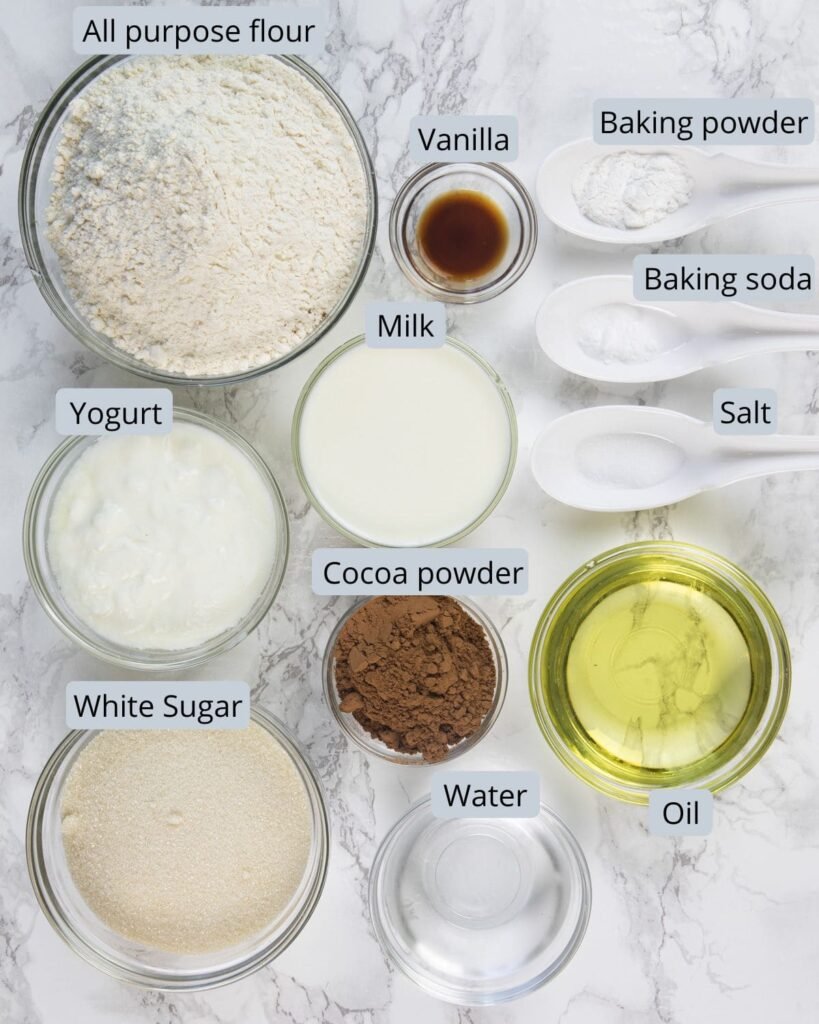
- Flour: Like most classic cakes, this recipe uses plain all-purpose flour—commonly known as maida in Hindi. It provides the perfect base for a soft and tender crumb. Avoid substituting with whole wheat flour as it may alter the texture and make the cake denser.
- Sugar: Regular white granulated sugar works best here. It sweetens the batter evenly and contributes to the overall softness of the cake. Make sure the sugar is fine so it dissolves easily into the wet ingredients.
- Leavening Agents: This recipe uses a combination of baking powder and baking soda. Together, they help the cake rise beautifully while giving it a light and airy structure. Be sure to measure accurately for best results.
- Salt: Just a pinch of salt enhances the sweetness and balances the flavors. It may seem minor, but it plays a key role in amplifying the overall taste.
- Yogurt: Thick, full-fat yogurt serves as a natural egg replacement. It not only adds moisture but also reacts with the baking soda to create a soft, fluffy texture. Avoid using flavored or low-fat yogurt for best results.
- Milk: Whole milk is recommended to keep the batter rich and smooth. It also helps blend the ingredients properly while contributing to the cake’s moistness.
- Oil: Neutral oils like vegetable, canola, safflower, or avocado oil work well here. Oil ensures the cake stays moist and soft for days without turning dry.
- Cocoa Powder: Use natural, unsweetened cocoa powder like Hershey’s or Ghirardelli. It gives the chocolate swirl its deep flavor. Dutch-processed cocoa can be used, but it may slightly alter the taste and color.
- Vanilla Extract: Always opt for pure vanilla extract for the best aroma and flavor. Avoid synthetic or imitation variants.
- Warm Water: This helps dissolve cocoa powder smoothly, ensuring there are no lumps in the chocolate batter.
Step By Step Instructions
Preheat & Prepare the Pan:
Preheat your oven to 350°F (180°C) and let it warm up for a minimum of 10 minutes to ensure it reaches a consistent, even temperature for perfect baking results. Meanwhile, grease a 9x5x3-inch loaf pan with oil or butter. Line it with parchment paper, leaving extra paper hanging over the longer sides—this overhang will help lift the cake out easily once baked without damaging its shape.
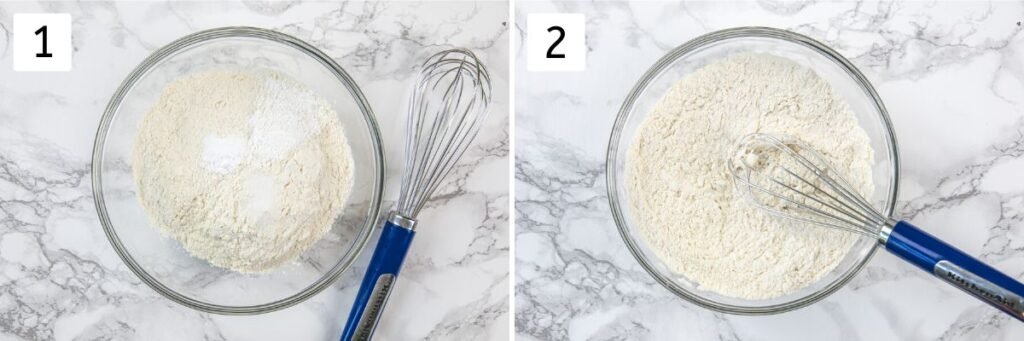
1) Mix Dry Ingredients:
In a medium-sized mixing bowl, add all-purpose flour, baking powder, baking soda, and a pinch of salt.
2) Whisk Dry Ingredients:
Use a wire whisk to thoroughly mix the dry ingredients, making sure there are no lumps and that the baking powder, baking soda, and salt are evenly dispersed throughout the flour for a uniform rise.
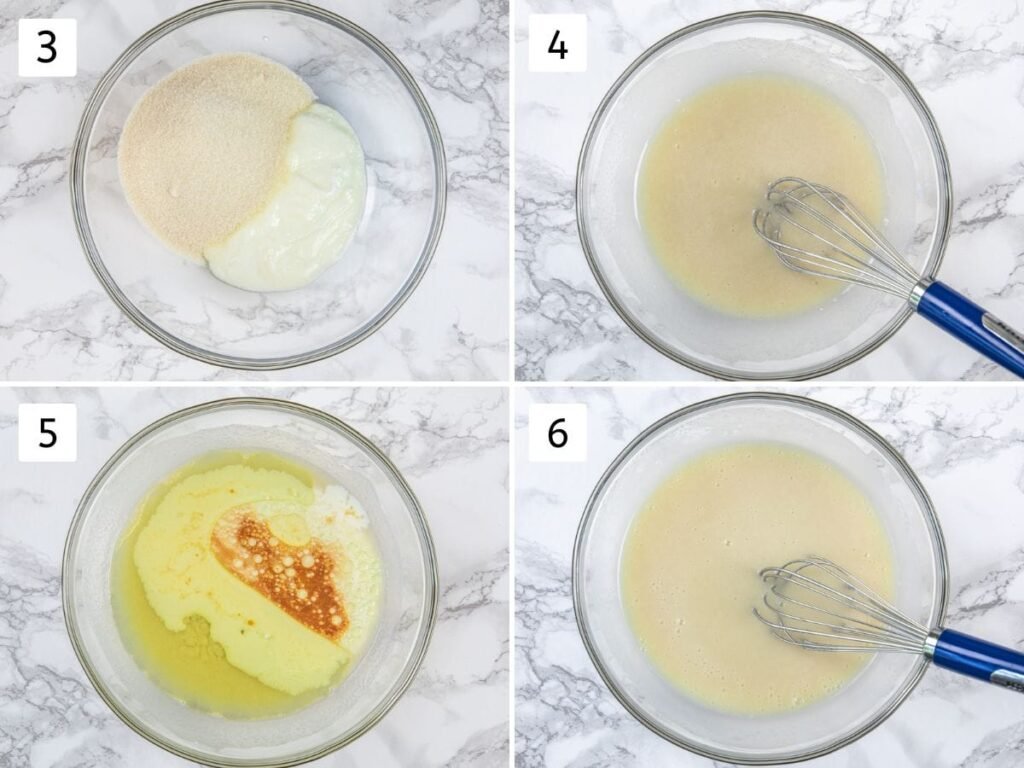
3, 4) Mix Wet Ingredients:
In a separate large bowl, add thick yogurt and granulated sugar.
Whisk well until the sugar almost dissolves and the mixture turns smooth and creamy, forming the base for a rich and fluffy batter.
5, 6) Add Remaining Wet Ingredients:
Pour in full-fat milk, flavorless oil, and pure vanilla extract.
Whisk again until all the ingredients are well combined and the mixture appears smooth and slightly glossy.
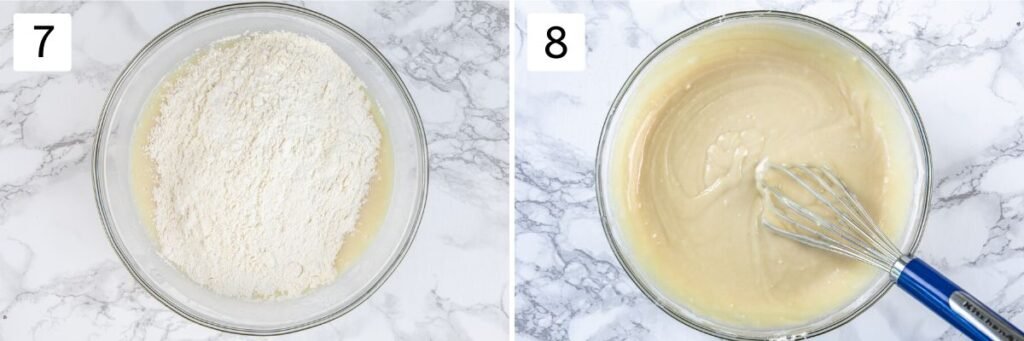
7) Make Vanilla Batter:
Gradually add the prepared dry mixture into the bowl with wet ingredients.
8) Whisk Batter:
Using a whisk or spatula, gently mix until a lump-free and smooth batter is formed. Do not over-mix, as this can affect the cake’s light texture.
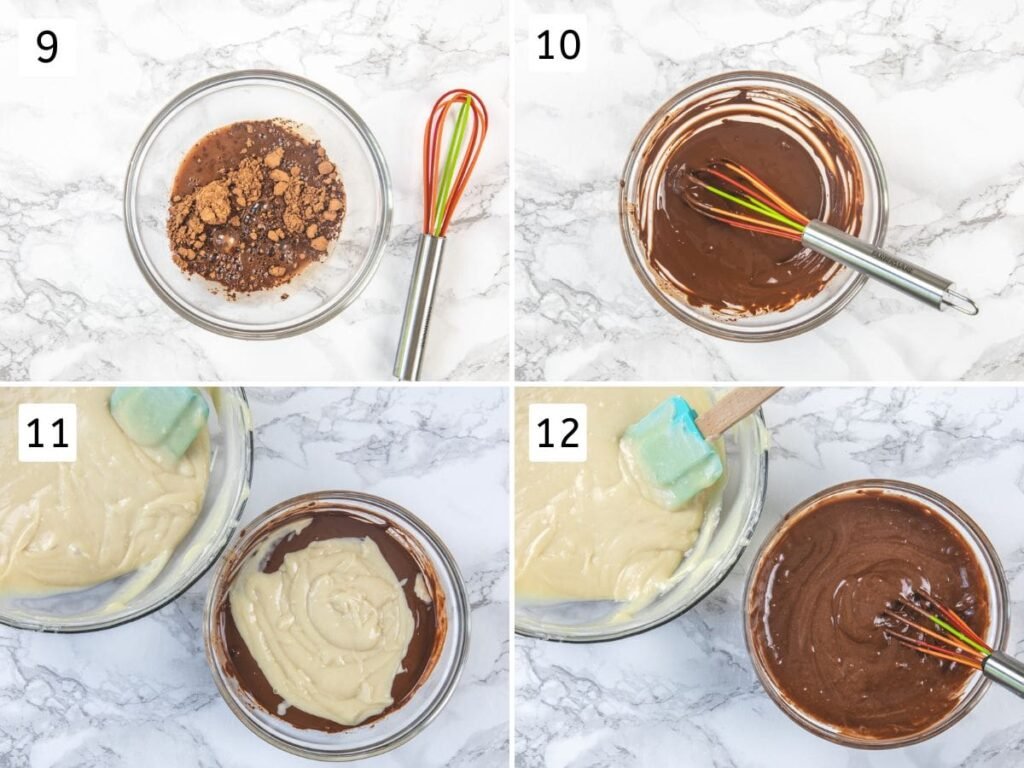
9) Prepare Cocoa Mix:
In a separate small bowl, take unsweetened cocoa powder and add warm water.
10) Make Smooth Cocoa Mixture:
Whisk until it forms a smooth, glossy, and lump-free paste. This mixture will be used to create the chocolate portion of the marble cake.
11) Add Vanilla Batter to Cocoa:
Take about half of the prepared vanilla batter and add it to the cocoa mixture.
12) Mix Chocolate Batter:
Gently mix until the two are combined and a smooth chocolate batter is formed. Avoid over-mixing to maintain a soft and airy crumb.
Layer the Batter for Marble Effect:
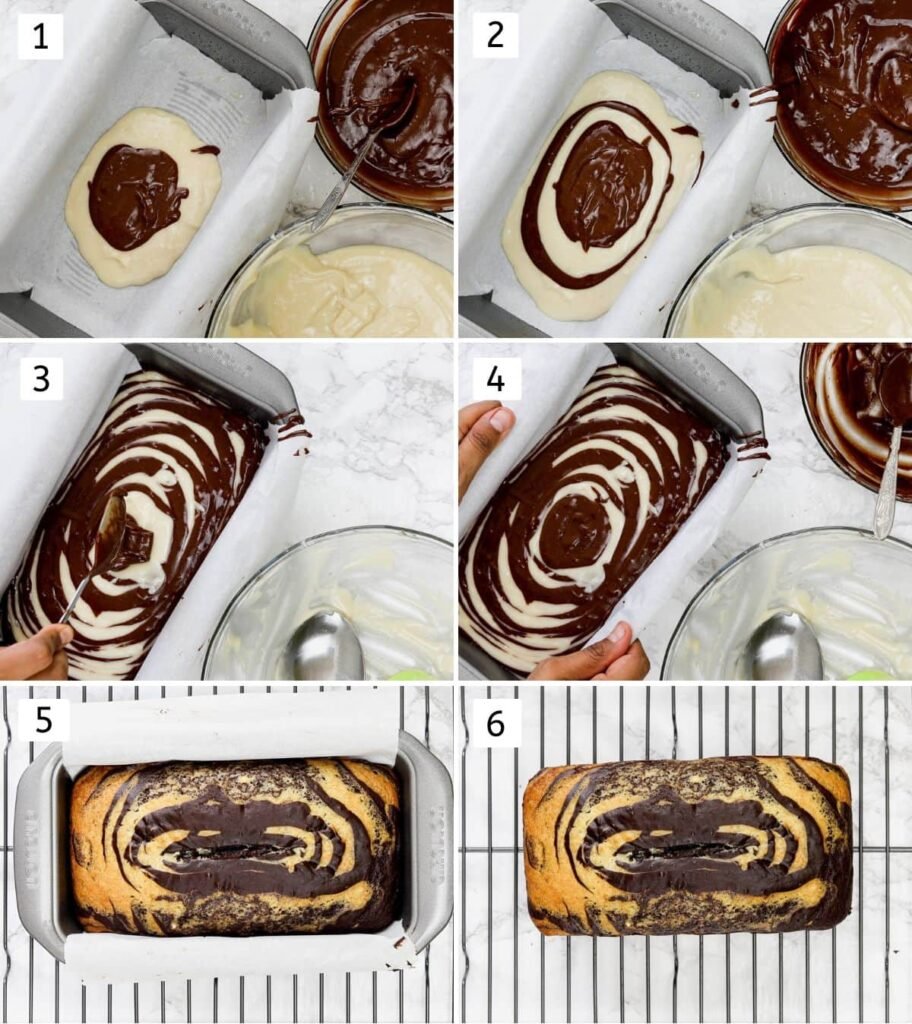
1) Start Layering in Loaf Pan:
Spoon 2 tablespoons of vanilla batter into the center of the prepared pan. Do not spread it.
Now spoon 2 tablespoons of chocolate batter right on top. Let them settle naturally.
2, 3) Alternate the Batters:
Continue layering generous spoonfuls of vanilla and chocolate batters one over the other in the center of the pan, allowing them to naturally spread outward and create a beautiful marbled pattern as they stack. The batter will naturally spread outward, creating concentric circles and a stunning marbled effect.
4) Tap to Settle Batter:
Once all the batter is used, gently tap the loaf pan on the counter a couple of times to level the surface. Be careful not to tap too hard—this might disturb the layered pattern.
5) Bake the Cake:
Place the loaf pan in the preheated oven and bake for 50–55 minutes, or until a skewer or toothpick inserted into the center comes out clean or with a few moist crumbs.
6) Cool and Unmold:
Allow the freshly baked cake to sit in the loaf pan for 5–8 minutes so it can firm up slightly, making it easier to handle without breaking. Then carefully lift it out using the parchment overhang and transfer it to a wire rack. Gently peel off the parchment paper and allow the cake to cool completely before slicing.
Expert Tips For Marble Cake:
- Grease and Line the Pan Properly: Even if you’re using a nonstick loaf pan, it’s important to grease it lightly and line it with parchment paper for best results. Greasing the pan first helps the parchment stay in place when you pour in the batter, preventing it from slipping or folding. Make sure to leave some parchment paper hanging over the longer sides of the loaf pan—this acts like a handle and makes it easy to lift the cake out once baked. It also helps prevent any risk of the cake sticking or breaking during removal.
- Avoid Overmixing the Batter: Once you add the dry ingredients to the wet mixture, mix gently and only until everything is just combined. Overmixing can develop the gluten in the flour, which leads to a dense or chewy texture instead of a soft, tender crumb. A few small lumps are perfectly fine—resist the urge to overwork the batter.
- Cool Completely Before Slicing: Patience is key when it comes to slicing this marble loaf. After baking, the cake remains warm and fragile for a while. It’s best to let it cool in the pan for a few minutes, then transfer it to a wire rack and allow it to cool fully to room temperature—this can take around 2 hours. Slicing it too soon can cause it to crumble or fall apart, ruining the clean, beautiful slices that show off the marbled pattern. Waiting ensures perfect presentation and the best texture.