
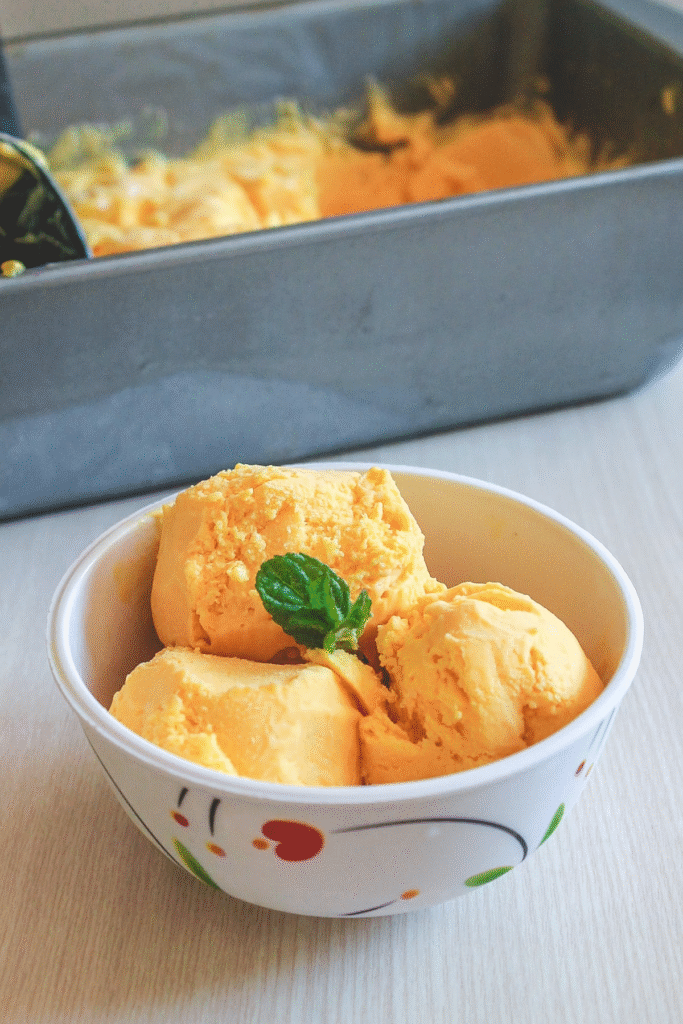
This mango ice cream is a summertime dream come true—rich, creamy, and bursting with pure mango flavor in every bite! Whether you’re entertaining guests or simply craving a refreshing treat, this homemade dessert will win hearts instantly. It’s so luscious and smooth, you won’t believe it’s made with just three simple ingredients and no ice cream maker required.
Unlike store-bought versions that often contain artificial flavoring or preservatives, this recipe is all-natural and made from real mangoes, giving it a fresh, fruity essence that shines through. The best part? You only need 20 minutes of hands-on time to whip it up. The rest is as easy as letting your freezer do the magic!
Perfect for hot days, dinner parties, or those moments when your sweet tooth demands something fruity yet indulgent, this mango ice cream is guaranteed to become your go-to summer dessert. Kids love it, adults crave it, and best of all—it’s customizable too.
Once you try this homemade version, you’ll never go back to the store-bought tubs. It’s tropical, it’s decadent, and it’s made with love!
❤️ You’ll Love This Mango Ice Cream
Homemade mango ice cream is 1000 times superior than store-bought.
- The homemade version of mango ice cream is rich in the fresh, authentic flavor of real mangoes, offering a naturally sweet and tropical taste that’s hard to beat. In contrast, store-bought or commercial versions often rely on artificial or synthetic mango flavoring, which can lack the depth and aroma of the real fruit. The difference in taste is quite noticeable once you’ve tried both.
- When you prepare mango ice cream at home, you have complete control over the ingredients. You can use high-quality, fresh, and natural components like ripe mangoes, heavy cream, milk, and a touch of sugar. There are no hidden chemicals or unnecessary additives. On the other hand, store-bought ice creams are mass-produced and often contain preservatives, artificial stabilizers, and additives like guar gum, gelatin, and synthetic thickeners to enhance shelf life and texture. These ingredients may compromise both flavor and nutritional value.
- Another benefit of making it at home is the ability to customize the recipe. You can effortlessly tailor the texture and flavor to your liking—make it extra creamy, highlight the mango for a fruitier punch, or tone down the sweetness as per your personal preference. Plus, it’s a great option for those with dietary restrictions, as you can choose to make it vegan, low-sugar, or dairy-free if needed. Commercially available options often lack flexibility and may not align with specific dietary needs or personal flavor preferences.
No ice cream machine is required. It’s super simple to make.
There are no ice gems in this ice cream indeed in spite of the fact that it is made without an ice cream machine. The surface is super wealthy and creamy.
🧾 Ingredient Notes
You’ll require fair 3 fixings to make this hand crafted mango ice cream recipe.
- Mangoes: Continuously utilize new, ready, sweet mangoes. I incline toward to utilize Ataulfo (a Mexican fruit) variety as it gives a great mango flavor. If you’re in India and if conceivable at that point utilize Alphonso (hapus) mango for the best results.
- Heavy whipping cream: It is whipped until firm top and this prepare circulates air through the blend fair like the ice cream machine does by churning the ice cream gradually. So in the conclusion, there will be no ice crystals.
- Try to utilize the overwhelming whipping cream that has 30-36% fat content.
- Sugar: Fair a small bit of sugar as per your sweetness inclination. If your mangoes are sweet sufficient at that point include less.
👩🍳 How To Make Mango Ice Cream? (Pics)
Prep:
- Puree the mango and include the required sum of sugar as per the fruit’s sweetness.
- Chill the bowl, whisk connection and overwhelming whipping cream in the cooler for 10 minutes. Why? If everything is decent and chilled at that point cream gets whipped exceptionally rapidly and too gets whipped to its most extreme volume.
Making Ice Cream Mixture:
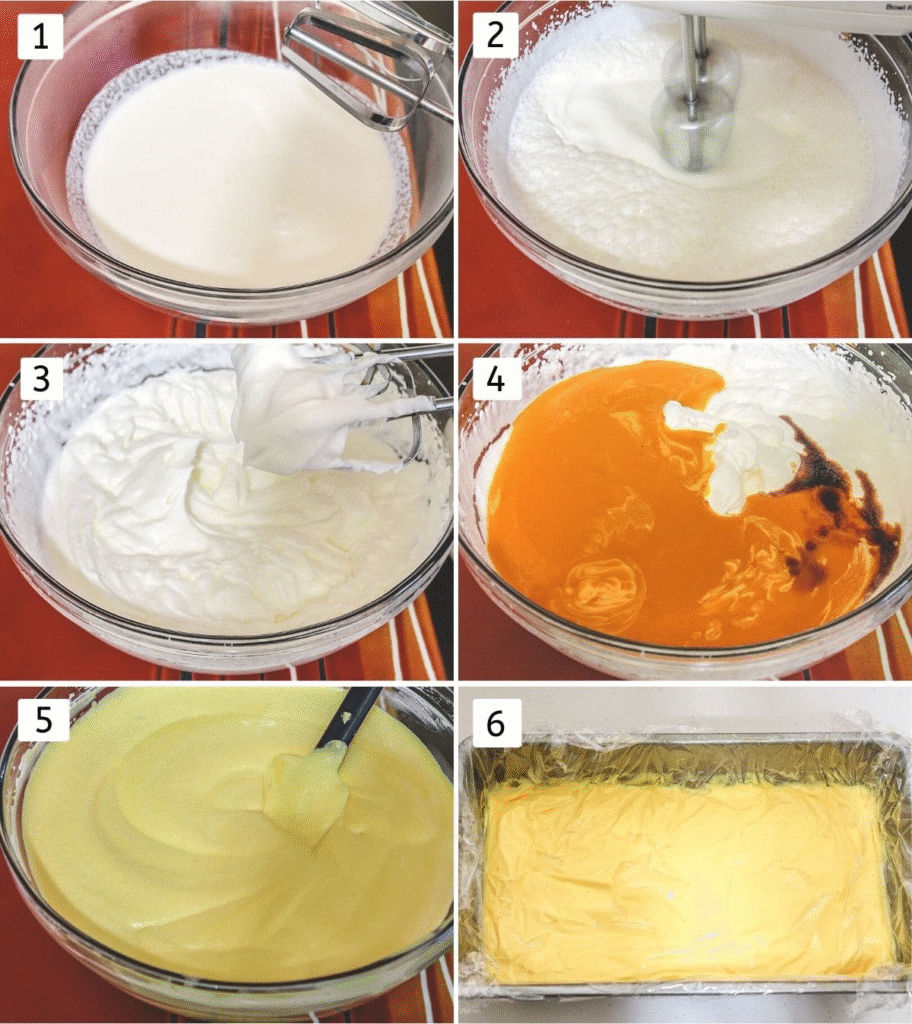
1) Start by adding ¼ cup of sugar to the chilled heavy whipping cream. Make sure the cream is well-chilled, straight from the fridge—cold cream whips up faster and holds its shape better. Adding sugar at this stage not only sweetens the mix but also helps create a rich, silky-smooth texture that enhances the creaminess of your dessert.
2) Using a hand mixer or a stand mixer fitted with the whisk attachment, begin whipping the cream mixture on medium speed. Make sure your mixing bowl is clean, dry, and preferably chilled as well—this creates the ideal environment for whipping. As the mixer runs, you’ll see the cream gradually thickening.
3) Continue beating the cream until it reaches stiff peaks. This means that when you lift the whisk out of the cream, it should hold a firm, upright shape without drooping. Be very careful not to overwhip—if you continue beating beyond this point, the cream will begin to separate and turn grainy, eventually curdling into butter and liquid whey, which is not suitable for ice cream. Stop as soon as it reaches a smooth, fluffy, and stable consistency.
4) Add the mango pulp and vanilla extract: Once your whipped cream has reached stiff peaks, gently add the fresh mango pulp to it. The mango pulp should be smooth and thick, preferably made from ripe Alphonso or Ataulfo mangoes for the best flavor and natural sweetness. Also, add a splash of pure vanilla extract at this stage. The vanilla not only enhances the mango flavor but also adds a subtle warmth that balances the sweetness.
5) Gently fold the mixture: Using a silicone spatula or a broad spoon, slowly fold the mango and vanilla mixture into the whipped cream. Do not stir or beat it, as this can deflate the airy structure you’ve created. The goal is to maintain the light and fluffy texture while ensuring that the mango pulp is evenly incorporated. Fold until the entire mixture looks smooth, creamy, and well-blended with no streaks of cream or pulp remaining.
6) Transfer and freeze properly: Carefully pour the mixture into a shallow, wide container such as a metal baking dish or a daydream skillet. Using a shallow dish helps the ice cream freeze faster and more evenly. Once poured in, smooth out the top using a spatula. Cover the surface of the ice cream with a piece of plastic wrap or parchment paper so that it directly touches the surface of the mixture. This prevents the formation of ice crystals on top, keeping your ice cream creamy. Finally, place the container into the freezer and let it sit undisturbed for about 7 to 8 hours, or overnight, until it is fully set and firm.
💭 Expert Tips
- Craving a scoop of homemade mango ice cream? When you’re ready to indulge, take the container out of the freezer and allow it to rest at room temperature for around 5 minutes. This short wait helps soften the ice cream just enough to make scooping easier and gives it a perfectly creamy texture when served. Enjoy it in a bowl, a cone, or even with a sprinkle of chopped nuts or fresh mango cubes for added flavor.
- A word of caution when whipping the cream: Be careful not to overwhip the heavy cream. Once you reach stiff peaks, stop immediately. If you continue beyond that point, the cream may curdle and start to turn into butter, leaving you with a grainy texture and separated fat, which is not ideal for making smooth, luscious ice cream.
- Use ripe, juicy, and naturally sweet mangoes for best results. The variety and ripeness of mangoes play a crucial role in determining the final taste and fragrance of your ice cream. Choose mangoes that are fragrant, vibrant in color, and soft to the touch—such as Alphonso, Kesar, or Ataulfo varieties. These will deliver the richest, most authentic mango flavor and natural sweetness.
- No artificial coloring added! You might notice a difference in the ice cream’s color between the main image and the step-by-step pictures. That’s purely due to the lighting conditions under which the photos were taken. The primary image was captured during the day in natural sunlight, highlighting the vibrant golden hue of the mangoes, while the stepwise images were taken indoors under artificial lighting, which can slightly alter the appearance of the color. Rest assured, the bright and beautiful yellow comes entirely from the mangoes themselves—no artificial colors or additives have been used.
- Using Canned Mango Pulp: If fresh mangoes are not in season or easily available, you can absolutely substitute them with canned mango pulp. Canned Alphonso mango pulp, in particular, is a great alternative and is widely available in most Indian grocery stores. It offers a rich, sweet mango flavor that works wonderfully in ice cream recipes. Just make sure to choose a high-quality brand with no added artificial flavors or preservatives for the best results.
- Instead of vanilla extricate, you can flavor this ice cream with cardamom powder and saffron.
- You can include a few mango pieces or nuts like pistachios, almonds or chocolate chips into the ice cream some time recently freezing.
