
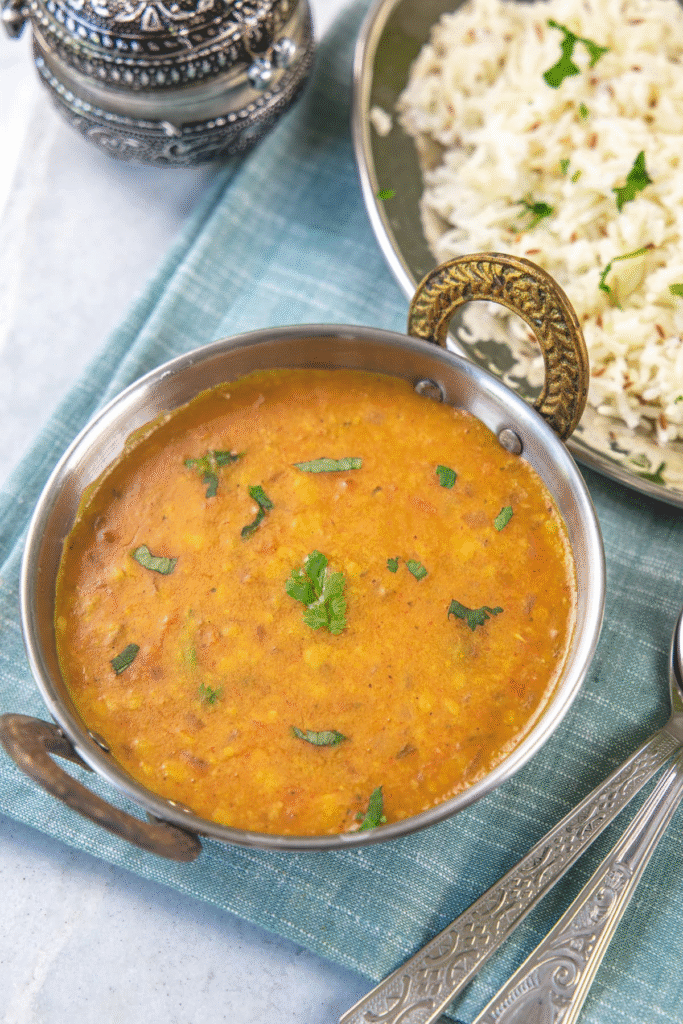
The Ultimate Dal Fry Recipe This flavorful and hearty dal fry is hands down one of the most cherished recipes in my kitchen—and for good reason! Inspired by the rich, comforting flavors you find in North Indian restaurants, this dal fry is a soul-satisfying dish that always earns compliments. It pairs beautifully with fluffy basmati rice or aromatic jeera rice, making it a go-to meal for both everyday dinners and special occasions.
The base of this dish is toor dal, also known as split pigeon peas, which are gently pressure-cooked until soft and creamy. What truly elevates this dal, though, is the fragrant Punjabi-style onion-tomato masala, slow-sautéed with ghee or oil until deeply caramelized. Into this masala goes a robust blend of spices—think cumin seeds, mustard seeds, hing (asafoetida), turmeric, red chili powder, coriander powder, and garam masala—all of which come together to create an irresistibly rich, bold flavor.
Freshly chopped garlic, grated ginger, and green chilies add heat and zest, while a final tempering (tadka) of sizzling ghee, cumin, and dried red chilies poured over the dal right before serving infuses it with restaurant-style aroma and depth. A sprinkle of fresh coriander leaves not only adds color but also enhances the freshness.
Whether you’re serving it with rice, roti, or paratha, this dal fry brings pure comfort in every spoonful. It’s a dish that manages to be both simple and luxurious—humble ingredients, elevated by technique and love. Once you try it, you’ll understand why it’s a repeat favorite in so many Indian homes.
What Is Dal Fry?
- In Indian culinary terminology, dal refers to split lentils, while fry often denotes a method of sautéing, not necessarily deep or shallow frying as the term suggests in conventional English cooking.
- Contrary to the literal meaning of “fry,” this recipe doesn’t involve deep frying at all. Instead, onions and tomatoes are gently sautéed in oil with spices—a technique commonly referred to as “frying the masala” in Indian kitchens. This traditional method is what gives the dish its name, Dal Fry.
- When you follow this recipe precisely, using the exact ratios of ingredients provided, you’re almost guaranteed a flavor that rivals your favorite restaurant version.
❤️ You’ll Love This Dal Fry Recipe Because
- This dal fry offers that rich, restaurant-style flavor right at home.
- Made using simple, everyday ingredients commonly found in any Indian kitchen.
- The cooking process is incredibly straightforward—perfect for beginners or anyone new to Indian cooking.
- It’s a wholesome, plant-based dish you can prepare regularly, unlike the heavier dal makhani.
- Just like many traditional lentil dishes, this dal fry pairs beautifully with steamed rice or roti, making for a hearty and comforting meal.
🧾Ingredient Notes

- Lentils: This recipe traditionally uses toor dal (also known as arhar dal or split pigeon peas), as it’s a staple in most restaurant-style dal fry preparations. However, for a more homely twist, feel free to experiment with other lentils like moong dal, chana dal, urad dal, masoor dal, or even a comforting blend of mixed dals. Each variation brings its own unique texture and taste.
- Aromatics – Ginger, Garlic & Green Chili: For the best depth of flavor, it’s ideal to use freshly crushed ginger, garlic, and green chilies—either pounded in a mortar and pestle or blitzed in a small wet grinder. While store-bought ginger-garlic paste and finely chopped chilies are convenient, the fresh ingredients add a noticeably richer aroma and liveliness to the dish.
- Onion & Tomato: These are finely chopped to ensure they soften quickly and blend seamlessly into the masala, creating a smooth and rich base. This mushy consistency is essential for that luscious, restaurant-like gravy texture.
- Kasoori Methi (Dried Fenugreek Leaves): This secret ingredient adds a distinctive touch of restaurant-style magic. Always crumble and add it towards the very end of cooking to preserve its unique aroma and nuanced flavor
👩🍳 How To Make Dal Fry (Stepwise Photos)
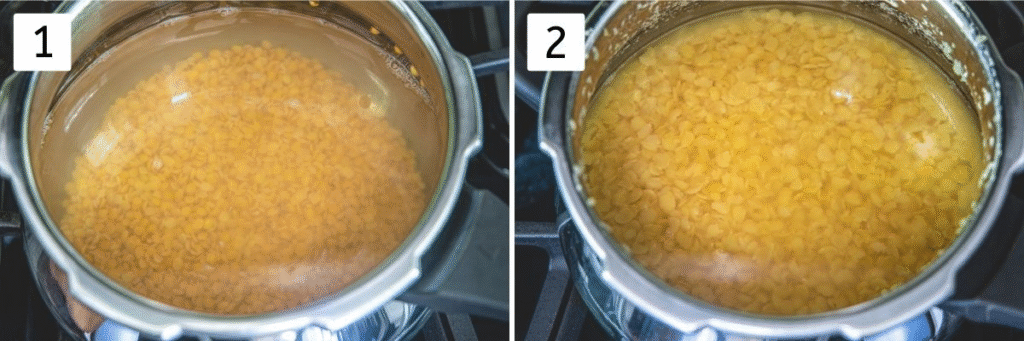
1) Take toor dal in a colander and wash beneath running cold until the water runs clear. Or flush the dal 2-3 times in a bowl until the water is not cloudy any longer. Take washed dal in a pressure cooker along with new water.
2) Cover the cooker with a cover, put the weight on and cook on medium warm for 2-3 shrieks. (Moment pot: manual, tall pressure for 5 minutes) Let the pressure go down by itself and at that point open the lid.
3) In the interim, the pressure is discharged, let’s begin cooking masala. Warm oil in a skillet or kadai on medium warm. Once hot include cumin seeds and let them sizzle.
4) Include onion and sprinkle a small salt to speed up the cooking prepare. Cook until onion turns light brown or pink and super delicate.
5) Include pulverized ginger garlic and green chili.
6) Blend and saute for 1 miniature or until the crude scent of ginger garlic goes away.

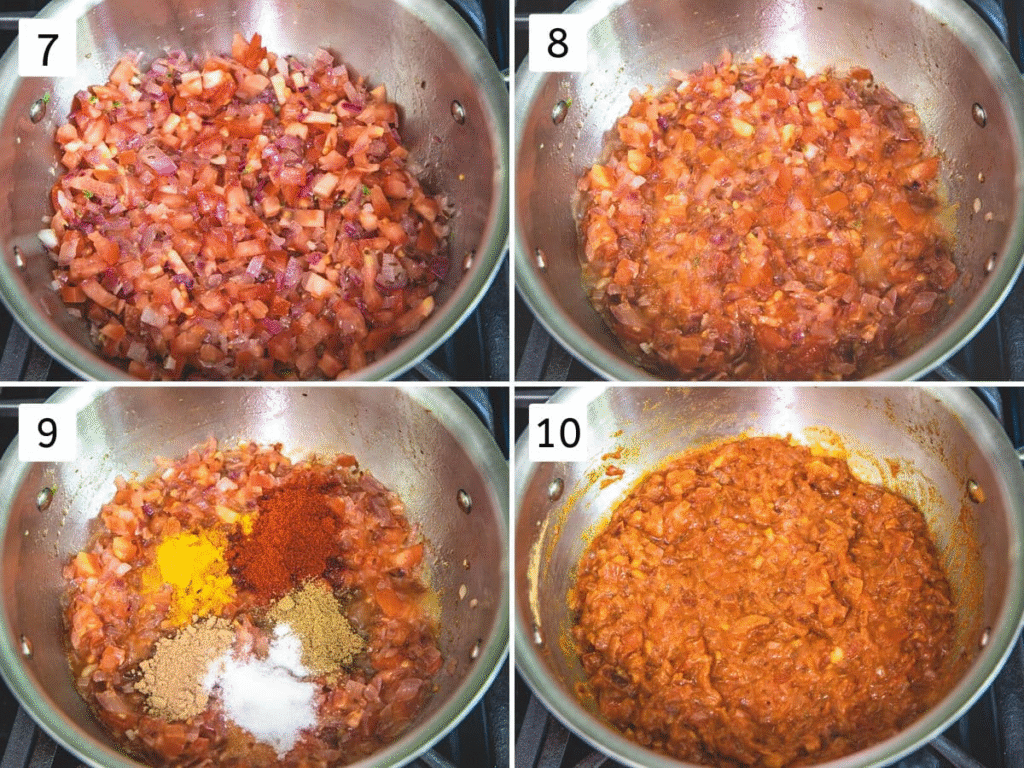
7) Include chopped tomatoes.
8) Cook until tomatoes are delicate and nearly mushy.
9) Include remaining salt, turmeric powder, red chili powder, cumin powder and coriander powder.
10) Blend and cook for a diminutive, oil will begins to overflow out from the sides.
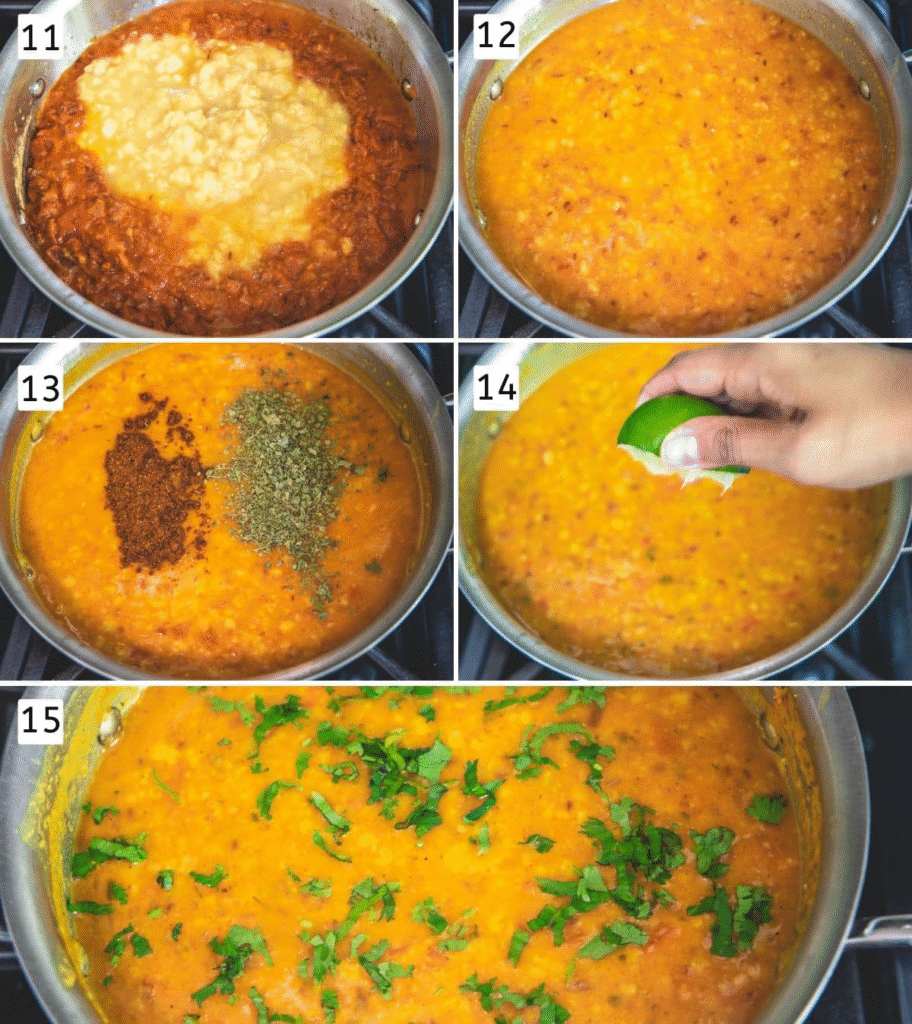
11) Include cooked dal and more water (in case needed).
12) Blend and let it stew for 5 minutes on moo. Do mix in between to make beyond any doubt that the dal is not staying to the foot of the pan.
13) Include garam masala and kasoori methi (pulverize between your palm some time recently including). Blend well.
14) Include lemon or lime juice, and mix.
15) Finally, decorate with crisply chopped cilantro. If not serving right absent at that point keep it secured. So it remains warm till the time of serving.
💭 Expert Tips
- Use Fresh Lentils Whenever Possible: Lentils that are more than a year old tend to be drier and tougher, which significantly increases their cooking time and water requirement. If you happen to use an older batch of toor dal, be prepared to extend the cooking duration and add extra water to get them tender. For best results in terms of taste, texture, and nutrition, try to use fresher lentils whenever available.
- Soaking is Optional but Helpful: While soaking toor dal is not strictly necessary, especially when using a pressure cooker or Instant Pot, doing so can be beneficial. If you have 30 minutes to spare, soaking the dal in fresh water helps soften it slightly and reduces overall cooking time. Always remember to discard the soaking water before cooking, as it may contain some of the impurities or antinutrients released during the soaking process.
- Adjust Spices to Match Your Taste: The beauty of dal lies in its flexibility. Whether you enjoy your food mild or spicy, you can tailor the heat level by adjusting the amount of green chilies and red chili powder. Feel free to reduce these ingredients for a milder dish or add a bit more for a spicier punch. Tasting and tweaking as you cook ensures it suits your palate perfectly.
- Achieve the Ideal Dal Consistency: The preferred texture for dal fry is a medium-thick consistency — not too runny, not overly dense. As the dal simmers, it tends to thicken naturally. If it becomes too thick for your liking, simply add a small amount of hot water to thin it out slightly. Stir well after each addition to maintain a uniform texture. Avoid making the dal watery, as this dilutes the spices and weakens the overall flavor profile.
- Balance Flavor with Proper Timing of Ingredients: Timing matters when it comes to adding finishing spices. Always stir in garam masala and crushed kasoori methi (dried fenugreek leaves) only after the dal has finished simmering. These aromatic ingredients are delicate and can lose their potency if boiled for too long. Adding them at the end helps preserve their unique fragrance and depth of flavor.
- Handle Citrus with Care: If you’re planning to add lemon or lime juice to enhance the dal’s tangy note, make sure to do it only at the very end — after turning off the heat. Simmering the dal after adding citrus juice can cause it to develop a slightly bitter taste and may diminish the fresh, bright flavor that citrus is known for. A final squeeze just before serving works best.
🥣 Storage Instructions
- Refrigeration: When stored in an airtight container, the dal remains fresh in the refrigerator for about 2 to 3 days.
- Freezing: You can freeze dal for up to 3 months. I usually prepare a larger batch and divide it into family-sized portions using freezer-safe containers for convenience.
- Thawing: To defrost, either transfer the container to the refrigerator the night before or leave it at room temperature for a few hours until fully thawed.
- Reheating: Warm the dal in a pan over medium heat until it begins to gently simmer. Once thawed and reheated, it’s best to consume it within 24 hours.
🍽 How To Serve Dal Fry?
- Pair the flavorful dal fry with jeera rice, plain steamed basmati rice, or a delicately spiced pulao such as matar (peas) pulao for a comforting meal.
- It also goes wonderfully with Indian breads like soft parathas, buttery naan, or crispy tandoori rotis.
- To round out the meal, add a side of refreshing kachumber salad, a crunchy papad, and a chilled glass of chaas (spiced buttermilk) for a perfect balance of textures and flavors
