This bhindi raita is a delightful and refreshing accompaniment that pairs wonderfully with pulao, biryani, or any traditional Indian thali. What truly makes this raita stand out is the irresistible texture and flavor of the okra. Thinly sliced bhindi is lightly seasoned and pan-fried until it’s golden and crisp, bringing a satisfying crunch to every bite. These crispy okra strips are then folded into a creamy, well-spiced yogurt base that’s seasoned with roasted cumin powder, black salt, and a touch of green chili or red chili powder for a mild kick.
The contrast between the smooth, chilled curd and the warm, crunchy bhindi makes this dish irresistible. It’s not only delicious but also a great way to add vegetables to your meal in an enjoyable form. Serve it as a cooling element alongside spicy rice dishes or make it a part of your everyday summer menu—this unique raita variation is sure to become a family favorite.

❤️ You’ll Love This Bhindi Raita Recipe
Easy Preparation: Making this bhindi raita is as straightforward as it gets. Similar to other raita recipes, it follows a simple process with minimal steps. The key is to pan-fry the okra slices until they turn golden and crispy, allow them to cool slightly, and then gently fold them into well-chilled, whisked yogurt that has been seasoned with spices. It doesn’t require any fancy ingredients or equipment, making it ideal even for beginner cooks.
Perfect Summer Dish: Bhindi raita is a naturally cooling side dish that’s especially popular during hot and humid months. Yogurt is known for its soothing and hydrating properties, helping to balance body heat during scorching summer days. Pairing it with bhindi not only makes it more substantial but also adds a delightful twist to the usual summer fare.
Flavor & Texture Delight: What makes this raita stand out is the contrast of textures and the subtle flavors. The yogurt base is creamy and delicately spiced, offering a refreshing tang. The highlight, however, is the addition of crisp, pan-fried okra which lends a crunch and a slightly nutty flavor. When served immediately, the bhindi retains its crispiness, creating a wonderful texture play. If stored for later use, the okra softens and soaks up the flavors of the yogurt—resulting in a different but equally enjoyable taste.
Adjustable to Your Needs: Whether you’re making it for one or preparing it for a gathering, this recipe is extremely flexible. You can easily scale the quantities up or down based on the number of servings you need. Just keep in mind that if you’re preparing a larger quantity, it’s best to cook the okra in batches to ensure even frying and avoid overcrowding the pan. This way, you maintain that signature crispy texture that elevates the dish.
🧾 Ingredient Notes
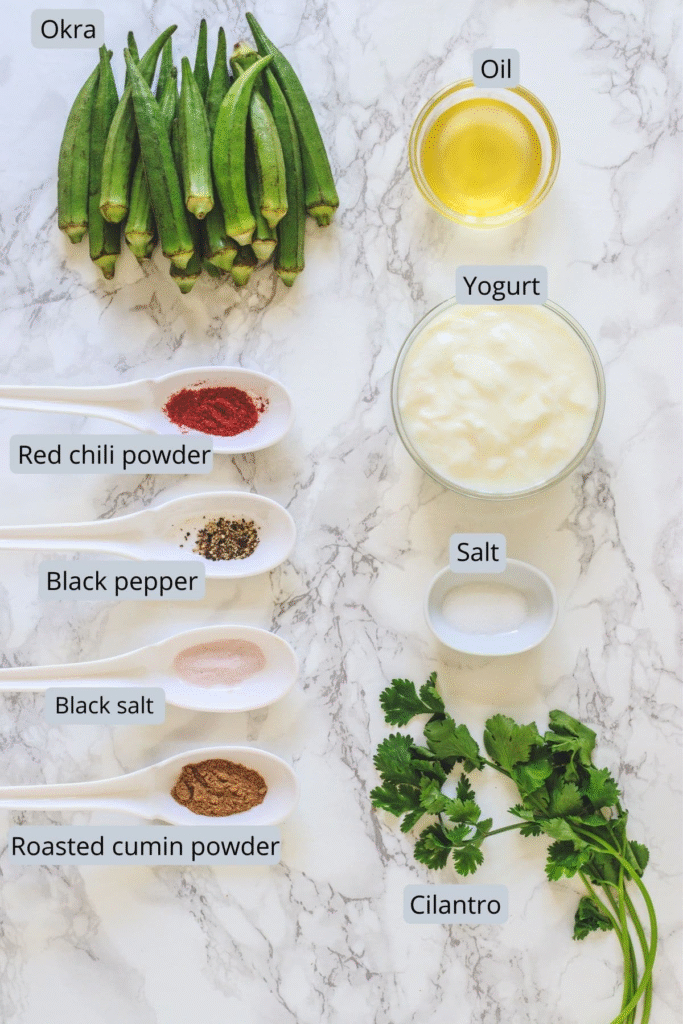
- Okra (Bhindi): I prefer using small, tender desi okra that I usually buy from the local Indian grocery store. These are slimmer, fresher, and cook more evenly compared to the large-sized okra typically available at American supermarkets. The American variety often has a tougher outer skin and larger, more mature seeds that don’t lend themselves well to the delicate texture of raita. For the best flavor and crunch, always choose fresh okra that’s free from blemishes or softness.
- Yogurt (Dahi): I almost always rely on homemade yogurt for raita because it has a naturally rich, creamy consistency and a subtle tang that complements spices beautifully. Homemade dahi is also free from thickeners or preservatives, making it a healthier choice. However, if you’re short on time or prefer convenience, plain store-bought yogurt is also perfectly fine—just make sure it’s unsweetened and not too runny in texture.
- Black Salt (Kala Namak): This distinctive Indian spice has a pungent, sulfurous aroma and tangy, salty taste that’s hard to replicate. It infuses the raita with a distinct umami flavor that beautifully complements and elevates the tanginess of the yogurt.. There truly isn’t a perfect substitute for kala namak, so if you don’t have it on hand, it’s better to omit it rather than try to replace it with regular salt.
- Roasted Cumin Powder (Bhuna Jeera): This earthy, aromatic spice is a must in most Indian raita recipes. To prepare it at home, dry roast whole cumin seeds in a pan over medium heat, stirring continuously until they turn a deep golden brown and release a strong nutty aroma. Allow them to cool down fully before grinding into a fine powder using either a spice grinder or a traditional mortar and pestle. This freshly ground blend delivers a bolder, richer flavor than store-bought alternatives and adds a warm, roasted aroma to the dish.
👩🍳 How To Make Bhindi Raita? (Stepwise)
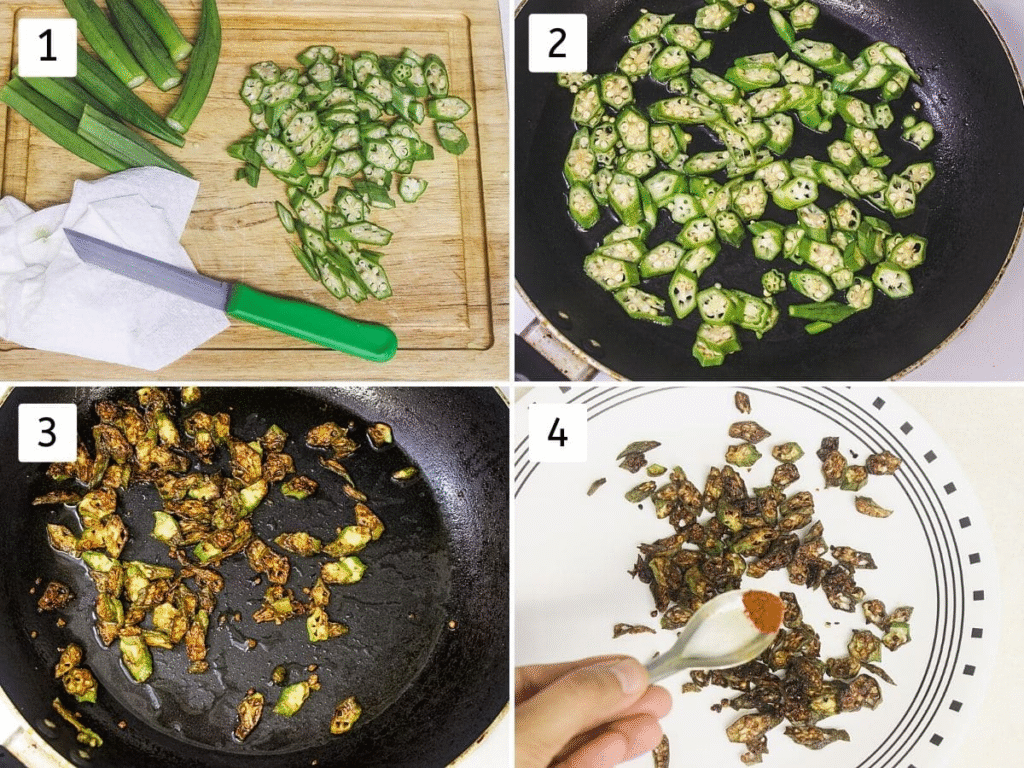
1) Prepare the Okra: Rinse the okra (bhindi) well under cool, running water, gently rubbing each pod to remove any dirt or residue. This ensures they’re clean and ready for prep. Pat them completely dry using a clean kitchen towel—this step is important to avoid sliminess during cooking. Trim off and discard both the head and tail of each okra. Then, slice them diagonally into thin pieces using a sharp knife. If the knife gets sticky while slicing (which is common with okra), wipe it clean with a damp paper towel in between to prevent a gooey mess and ensure smooth cutting.
2) Fry the Okra in Batches: Heat oil in a wide, heavy-bottomed pan over medium-high heat. To check if the oil is ready, drop in a single slice of okra—if it sizzles immediately, the temperature is perfect. Carefully add the sliced okra in a single layer without overcrowding the pan.. Spread the pieces evenly into almost a single layer—avoid overcrowding the pan as it causes the okra to steam instead of fry. If needed, fry in two or more batches for best results.
3) Cook Until Crispy and Golden: Stir and flip the okra frequently using a spatula. Fry until the slices become crisp, dry to the touch, and turn a golden brown color. You’ll notice that as they cook, the okra pieces shrink slightly and deepen in color. This process helps remove moisture and ensures they remain crunchy even when mixed with yogurt.
4) Season While Warm: Once done, use a slotted spoon to remove the fried okra onto a paper towel-lined plate to drain excess oil. While still warm, sprinkle a pinch of red chili powder over the fried okra for a hint of spice and color. Let the pieces cool down completely at room temperature before adding to the yogurt later. Continue frying the remaining okra in batches, following the same method to ensure each piece turns crispy and golden without becoming soggy.
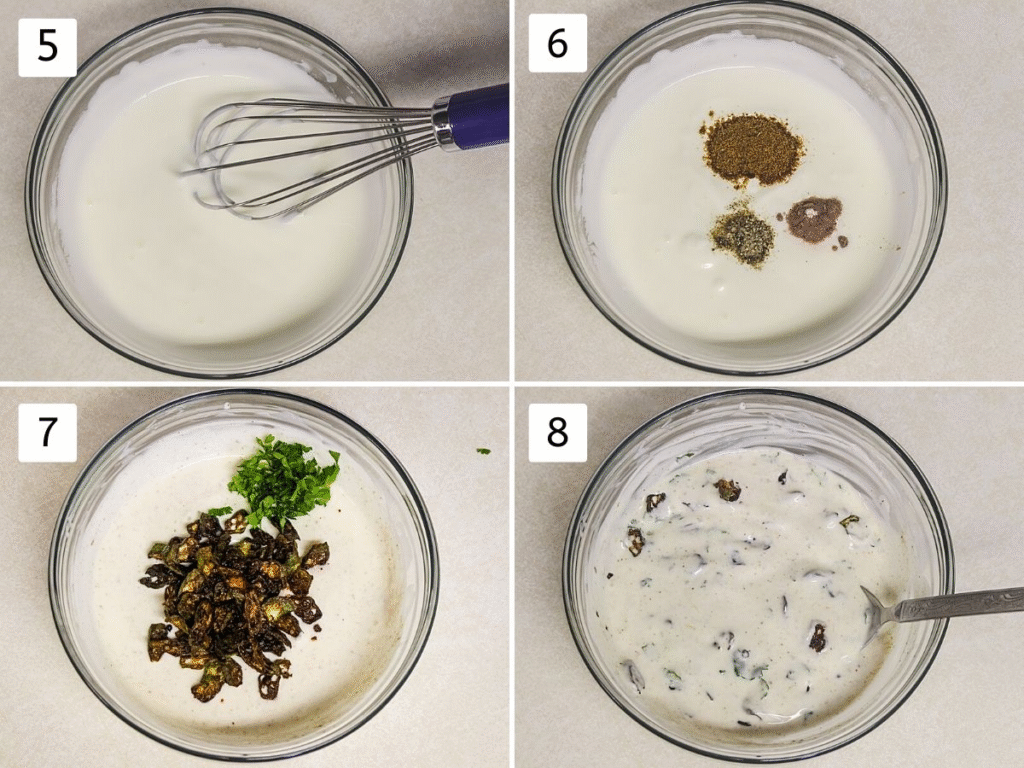
5) Prepare the Yogurt Base: In a mixing bowl, add fresh, chilled yogurt. Beat the yogurt thoroughly using a wire whisk or spoon until it becomes silky, smooth, and completely free of any lumps. The consistency should be thick yet pourable.
6) Flavor the Yogurt: To the whisked yogurt, mix in a pinch of regular salt, a touch of black salt (kala namak) for its signature tangy depth, a sprinkle of freshly ground black pepper Mix everything thoroughly to ensure the spices are well incorporated. Once mixed, cover the bowl and refrigerate the yogurt until you’re ready to serve. Keeping it cold enhances the overall refreshing taste of the raita.
7) Combine Just Before Serving: Right before serving, gently fold the completely cooled fried okra into the chilled yogurt mixture. Also add freshly chopped cilantro (coriander leaves) for a burst of freshness and color.
8) Serve Immediately: Mix everything together lightly and serve the raita immediately for the best taste and texture. The contrast between the cool, creamy yogurt and the crunchy, spiced okra makes this dish incredibly satisfying. However, note that the okra will begin to soften the longer it sits in the yogurt, so it’s best enjoyed fresh.
💭 Expert Tips For Okra Raita
- Serve it chilled: For the best flavor and refreshing taste, always use well-chilled yogurt when making bhindi raita. The coolness enhances its soothing quality, especially in hot weather.
- Add okra just before serving: To maintain the delightful crunch of the fried okra, stir it into the yogurt mixture only at the last moment before serving.
- Prep ahead for convenience: You can fry the okra in advance, toss it with a touch of red chili powder, and let it cool completely. Meanwhile, whisk the yogurt with your chosen spices and keep it refrigerated. When it’s time to serve, simply combine the two for a quick, fresh raita..
🍽 Serving Ideas
- Pairs Perfectly with Rice Dishes: Bhindi raita makes a delicious companion to a variety of rice-based meals. Whether you’re enjoying a fragrant vegetable pulao, a spicy vegetable biryani, or even a simple jeera rice, this raita adds a cooling, flavorful contrast that balances out the spices in the main dish.
- Ideal Side for Daily Indian Meals: This raita complements everyday Indian thalis beautifully.Serve it alongside roti or phulka, dal tadka, and steamed basmati rice for a wholesome, home-style meal. The creamy yogurt combined with crispy okra adds both texture and flavor, elevating a regular lunch or dinner.
- A Tasty Pairing with Parathas: Bhindi raita also works wonderfully as an accompaniment to stuffed or plain parathas. Try it with methi paratha, aloo paratha, or even broccoli paratha. Whether you’re having it for breakfast, brunch, or a light meal, the raita lends a creamy freshness and makes the meal feel more satisfying and complete.
- Versatile Enough for Any Occasion: Be it a weekday meal or a festive spread, bhindi raita fits right in. The delightful contrast of crispy, spiced okra paired with cool, tangy yogurt creates a harmonious blend of textures and flavors, making this dish universally appealing across age groups and dietary choices..