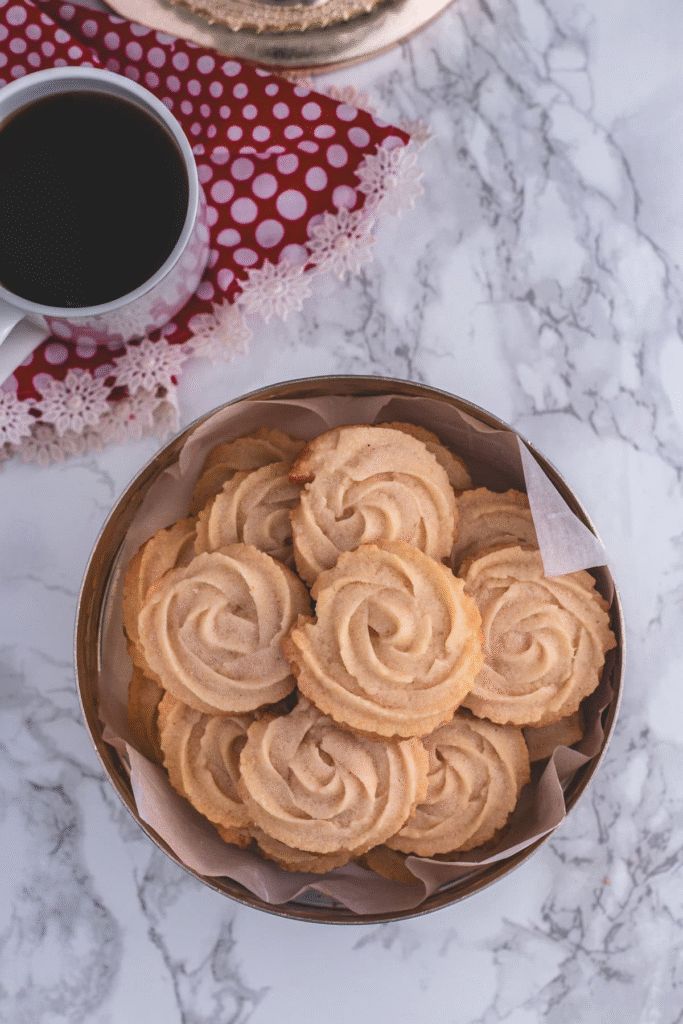
These homemade eggless butter cookies are an absolute delight and make the perfect addition to your festive baking lineup. With their rich, buttery flavor and irresistibly crisp yet tender texture, these cookies simply melt in your mouth with every bite. What sets them apart? They’re made without eggs—yet taste even more indulgent and flavorful than the iconic Danish butter cookies that come in the classic blue tin.
Whether you’re baking for Christmas, gifting loved ones, or just indulging in a cozy afternoon treat with tea or coffee, these cookies never disappoint. The golden edges, the light crumb, and the pure buttery aroma wafting through your kitchen will transport you straight to holiday bliss. And because they’re eggless, they’re perfect for anyone with egg allergies or following a vegetarian lifestyle.
You don’t need any fancy ingredients—just simple pantry staples like flour, butter, sugar, and vanilla. The dough comes together easily and can be shaped however you like—classic piped swirls, pressed rounds, or even cut-outs. These cookies hold their shape beautifully and turn out picture-perfect every single time.
Once you bake a batch of these eggless butter cookies, you’ll understand why they’re such a beloved favorite. Crisp on the outside, tender on the inside, and bursting with buttery goodness—these cookies are more than just a treat, they’re a holiday tradition waiting to happen.
Why You’ll Love These Cookies
- Soft Center, Crisp Edges: Each bite of these cookies offers the best of both worlds—an irresistibly tender center that melts away in your mouth, balanced perfectly by delightfully crisp and golden edges. This contrasting texture creates an indulgent experience that’s hard to beat and makes every bite feel like a cozy celebration.
- Rich, Buttery Vanilla Flavor: Crafted with real butter and fragrant pure vanilla extract, these cookies bring you the timeless taste of classic vanilla in its most delicious form. The luxurious buttery base allows the vanilla to shine through, creating a flavor that’s both nostalgic and unforgettable—one that’s sure to be loved by kids and grown-ups alike.
- Melt-in-Your-Mouth Texture: What sets these cookies apart is their luxurious, tender crumb that quite literally dissolves on your tongue. This delicate texture comes from the high butter content, which not only enriches the flavor but also gives the cookies their signature shortbread-like softness.
- No Leavening Agents Needed: These cookies achieve a delicate, airy texture all on their own—no baking soda or baking powder needed. The absence of leavening agents gives them a fine, crumbly texture reminiscent of traditional Danish butter cookies. This also makes them a great choice for those looking to avoid chemically leavened baked goods without compromising on taste or texture.
- 1-Bowl Wonder: Say goodbye to sink-fulls of dirty dishes. This recipe requires just one mixing bowl, keeping things delightfully simple and making cleanup a breeze. Whether you’re baking solo or with little helpers, this minimal-mess approach adds to the joy of baking without the hassle.
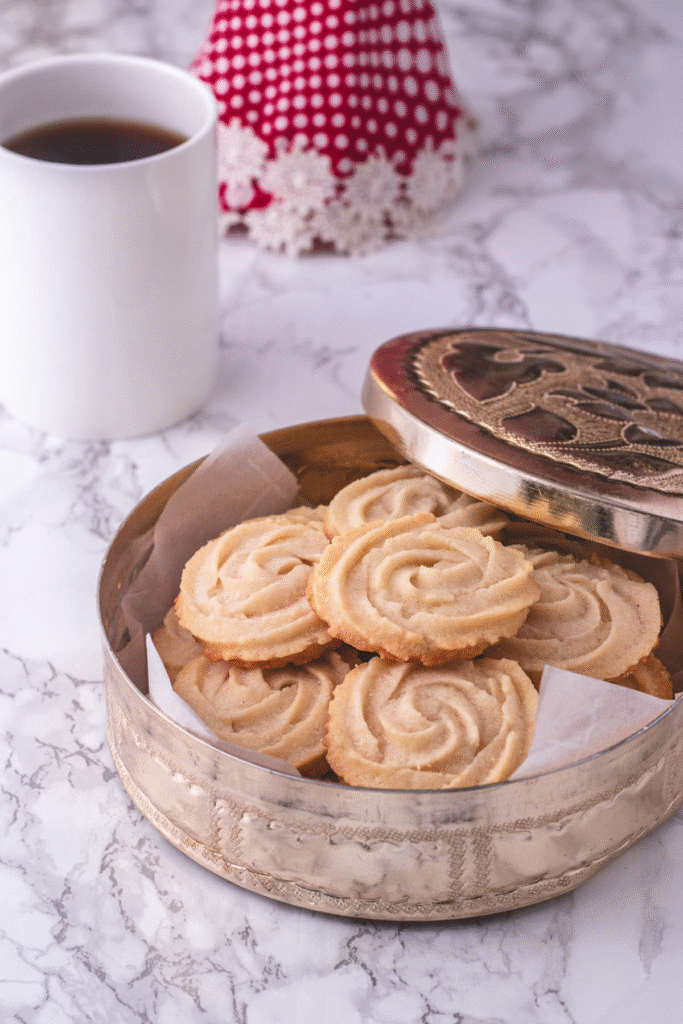
- Endlessly Versatile: These cookies aren’t just tasty—they’re wonderfully versatile too. Serve them alongside your afternoon tea, add them to your holiday cookie platter, or wrap them in parchment and tuck them into decorative tins for a heartwarming homemade gift. Their elegant simplicity makes them suitable for every occasion—from festive gatherings to quiet moments of indulgence.
These cookies hold their shape beautifully, making them perfect companions for dunking into your favorite cup of tea or coffee. Ideal for festive celebrations or relaxing tea-time moments, these eggless butter cookies bring warmth and joy with every bite.
Ingredient Notes in Butter Cookies
You only need five basic ingredients—plus a pinch of salt—to whip up these delightful eggless butter cookies. Simple, fuss-free, and absolutely irresistible!
- Butter: Always opt for high-quality unsalted butter, as it gives you full control over the salt content in your cookies and enhances their buttery flavor. Salted butter may alter the taste profile and make the cookies overly salty. Make sure the butter is softened to room temperature—not melted or cold—so it creams easily with the sugar. The texture of the cookies largely depends on the consistency of the butter, so this step is crucial for achieving that tender, melt-in-your-mouth bite.
- Sugar: These cookies call for regular white granulated sugar, which not only sweetens but also helps create a slightly crisp edge. Granulated sugar also aids in creating a pleasant golden hue on the bottom of the cookies as they bake.
- Milk: A small amount of milk is used to bring the dough together. You can use whole milk, low-fat, or even fat-free milk depending on what you have on hand. Even plant-based options like almond milk or oat milk can be used for a vegan-friendly version.
- Vanilla Extract: For that classic, warm flavor, always choose pure vanilla extract over artificial or imitation ones. The aroma and depth that real vanilla brings cannot be matched by synthetic versions. A small splash goes a long way in enhancing the buttery notes of these cookies.
- All-Purpose Flour: The foundation of the cookie dough is good old all-purpose flour, also referred to as maida in Hindi. For best results, use unbleached flour, which has a more natural texture and flavor. It provides the perfect structure without making the cookies too dense or too soft. Sifting the flour before adding it to the dough helps avoid lumps and ensures even mixing.
Step By Step Photo Instructions (With Tips)
Get the Baking Trays Ready: Line a pair of cookie sheets with either parchment paper or silicone baking mats. Set them aside so they’re ready when your dough is shaped and ready to bake.
1 ) Prepare the Eggless Butter Cookie Dough
- Cream the Butter and Sugar: Start by placing softened unsalted butter, a pinch of salt, and granulated sugar into a large mixing bowl. Whisk the mixture until it turns light, fluffy, and smooth. You can use a hand whisk for a little arm workout, or opt for an electric hand mixer or stand mixer fitted with the paddle attachment to make the process faster and more efficient.
- Add Milk and Vanilla Extract: Next, add the milk and gently stir in the pure vanilla extract, allowing the flavors to blend smoothly into the creamy mixture. Continue whisking until the wet ingredients are thoroughly blended and the mixture looks creamy and uniform.
- Fold in the Flour: Now, gradually add the all-purpose flour to the bowl. Stir the mixture until the dough forms and no dry patches remain. If you’re mixing by hand, a spatula will make this step easier and help ensure everything comes together without overworking the dough.
Check Dough Texture: The final dough should be smooth, soft, and thick enough to hold its shape when piped. It shouldn’t feel dry or overly stiff. If the dough seems too dense or crumbly, add milk a teaspoon at a time, gently mixing after each addition, until you achieve the perfect consistency.

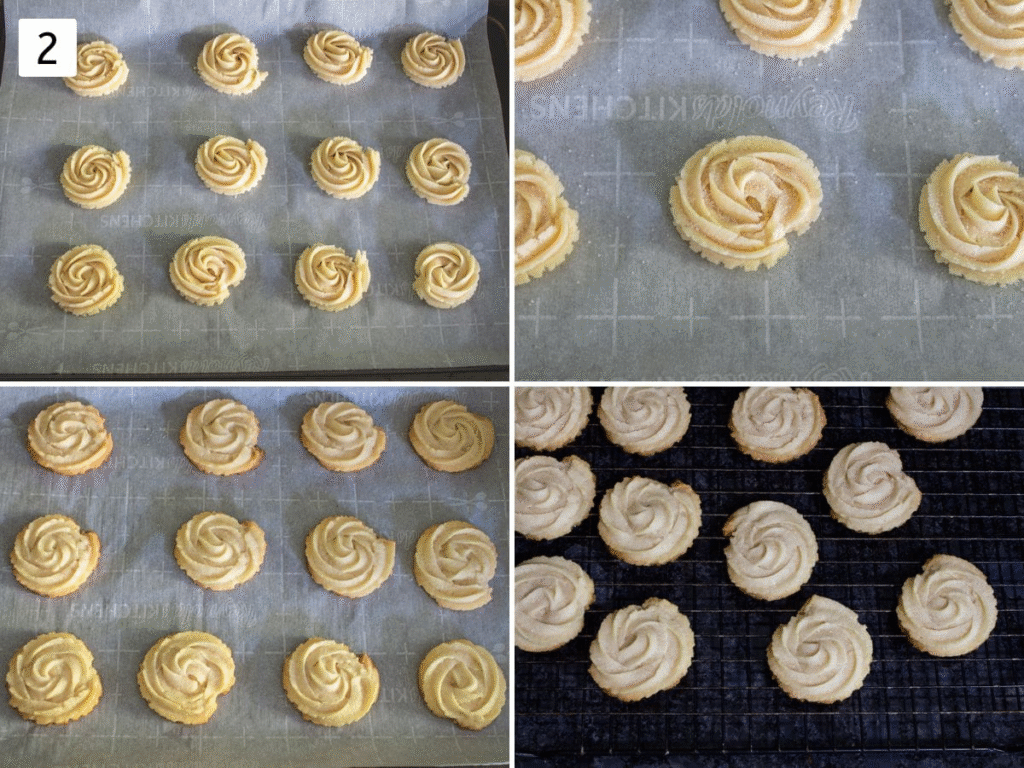
2) Shape, Chill & Bake the Eggless Butter Cookies
- Pipe the Cookie Dough: Spoon the prepared dough into a piping bag fitted with a large open star nozzle. I used the Wilton 1M tip, but you can also try Wilton 8B or Ateco 849/824 for similar results. Pipe the dough onto the lined baking trays in circular swirls, spacing them slightly apart. You should get approximately 18 cookies from this batch.
- Chill to Set the Shape: Once piped, refrigerate the cookies for at least 30 minutes. Why is chilling important? It helps the butter solidify and keeps the intricate shapes from spreading too much when baked, resulting in defined, bakery-style cookies.
- Preheat the Oven: While the cookies are chilling, preheat your oven to 350°F (180°C). Make sure it’s fully preheated by the time the cookies go in—this usually takes around 10 minutes.
- Optional Touch – Sugar Sprinkle: Right before baking, give each cookie a light dusting of granulated sugar. This adds a subtle sparkle and an extra layer of crunch on top.
- Bake the Cookies: Place the trays in the preheated oven and bake for 12 to 14 minutes, or until the edges start turning a gentle golden brown. In my oven, they baked perfectly in 14 minutes, but timing can vary.
- Cool Down Properly: Let the cookies sit on the tray for about 5 minutes after baking—this allows them to set without breaking.
Storage: After the cookies have cooled completely, transfer them to a clean, airtight container to preserve their delicate crunch and buttery flavor. Stored properly at room temperature, they remain fresh and crisp for up to 2 weeks.
Variations Butter Cookies
- Classic Touch: For a timeless finish, lightly sprinkle coarse sugar over the cookies just before baking. It adds a delightful crunch and a subtle sparkle that enhances their appeal.
- Festive Flair: Give your cookies a celebratory makeover by swapping the sugar for vibrant sprinkles before they go into the oven. Ideal for special occasions like Christmas, Diwali, Halloween, birthdays, or any festive gathering.
- Chocolate-Coated Delight: After baking and cooling completely, dip half of each cookie in melted chocolate—dark, milk, or white, as you prefer. While the coating is still tacky, decorate with toppings such as colorful sprinkles, chopped nuts, or shredded coconut for an indulgent and eye-catching treat.